2.2.3. Add/Edit Student
Scenarios in this section illustrate functions available to the system administrator. These functions allow an administrator to add a student and their respective information to one of their courses.
2.2.3.1. Adding a New Student
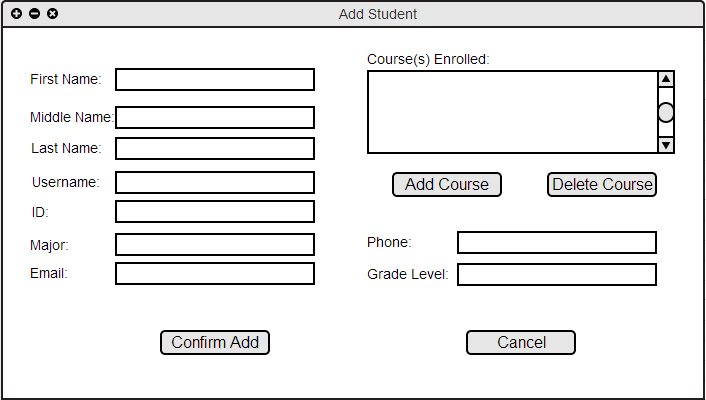
When the user selects the "New +" button in the Student column of the front page or when the user navigates the toolbar "Student->Add Student" the system responds with the dialog shown in Figure 1.

Figure 1: Add Student dialog.
"First Name:" is a text input field required in order to add a student. "Last Name:" is a text input field, also required in order to add a new student. "Username:" is an optional text input field, and may contain the student's university user name. ID: is a required text input field for the student's university identification number. Email: is not a required text input field. Date of Birth: is not a required text input field with a format requirement of MM/DD/YYYY. Course(s) Enrolled: will list the courses taught by the administrator that the student is enrolled in. Adding courses to this is done by selecting the Add Course button, which opens an additional dialog box. The Delete Course button will delete any highlighted courses in the Course(s) Enrolled text box. Phone: is not a required text input field. Grade Level: is not a required text input field that may contain either numbers or characters, depending on the user's preference. Confirm Add saves the data of the new student and automatically adds the new student to the roster of their enrolled courses. Cancel throws away all entered text and closes this dialog box.
2.2.3.2. Edit Student Info
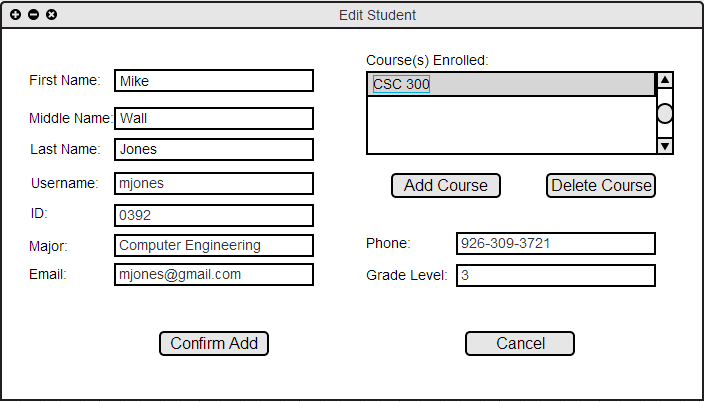
When the user right clicks a cell in the Student column of the Grader Tool homepage and selects Edit Student Info option, the system displays the dialog shown in Figure 2.

Figure 2: Edit Student Info dialog.
All input fields in the Edit Student Info dialog correspond to the fields in the Add Student dialog. Please see 2.2.3.1. Adding a New Student. for information on input requirements. When the user manipulates the entry fields and selects Confirm Add, the new data is automatically added to the student and to the roster of their enrolled courses. Selecting Cancel. closes the dialog box and no changes are made.
2.2.3.3. Select Course
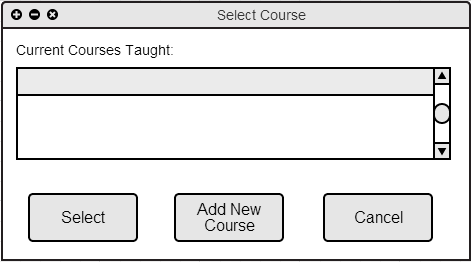
When the user selects Add Course from the Add Student dialog or from the Edit Student Info dialog box, the system responds with the dialog shown in Figure 3.

Figure 3: Select Course dialog.
The Current Courses Taught: text field displays all of the courses that the administrator has added to his or her list of courses. The user chooses the course that they wish to add by first clicking on the text in the Current Courses Taught: text box. The user then clicks the Select button to confirm adding the highlighted course. The user may add another course from scratch to their list of current courses by selecting the Add New Course button. The Cancel button will close the dialog box and changes will not be saved.
Prev: group-meeting-scheduling
| Next: options
| Up: functional
| Top: index


