2.4.2 Creating a Lesson
To manage the Lessons in a class, the Instructor selects the "Course->Lesson Manager" item from the command menu. In response the system displays the interface shown in Figure 242-1.

Figure 242-1
Here the Instructor can manage their Lessons. The main display window contains all of the Instructors Lessons. To delete a Lesson, the Instructor selects the Lesson from the main display window, then chooses the "Delete" button. This command deletes the Lesson from the Instructors local machine and the Lesson database. The "Exit" button exits the Instructor from the interface. To create a new Lesson the Instructor selects the "New Lesson..." button, they are then taken into the interface shown in figure (IDK). To modify a Lesson, the Instructor selects the "Modify" button, they are then taken to the interface shown in figure (IDK).
In figure 242-2, Lessons have been added through the "New Lesson..." interface. Now the main display window shows the Lesson name and to the right of it it"s status.

Figure 242-2
The status circles show the Lessons status with the database. If the circle is green, it indicates that the Lesson on the Instructors machine is the same as that in the database. If the circle is yellow it indicates that the Lesson in not the same as the Lesson in the database. If the circle is red, it indicates that the Lesson is not present in the database.
The post button is used to update the Lessons on the database. To do this the Instructor selects the Lesson and clicks the "Post" button. This uploads the Lesson to the server, either adding it to the server or updating the existing Lesson as needed. The "Rollback" button is used to retrieve a copy of a Lesson from the database that you may have changed on your local machine. To rollback the "Introduction to Threads" Lesson, the Instructor would select it in the main display and click "Rollback". The updated interface can be seen in Figure 242-3.
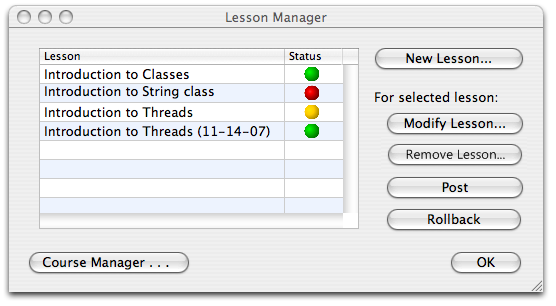
Figure 242-3
The rolled back Lessons status is always green as it is currently in the database and has the current date appended to its name. From here it is treated as a separate Lesson from that of "Introduction to Threads". To replace the "Introduction to Threads" Lesson with the "Introduction to Threads(11-14-07)" Lesson, the Instructor would need to delete "Introduction to Threads" Lesson and remove the appended date on the "Introduction to Threads(11-14-07)" Lesson, which can be done in the interface shown in Figure (IDK).

Figure 242-4
This interface allows the Instructor to manage individual Lessons. The Lesson Name field is the currently selected Lessons name or the new Lessons name if creating a new Lesson. The associated class field is the class that this class is associated with. Pressing the Browse button brings up an explorer like dialog that allows the Instructor to select which of their classes the Lesson is associted with. The Permissions and Tracking, By User Group window shows the permission and tracking details of the group associated with the Lesson and the advancement details of a Quiz. Clicking the Select... button in this window will bring up the dialog shown in Figure 242-5 and allow the Instructor to edit the groups associated with the Lesson.

Figure 242-5
The User Groups dialog is explained in detail in section (IDK). After you have selected the User Group to associate the Lesson with, click "Ok". The system will repond by displaying the updated Lesson Setup dialog shown in Figure 242-6.

Figure 242-6
To give the group Access permissions the Instructor selects the Access check box, to give them edit permissions they select the Edit check box and to track this User Groups progress they select the Track check box. Under Advancement Requirements the Instructor sets whether the user must pass each Quiz to advance beyond that Quiz and whether they must complete the previous Lesson before they take this Lesson. These Advancement Requirements are not set in Figure 242-7 but the User permissions have been set.

Figure 242-7
To upload new Pages the Instructor selects the "Upload New Page..." button. The system responds by opening a standard browser through which the user can select .html Pages to upload. These uploaded Pages can be seen in the Page List: window area as seen in Figure 242-7. The up and down arrows next to the Page List window allow the Instructor to reorder the Pages in the list. To do this the Instructor selects the Page to be moved and presses the arrow button in the direction the Page is to move. In figure 242-8 can be seen an example of this movement. The Instructor selects the introStuff.html Page and presses the "up" arrow, in response the Page moves up one place.

Figure 242-8
The buttons on the lower left of the dialog allow the Instructor add, edit and remove Pages or Quizzes from the list. The remove buttons will simply remove the Page from the list with no further dialogs opened. The "Create New Quiz.." and "Edit Quiz" buttons open the Quiz Editor interface covered in detail in section 2.4.3. A Quiz has been added as seen in Figure 242-9.

Figure 242-9
Once the Instructor has created the Lesson they select "Ok", the system responds by taking them back to the Lesson Manager dialog where their Lesson now appears in the Lesson list.
If the Instructor wishes to edit a Page with the built in editor they select the "Edit Page..." button, the system responds by opening the same dialog as the "Create New Page..." button will open, only the selected Page will have its data inputed into the editor. To create a new Page, the Instructor selects the "Create New Page..." button, in response the dialog shown in figure 242-10 appears.
 Figure 242-10
The left most entry box of the Page Editing interface displays raw HTML. The HTML entered and edited here is rendered in the rightmost display box.
Under the Page Properties section of the Page are options for how the Page is represented in browsers and specific data about the Page. The Page Title field is the title of the Page and is what will appear in the roadmap for the Pages title. The Page description field is a text field to describe the Page, this is mainly for the Instructors benefit as it is usually only viewable by them. The last part of the Page deals with what thumbnail the Page will have in the Roadmap. To use a shrunken image of the Page itself the Instructor selects the radio button next to "Use screenshot of Page". To upload a custom image the Instructor selects the "Upload Image" radio button, they can then either type the address of an image or use the browse button to select it from there own computer.
In the center of the interface are three insertion buttons. When the topmost button, "Image", is clicked, an image tag is place in the source HTML, the Instructor then types the link or path of an image. The image can be resized and moved in the rendered display box. When the middle insertion button, "Code", is clicked, a code box is inserted into the Page. The code box can be moved either in the rendered version of the Page or in the HTML version.
When the lowermost insertion box, "Link", is clicked, the interface shown in Figure 242-11 is displayed. The center data entry field is a one line string that describes the location of the item being linked.

Figure 242-11
The user enters the address of the item as shown in Figure 242-12 and selects link. The system responds by placing a link in the rendered and HTML data entry boxes in Figure 242-10. This link can be moved around in either entry box, and its name can be changed in either entry box by clicking on it and typing its new name.

Figure 242-12
In Figure 242-13 can be seen a filled out Page Editing dialog. If this is a new Page the Instructor selects "Create" to create the Page, the dialog will remain open in case further editing is desired. Once the Instructor is done editing the Page, they select "Done" to close the dialog and save their changes. To exit the dialog without saving changes the intsructor selects "Cancel".
 Figure 242-13