2.3.1 Create Question Bank
A question bank is a group
of questions listed together in the same database. It can either
setup shared or locally.
Create Shared Question Bank:
A shared question bank is a
group of questions that can be accessed from a non-local machine.
It can accessed from a web URL or a network
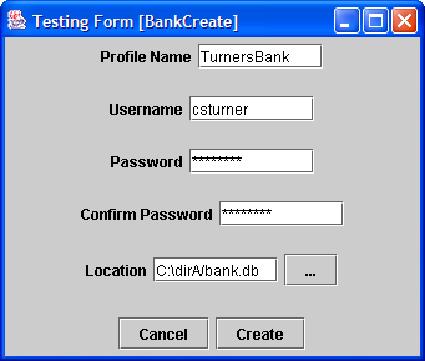
path. After the user clicks "Setup Shared Question Bank", the
screen shown in Figure 2.3.1.1f will appear. The first text box
is reserved for a profile name.
The profile name saves login information so the user can connect to the
created question bank in the future without having to remember login
information.
Figure 2.3.1.1f "Create Shared Question Bank":
The next required field, username,
it used to distinguish different users accessing the question
bank. The
first user to create the shared question bank is deemed the question
bank administrator. The
difference between an administrator and a
normal user is an administrator has privilages such as removing
questions from a question bank and managing authorized question bank
users. After the user types in an administrator name, the user
must then type in a password.
The password is for security so non-authorized users don't view a
question bank. Password
confirmation is necessary because the user cannot see the
typed characters because it is encrypted in asterisks
('*') for security. Password confirmation assures that the text
in the password box is indeed the desired password for the user.
If the password confirmation matches the password then that is the
password the user must enter when connecting to a question bank.
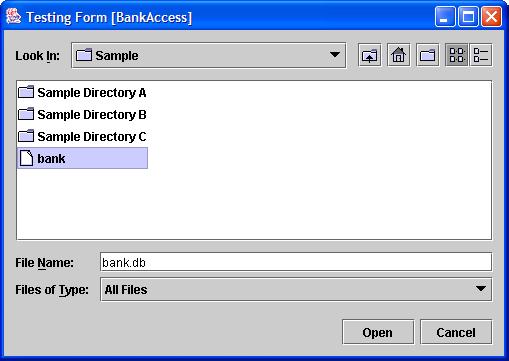
The location is the path where
the question bank is stored. As previously mentioned, a shared
question bank can either be stored in a web URL or network path.
In the location text field, the user can either type in the path, or
can browse the network through a file
directory by clicking the '...'
button. In a file directory, as shown in figure 2.3.1.2f, the
user can browse directories and find exactly where the question bank
is,
without having to memorize the directory path.
Figure 2.3.1.2f "File Directory":
After the above fields are completed, the administrator can move on to
the next step by clicking the "Create Button". The next screen
that appears is the bank users
management screen, as shown in figure 2.3.1.3f. Since
many teachers don't want students to see test questions and answers,
it's necessary to only allow authorized users to view a shared question
bank. Users are added by typing a username and password into the
respected
boxes and by clicking the right arrow. Once the right arrows are
clicked, the added username will appear on the right side of the screen
along with the other authorized users. To delete a user, the user
must click the left arrows and then the username will be removed from
the
authorized user list. To change a username or password of a user
on the authorized user list, the name must first be removed from the
list then added after the changes are made. This screen
can also be accessed from the main menu once an administrator is logged
into the shared question bank.
Figure 2.3.1.2f "Bank Users Management":
Create Local Question Bank:
The steps to create a local question
bank, as seen in figure 2.3.1.4f
is similar to a shared question bank with the exceptions that
there is no bank users management and a local question bank can only be
accessed locally. If the question bank creator decides not
to manually type in a path to the question bank, the creater can use
the file directory to browse the local computer for a question
bank.
Figure 2.3.1.4f "Create Local Question Bank":