2.7. Grading
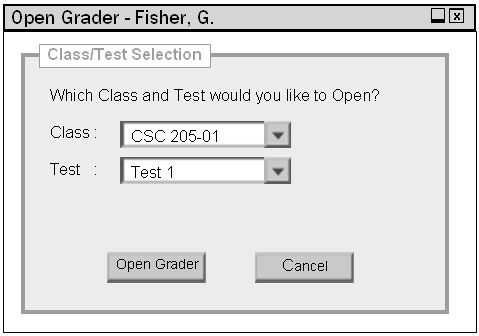
This section describes the steps an instructor takes to grade a test, change individual test grades, and post the grades back to the students. This scenario in Figure 1 shows what the user sees when the user initially starts up the grading portion of the Test Tool.
Figure 1. Starting the Grader function
This dialog screen allows the currently logged in instructor to choose from a drop down menu of classes that the user teach, as well as from another drop down menu of tests that the selected class has completed. Once the instructor has done this, they click on Open Grader button and the following window appears.
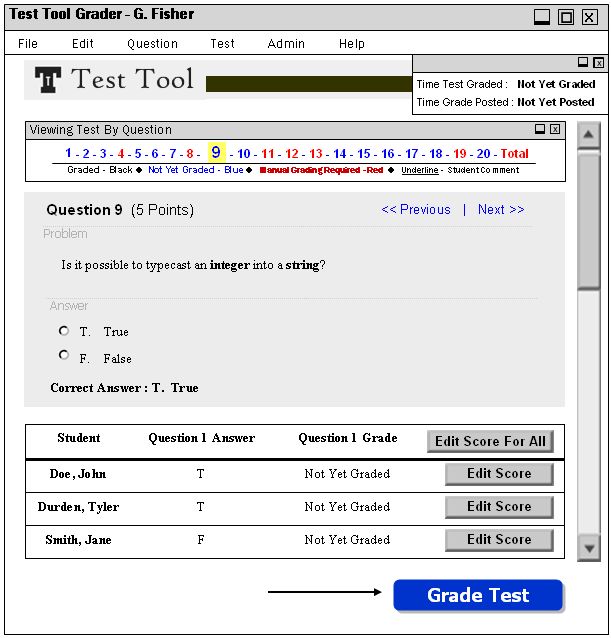
Figure 2. Main Grading screen with a test already taken, viewing by question
This is the main screen of the Grader. For this example, question 9 is shown. At the top right there is a window containing the times that the currently shown test was graded and posted, for this current example neither operations have been performed yet. Below that is the Viewing By Question menu bar. The grade viewer by default goes to Viewing By Question, but this can be changed, which is described in more detail in Section 2.7.6. The Viewing By Question menu bar shows each question in the test, and is color coded to show the status of each question. They are as follows:
Graded - Black
Not Yet Graded - Blue
Manual Grading Required - Red
Underline - Student Comment
Clicking on a question or the total at the end of the list will take the user to the appropriate question in the test. Below this is the actual student test, which is viewable in different ways just as the student viewing works, as explained in Section 2.7.4.2. Right now the test is being displayed 1 question at a time. Below each question is a table containing a list of each student that took the test, their answer for the question, and their Grade. The test is not graded as of now, so the grades are displayed as Not Yet Graded. To the right of each grade is a Edit Score button, whose function will be discussed in Section 2.7.4.
So for the user to grade this test, they simple click on Grade Test shown in Figure 2, which brings the following dialog in Figure 3.
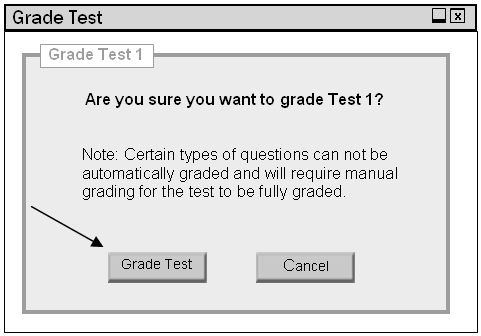
Figure 3. Grade Test dialog
2.7.1. Grading A Test Automatically
In this dialog box for Grade Test from Figure 3, the user is prompted to confirm their intention to grade the test. In our example test, the test is made up of different types of questions, some of which will need to be graded manually, which is described in Section 2.7.2. There is a note that the certain types of questions must be graded manually. This note in the dialog box will not show up if the entire test is made up of questions that can be graded automatically. Here is the breakdown:
For the Automatically Graded Questions, all but the Fill in the Blank questions are graded by simply comparing the student's answer with the correct answer and assigning either full or no credit to each score. The Fill in the Blank questions are graded by comparing the student's single answer word to the correct answer word, and if they are identical it assigns full credit. The program ignore case sensitivity, no matter what the capitalization is the grader assigns full points. If there are spelling errors, but the answer's characters are pretty close match to the correct answer, the grader assigns half points to the problem. If the problem is worth an odd number of points, the grader assigns a rounded up graded score. The instructor then gores through the Fill in the Blank questions and edits the scores compensating for spelling errors as they see fit. In all other cases the grader assigns 0 points for the question.
From the above table you can also see that Essay Answer and Program Code questions can be graded using a script. These scripts are to be created and linked to the question when it is made. The grader uses the script by taking the decimal percentage that the script returns (scripts are to return a decimal percentage, i.e. .95 = 95%, of the total points for the question that they are grading), and multiplies this decimal percentage with the total points that the question is worth. This number is assigned to the earned score portion of the question. If there is a problem in the script (if it crashes), then no score is assigned and the instructor manually grades the question.
The user then clicks on Grade Test which would grade as many questions as it can automatically, score them, and brings the user back to the main screen with an updated grades for the test in Figure 4.
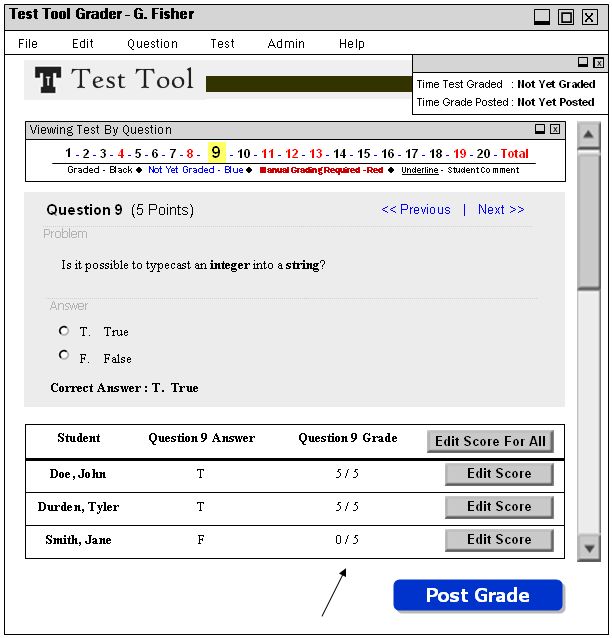
Figure 4. Test that was just graded automatically
This is exactly the same as the previous main screen in Figure 2, except that now in Question 9 Grade section of the grade boxes below each question are the scores that the students have earned. Also to note, at the top right in the Test Status area, Not Yet Graded still exists. It will not be changed to a graded time until all of the questions, including questions that must be manually graded, are indeed graded. At the bottom of the screen, the Grade Test button has been changed to the Post Grade button, showing the next function would be to post the grades to the students. This can not be done until the questions that need to be manually graded are graded, which will be shown in Section 2.7.2. If the user attempts to Post Grades before all questions are graded, they will receive an error telling them to grade the rest of the questions first.
2.7.2. Grading A Test Manually
In our example, the entire test can not be graded automatically. There are Short Answer, Essay, and Program Code questions which all need to be graded manually. We will use question 8, which as shown in Figure 4 is denoted with Red, meaning that Manual Grading is Required, as an example. There are 2 ways to manually grade a question. The user either clicks the Test drop down menu and then chooses Edit Score, or directly clicks the Edit Score button from the graded scores table corresponding to the desired student. Both methods are shown in Figure 5.
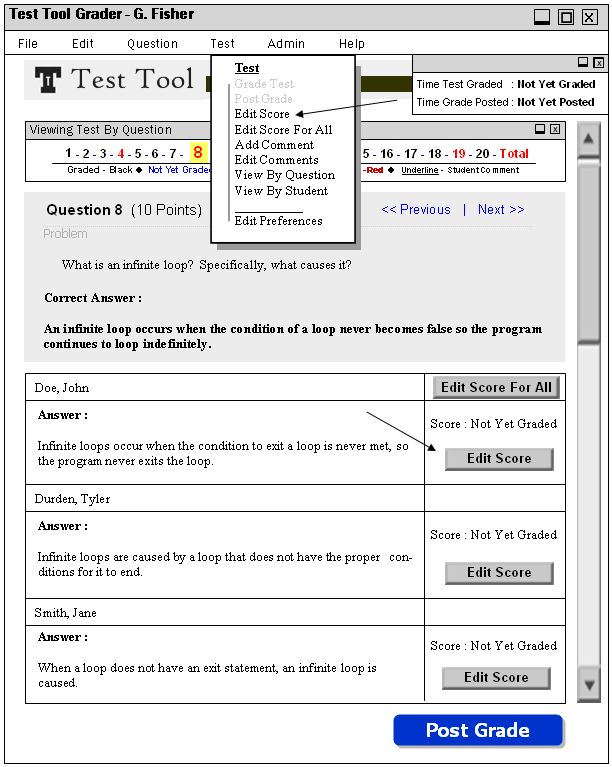
Figure 5. Grading a question manually
If the user clicked on Edit Score from the drop down Test menu, it would bring up the following dialog shown Figure 6. However, if the user clicked on the Edit Score button for the desired student under the selected question, it would skip directly to Figure 7. We will assume the user clicks on Edit Score from the drop down menu.
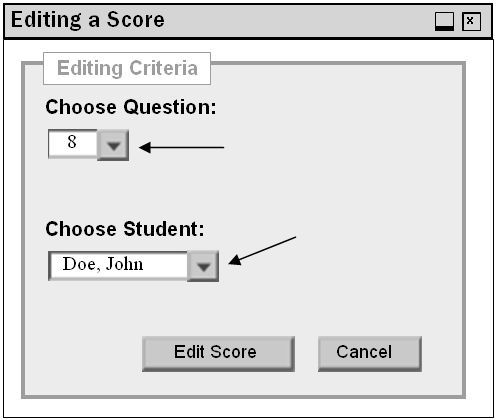
Figure 6. Choosing a Question and Student to edit score for
This menu is presented when choosing Edit Score from the drop down menu because the user must specify which question, and for which student they would like to edit the score for. The user chooses question number 8 from the Choose Question drop down menu, and student Doe, John from the Choose Student drop down menu. When those options are selected, the user clicks the Edit Score button and are brought to the following dialog box in Figure 7.
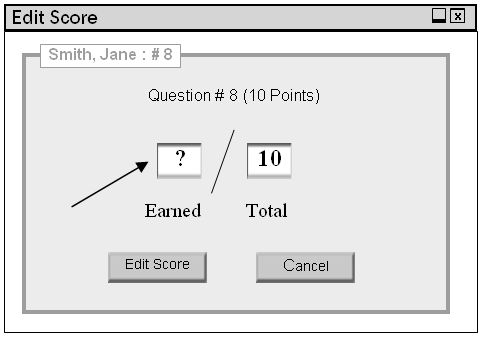
Figure 7. Editing score for Question 8
From this dialog box, the user enters the desired amount of points they wish the selected student to have for this particular question by typing it in the Earned text box. In this case, after reading John Doe's answer, the user decides to award them with 10 out of 10 points for the question. So the user simply types a 10 in the text box for earned and then click the Edit Score button. Then they are brought back to the main grading screen shown in Figure 8.

Figure 8. Score for John Doe's question 8 has been edited
In this figure the score of Question 8 for John Doe has been changed to reflect the score entered in the Edit Score dialog box. The user would continue to grade all of the questions that appeared red in the question index manually until they were all complete. When this was done the main test screen would reflect what is shown in Figure 9.
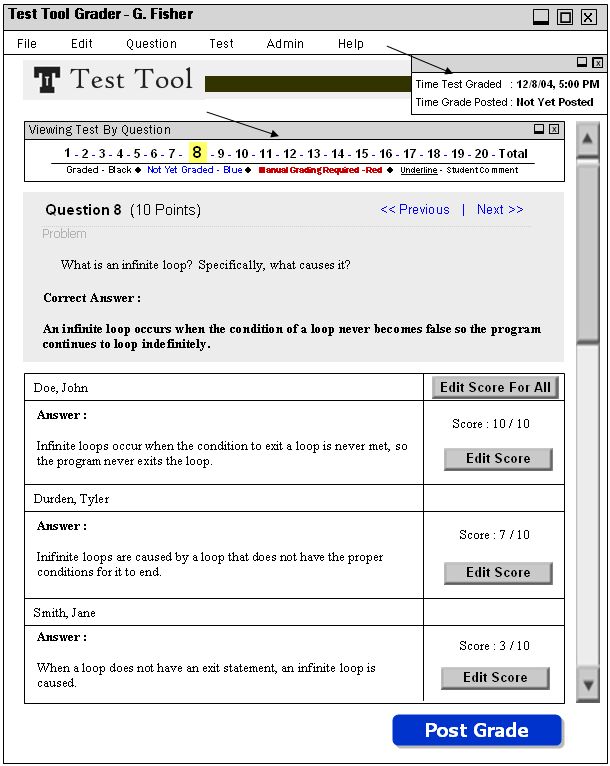
Figure 9. The test is completely graded, both automatically and manually
From Figure 9 it shows that the test is fully graded. Notice that at the top right the Time Test Graded has been updated, this reflects the time the last question that needed to be graded manually was graded. Also, in the Question Index all of the questions, including the total, are displayed in black, meaning that they are all graded. Now that the test is fully graded, the user can click on the Total link from the question index, which displays another grading table, but with a list of the students and their respective total grades.
Next the user would move on to posting the grades to the students.
When the user clicks the Post Grade button or chooses the "Post Grade" menu item from the Test drop down menu as shown in Figure 9, the following dialog in Figure 10 appears.
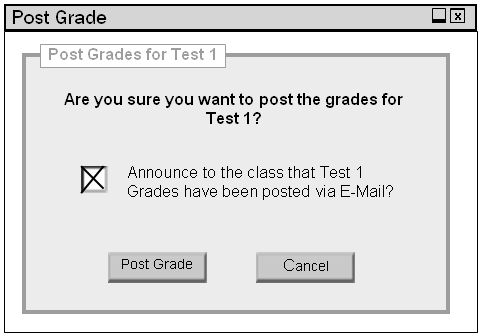
Figure 10. Post Grade dialog
The dialog box for Post Grade serves mostly as a reassessing question, confirming that the instructor wants to post the grades for that particular test for all of the students to see. But it does prompt the user for one option, which is a checkmark that will allow the posting of the grades for the test to be announced to the students via E-Mail. Sending E-Mail Notification is described in more detail in Section 2.7.3.1. The instructor clicks on Post Grade, which brings the user back to the main screen with the changes shown in Figure 11.

Figure 11. Test that was just posted
The only things different here than from Figure 5 is that the Test Status section the Posted area has been updated to reflect the time that it was posted, and the Post Grade button has changed to Save Changes. Save Changes is for when the instructor is modifying a test after it has been graded or posted. The Post Grade button from the Test pull down menu will now be grayed out as shown in Figure 5, since this last version was posted. If any changes are made to the scores and the instructor saves those changes, the user can then use the Post Grade function again to send the updated grades to the students.
When posting grades, the instructor has the option to send out a notification via E-Mail to all of the students included in the class. This option can be turned on and off when posting the grades using the check box shown in Figure 10. If a notification is sent out, it is sent through the E-Mail addresses linked to each student from their student information in their account, and the message is a generic message with the Test name, class name, and time posted in it. This can be changed by the instructor as they wish.
This section describes the multiple ways of changing test scores once they have been graded. The instructor can change test scores for the entire class, effectively adding or subtracting a certain amount of points from a question or the whole test. This is described in more detail in Section 2.7.4.1. The instructor can also change test scores for an individual student, and this procedure is shown in detail in Section 2.7.4.2.
2.7.4.1. Class-Wide Test Score Changes
While viewing the test, the instructor has two methods of changing a score on the test for all of the students. While in any view, the instructor clicks on Test drop down menu from the top menu, and chooses Edit Score For All. The other method is to click the Edit Score For All button while viewing the test by Question, which is located at the top left of each grading table. These methods are shown in Figure 12 below.
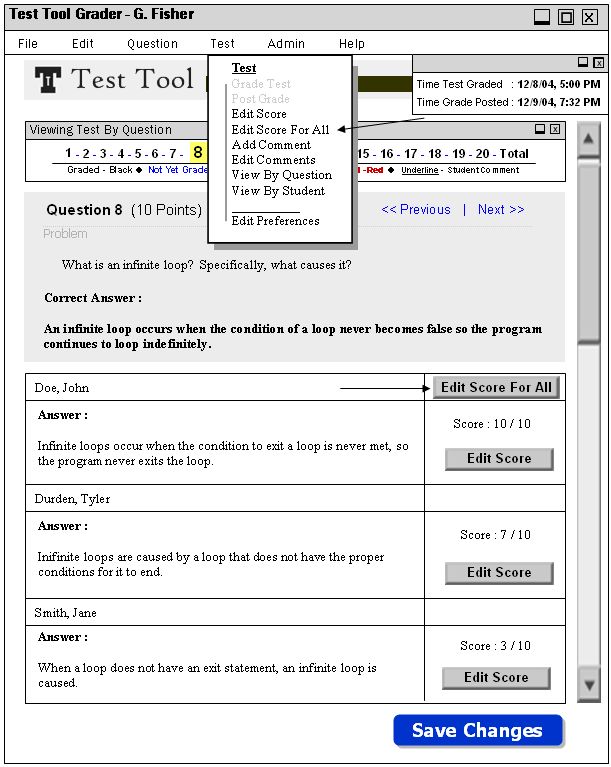
Figure 12. Accessing Edit Score For All function
If the user uses the drop down menu selection, then the dialog in Figure 13 appears asking them to specify which question they would like to edit the score for all the students. However, if the user clicked on the Edit Score For All button in the grading table for the selected question as shown in Figure 12, then the question is already specified and they jump directly to Figure 14. For completeness the user clicks Edit Score For All from the drop down menu and is presented with Figure 13.
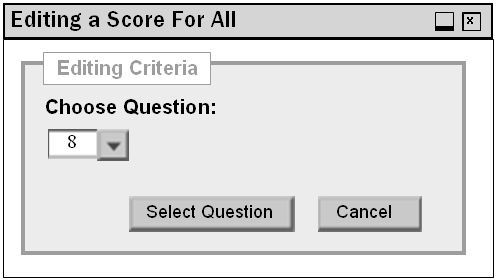
Figure 13. Choosing a Question to Edit Score For All
The user chooses question 8 from the drop down menu, and then clicks the Select Question button. Once that is done, a new dialog opens up as shown in Figure 14.
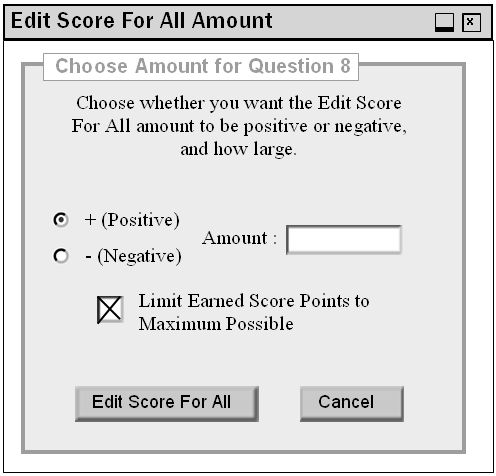
Figure 14. Choosing Edit Score Amount
From this dialog, the user chooses whether the change to all of the test scores should be a positive or negative change (+ / -) from the radial buttons, and then enters in the number of points to change the scores by. There is also a check box that allows us to limit the Earned points to be no more than the maximum number of points for the question. This keeps students from getting any kind of "extra credit", and can be changed at the users discretion. Let us assume the user wants to increase the score of the question for all the students by 3 points, and Limit the Earned Score, which is checked by default. They click the + radial button (selected by default), and type in a 3 inside of the text box. The completed dialog looks like Figure 15.
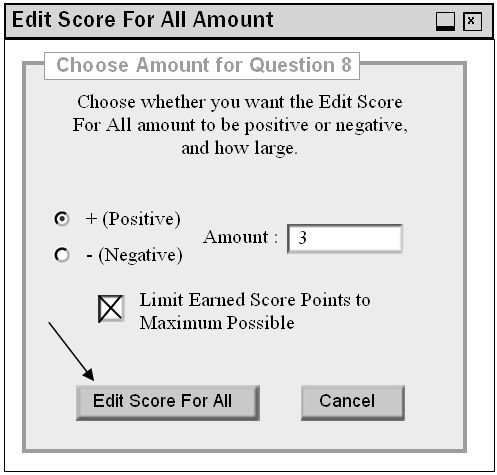
Figure 15. Edit Score Amount filled in
Then the user simple clicks the Edit Score For All button at the bottom of the dialog and the score for every student for Question 8 of Test 1 will be increased by 3 points, as shown in Figure 16.
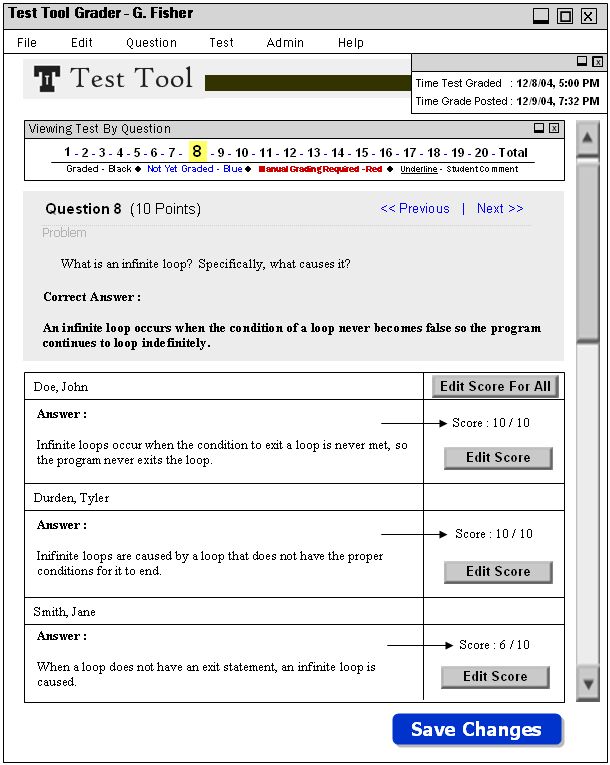
Figure 16. Scores Edited for All Students
The total scores of each students' respective test will also be increased by 3 points as well to reflect this change. To keep this change, the user just clicks the Save Changes button or chooses to Save from the File drop down menu just as before. After doing this, the user may Post Grade again to give the students their updated test grades.
2.7.4.2. Individual Student Test Score Changes
Changing a test score or question score is very similar to manual grading as shown in Section 2.7.2, except that there is already a score in place for the question and they are modifying it. To edit a test score, the user clicks on either the Edit Score button inside of the grade table adjacent to the student they want to edit the score for, or chooses Edit Score from the drop down Test menu at the top. Both of these methods are shown in Figure 17. If the user were to click the Edit Score button inside of the grade table, it jumps the user to Figure 20. For completeness, the user clicks on the Edit Score option inside of the Test drop down menu.

Figure 17. Accessing Edit Score function
This brings us to the following dialog to select the question and student the user wants to edit the question score for in Figure 18. This is the same dialog shown in Figure 6, only now the user is editing a score for Jane Smith and question 8.
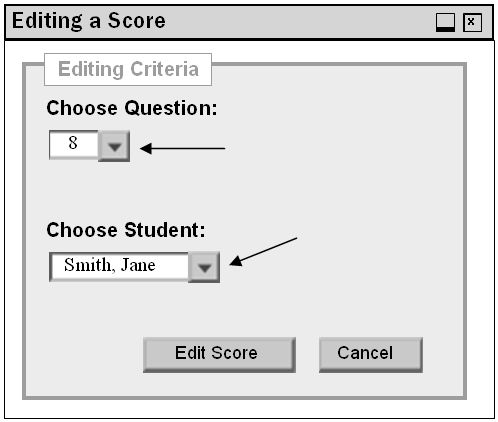
Figure 18. Choosing a Question and Student to edit score for
Once the student and question are both chosen, the user is prompted with the actual Edit Score dialog, shown in Figure 19. Remember, if the user had clicked the Edit Score button directly from the grade table for the desired question and student, it would have skipped the last two steps and jumped directly to Figure 19.
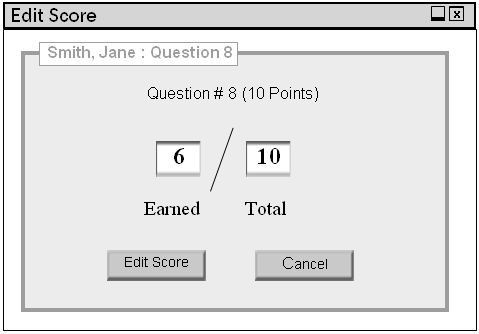
Figure 19. Edit Score dialog
This screen shows the points the student earned for this question, and the total points that the question is worth. It also gives the instructor the option to Edit Score, which would change the new results in the test, for the problem and for the total grade of the test. If the user wanted to get out of this dialog with no changes, they could simply click Cancel. In the above figure, the squares containing the 6 and the 10 are simply text fields that can be edited any way seen fit by the instructor, consequently changing the score for the problem and for the total test. If the instructor decided to give Jane Smith 8 points on this question instead of 6, the user just types a 8 in the Earned text box, the dialog box would then look like Figure 20.
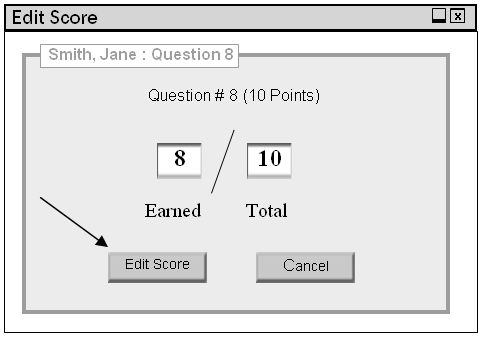
Figure 20. Edit Score dialog with changed Earned value
After clicking Edit Score the user is brought back to the previous grade view of the test with the newly updated test results, shown in Figure 21.

Figure 21. Test with question grade edited for Jane Smith
What has changed here from Figure 17 is that the score on Jane Smith's test for problem number 8 is now 8 instead of 6, and her total score has also changed to reflect this as well. For the changes to be saved the instructor would just need to click the Save Changes button now.
2.7.5 Adding Instructor Comments to a Graded Student Test
When the instructor needs to put a comment on a student test, they can add a comment to the test for the student to view. The Instructor clicks on Test at the top, and chooses the Add Comment option from the pull down list. Then the user is presented with the dialog as shown in Figure 23.
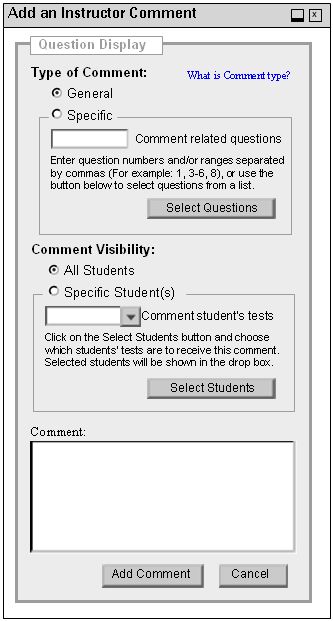
Figure 22. Adding an instructor comment for a graded test
In this dialog the instructor is presented with a variety of options. In the same way that students can add comments while taking a test, the instructor can choose for the comment to be general comment for the test as a whole, or a specific comment concerning a particular question or set of questions. This is set to General by default. Below that is the Comment Visibility section, in which the instructor can choose to give the comment to all of the students that took the particular test, or to a specific student or set of students. This is set to All Students by default. At the bottom is the text box for the user to insert the comment. When the instructor clicks on the Specific radial button in the Type of Comment section, and then clicks on Select Questions, they are brought to the following dialog shown in Figure 23.
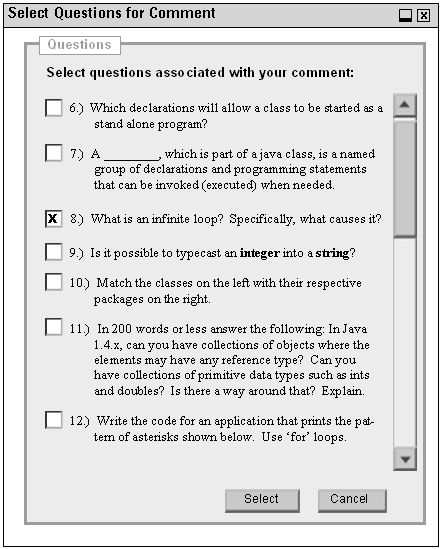
Figure 23. Selecting questions to add comments to
This dialog allows the instructor to choose which questions to add the comment for. There is a scroll bar on the right side to view all the questions for the current test. The user then selects question 8 as shown in Figure 23 by clicking on the corresponding check box, and then clicks Select. They are brought back to the Add Comment dialog, but with the new questions selected just put into the Specific section of Figure 22. This can be set for multiple questions, but for this example the comment will be added to question 8. Then the user clicks to add the comment for Specific Students by the radial button in the Comment Visibility section of the dialog, and then clicks on the Select Students button. Then they are brought to the dialog box shown in Figure 24.
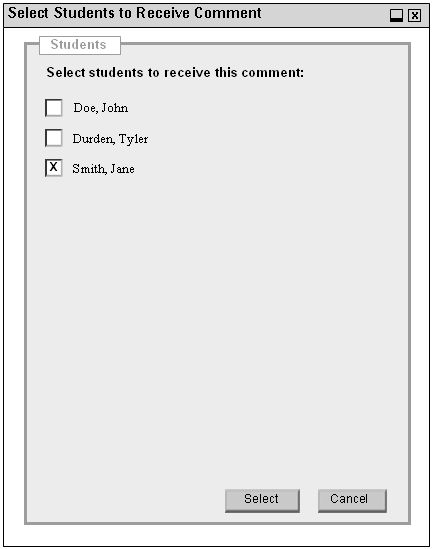
Figure 24. Select Students dialog for choosing which students receive the comment
From here the user chooses the students to receive the comment by clicking on their corresponding check boxes as shown in Figure 24. The instructor clicks on the check box next to Smith, Jane to direct the comment to her test. Once that is done the user then clicks on the Select button and is brought back to the main Add Comment dialog box with the students selected names listed in the drop down menu shown in the Specific Students section of Figure 22. Finally, to finish the comment, the instructor types in their comment and the dialog box is completely filled as shown in Figure 25.
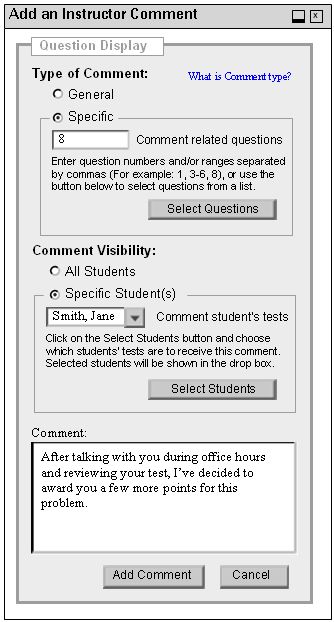
Figure 25. Add comment dialog filled out
If the instructor decided not to add the comment, they could click Cancel and go back to the test. Now that everything is filled out, to finally add the comment the user clicks on the Add Comment button, and the user is brought to the main test screen again in Figure 21. No changes are visible on this screen, but something new could be seen if the user were to look at the comments contained in this test. The end result of this procedure puts a comment in Jane Smith's test for question 8 telling why the score was changed in Section 2.7.4.2.
2.7.5.1 Viewing Instructor Comments
If the user wants to see the comments they have added to a graded test, they may do so using the View Comments function. This can be accessed by clicking on the Test drop down menu from the top, and selecting View Comments, as shown in Figure 26.
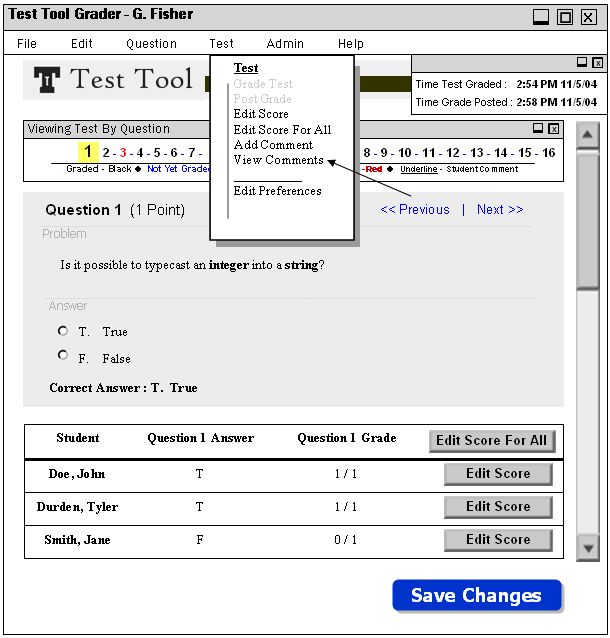
Figure 26. Accessing View Comments
Once View Comments is selected, the user is presented with the dialog in Figure 27 asking what type of comments that they want to view.

Figure 27. View Comments Type dialog
The user then chooses the radial button for Instructor Graded Comments, and clicks the View Comments button. This brings us to the instructor comment editor shown in Figure 28.
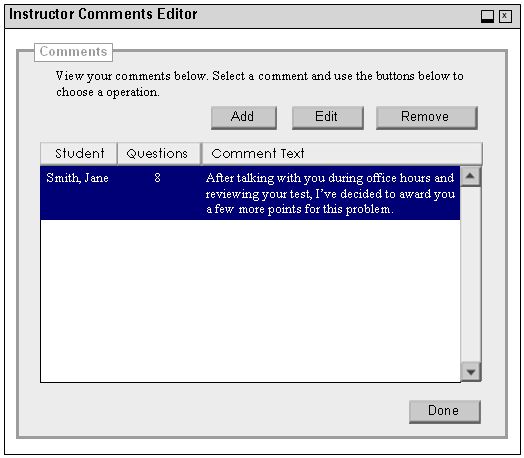
Figure 28. Instructor Comment Editor
In this dialog box the user can see the comment that the user first added to the test for Jane Smith in Sections 2.7.5, along with any other comments the user could have added in the past. From here they can remove comments, add another, or edit an existing comment exactly as shown in Section 2.6.2.3.5.
2.7.6. Viewing a Test by Question/Student
Throughout this scenario the user has been viewing the test by Question, but the test may also be viewed by Student as well. To do this, the user clicks on the Test drop down menu from the top and chooses View By Student as shown in Figure 29.
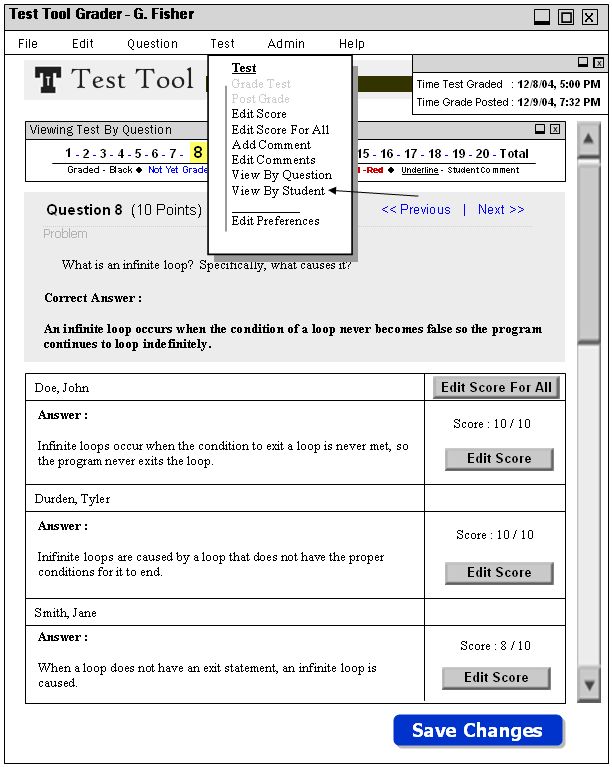
Figure 29. Choosing View By Student option
Clicking on View By Student brings up the following dialog as shown in Figure 30.
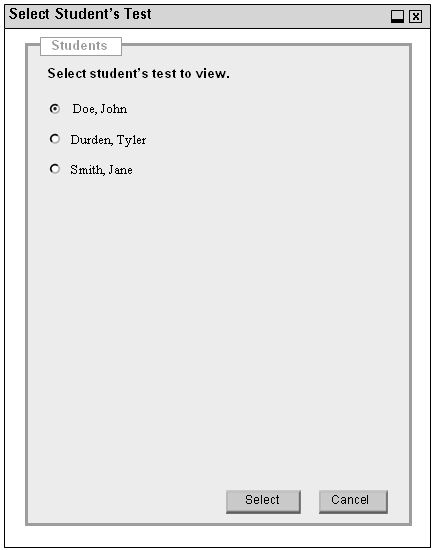
Figure 30. The Student test selection dialog
The user then chooses Doe, John from the selection of students and clicks Select, they are brought to the main grader screen shown in Figure 31.
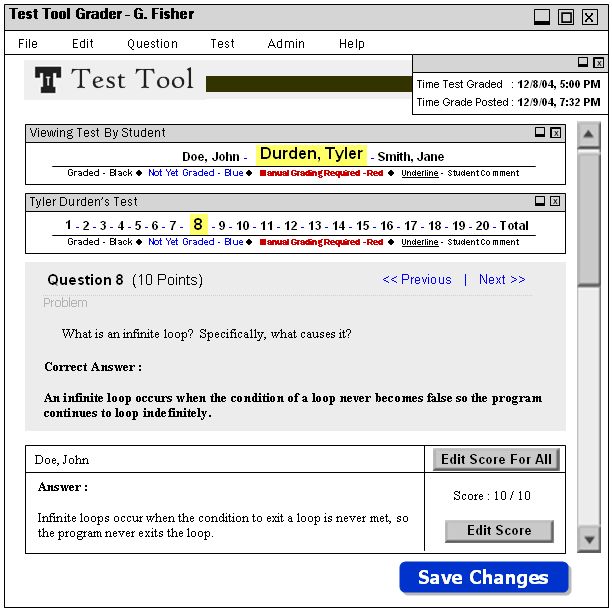
Figure 31. Viewing a test by Student for John Doe
This screen differs from all of the others in a few major ways. There is now a View Test By Student menu bar, which shows the students in the class, and the grading status of their tests (which are color coded much like the Question menu bar before). This can be used to quickly jump from one student's test to another. Also, the grading table below each question no longer shows all of the students' answers, but only the one student's answer that is selected. Other than those differences the other functions of for grading all work the same.