2.6 Student Users - Taking a Test
Students use the Test Tool application mainly for two purposes: test taking (proctored or non-proctored) and reviewing graded tests. The scenarios presented in this section describe the Student Test Tool features available to Student users and the various situations in which a Student will use this application. For reference purposes, the details of tests, comments, and additional data are available in the Appendices.
2.6.1 Kinds of Tests
Students may use Test Tool in a classroom setting or outside (e.g. from a home computer). Several important distinctions exist between the various exam types. The following is a brief description (including important distinctions) of each test type.
Proctored - Proctored exams are in-class, supervised tests given by an Instructor or appointed Proctor. These types of tests are distributed to students over an intranet in a controlled environment such as classroom or testing facility. Instructors have the additional option of “locking” a student’s computer during a proctored test. When a test has been locked, student cannot use any applications beyond Test Tool during the test. If a test is not locked, students may minimize the Test Tool application and use other programs during the test.
Take-Home - Instructors can make take-home exams available to students by placing them on a secure server. When a student logs in, Test tool automatically authenticates users and downloads available tests from the server. Test tool allows the student to submit a completed Take-Home exam through a similar process (See section 2.6.3.6) and posts the completed test back on the server where an instructor can collect it for grading.
Practice - Practice exams can also be made available on a server. Unlike the Take-Home exam, these exams cannot be submitted.
Graded - After take-home and proctored exams have been graded; instructors can release them back to Students to be reviewed. (See section xxx for details about grading exams)
Answer Key - Instructors can generate Answer Keys for practice tests or to be reviewed with Graded tests.
Additional details about the various types of exams are provided in section 2.3 Editing a Test.
2.6.2 Initial Screen Views
When a student first invokes Test Tool they are presented with a login screen. A view of the login screen and details of the login process are available in Section 2.1. After a student has successfully logged in, the next screen that appears depends on whether or not they are taking a proctored exam. If a Student is not taking a proctored test then a screen appears like the one shown below in Figure 1.
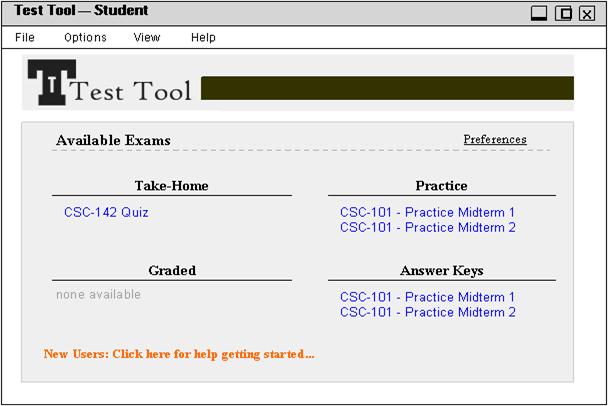 |
Figure 1. Example of Student user screen view after logging in for non-proctored exam.
The general appearance and available features are the same for all students; however, the available tests vary. For instance, the example above shows three available tests; “CSC-142 Quiz,” “CSC-101 Practice Midterm 1,” and “CSC-101 Practice Midterm 2.” There are also two answer keys available with the names of the corresponding tests, “CSC-101 Practice Midterm 1,” and “CSC-101 Practice Midterm 2.” These test names are shown in blue and are divided into four categories; “Take-Home,” “Practice,” and “Graded,” and “Answer Keys” depending on the type. To begin a test, the Student can double click the test name and the test will be opened (Additional methods for opening tests are provided in Section ***)
As mention earlier, the above screen shot appears during non-proctored exams. When an Instructor or Proctor launches an in-class test, the Students on the network will see a screen like the following figure.
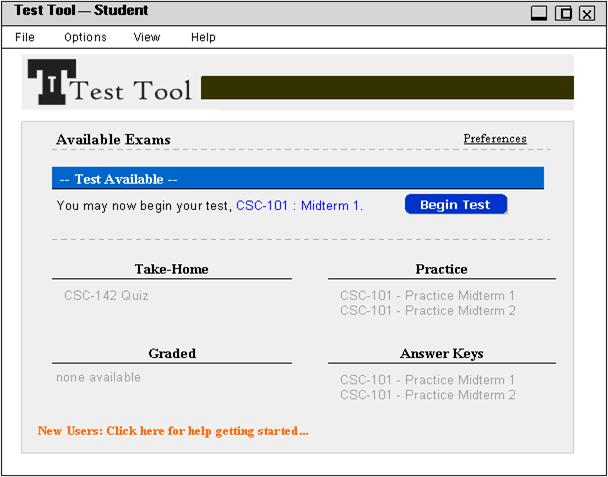 |
Figure 2. Example of Student user screen view after logging in for proctored exam.
Figure 2 shows test to be proctored under the blue header. The name of the test being proctored as “CSC-101: Midterm 1.” A student can open and begin this test by clicking either the test’s name or the “Begin Test” button. The next section will cover the details of opening, taking, and submitting a test once a Student user has logged in.
2.6.3 Test taking
The scenarios in this section cover the Test tool functions available to Students taking an exam.
2.6.3.1. Opening a test
To begin taking a test, a Student must first open the test. Students have several options for opening / beginning a test. They can select the test by either double clicking the test name, or, in the case of a proctored exam, they can click the “Begin Test” button (shown above in Figure 2). The other method for beginning a test is by selecting the “Open” command from the File menu of the command bar. When a Student selects the “Open” command a dialog box appears on screen. Figure 3 shows an example of the dialog box for opening files.
 |
Figure 3. Dialog Box invoked by “Open” command in the File menu, displaying all available tests.
The example in Figure 3 displays five of the six available tests from the example in Figure 2. The sixth test can be reached scrolling down. If a Student does not want to view all tests at once, they can display available tests by type. The current display shows all available tests, as indicated by the drop down menu option “All Tests.” A view of the complete drop menu is provided in Figure 4 and Figure 5 shows an example of only one test type (Proctored) being shown.
 |
|||
 |
|||
|
Figure 5. Dialog Box invoked by “Open” command in the File menu, displaying available proctored tests with the test “CSC-101: Midterm 1” selected by the user.
|
|||
To open a test, Students select the test and click the “Open” button. In Figure 5, the Proctored test, “CSC-101 Midterm 1” has been selected by the user.
2.6.3.2. Overview of Screen and Viewing Options
When a Student first opens a test, they are presented with a Summary and Instructions page for the test. This summary includes important information for the Student and also any instructions provided by the Instructor. See Figure 6 below for an example of a Summary and Instructions page.
 |
Figure 6. Example of Instructions and Summary provided at the beginning of a Test.
The information included in the Summary section varies depending on the test type.
The Instructor provides the information and text included in the instructions section for more information see section 2.4 Editing a Test..
When a student begins a test, several windows are opened. The main components of this page include the following:
- Clock window (Section 2.6.2.3.1. Clock Window )
- Question body (Section 2.6.2.3.2. Question Body )
- Question Index (Section 2.7.2.3.3. Question Index)
- Submit Button (Section2.6.2.5. Submitting a test)
Figure 7 below shows an example view of a test with each of these features indicated with red boxes and labels.
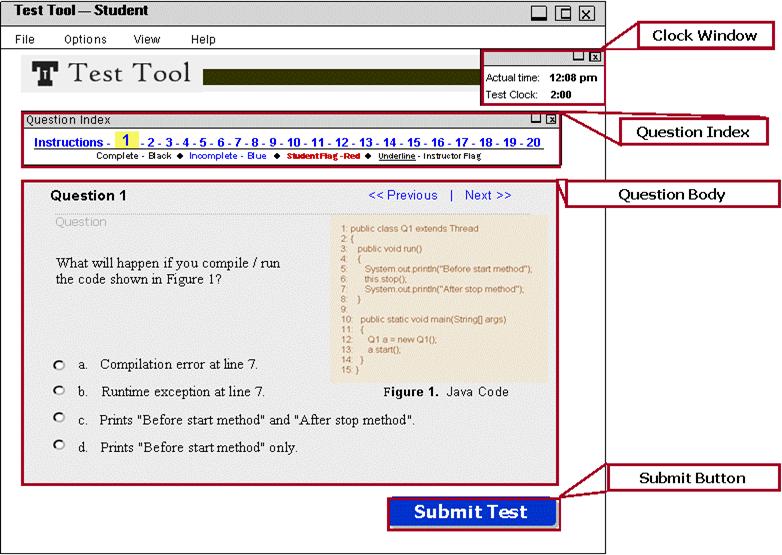 |
Figure 7. Student test screen view with labels.
2.6.3.2.1. Clock Window
The Clock window (upper right side in figure 7) shows the actual time of day and the time remaining on a test. (Please note: Options for the Test Clock, which shows the time remaining on a test, are only available when a time limit has been set by an Instructor or Proctor. The following scenarios assume that a time limit is set.) Students have the option of closing the clock window completely or only showing one of the clocks. The Clock window can be closed by clicking the close window button in the upper right corner or by selecting “Exit” from the “File” menu. The View menu of the command bar provides operations to hide or show the two clocks. Examples of the View menu and corresponding Clock Window are shown below in Figures 8-10.
 |
 |
 |
|||
|
Figure 8. Top: Commands available in view menu when both clocks are visible on screen. Bottom: View of example clock window. |
Figure 9. Top: Commands available in View menu when Actual time is visible but Time Remaining clock is hidden by Student or no time limit was set. Bottom: View of example clock window. |
Figure 10. Top: Commands available in view menu when neither clock is visible on screen. Clock window is closed. No clock window is shown because neither the actual time nor test clock is being displayed. |
Figure 8 shows the complete clock window. Since both clocks are visible, the View menu provides options for hiding the clocks, “Hide Actual Time” and “Hide Test Clock.” The clock window in Figure 9 only shows the actual time so the View menu provides the option of hiding the actual time, “Hide Actual Time” and the option to show the test clock, “Show Test Clock.” No clock window is shown in Figure 10 because when both clocks are hidden, the clock window is automatically closed. The View menu provides options to display both clocks, “Show Actual Time” and “Show Test Clock” and will automatically reopen the clock window when either option is chosen. If no test limit has been set for a test, then the Clock Window will not display the Test Clock. Also the menu option, “Show Test Clock,” will be grayed out as shown below in Figure 11.
 |
|||
|
|||
2.6.3.2.2. Question Body
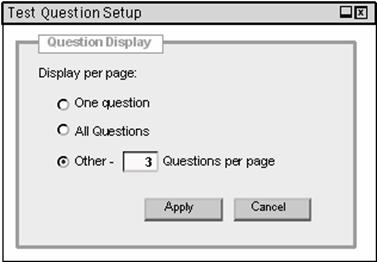
The main window of Test Tool contains the actual questions available on a test. Students have the option to change the number of questions per page. The default setting will display one question per page as shown in the previous Figure 7. To change the number of questions displayed on the screen, Students can select “Questions Per Page” from the View menu. When a Student user selects this command, they invoke the dialog box shown in Figure 12.
 |
 |
||
|
||||
|
||||
Students are provided with three general display choices. Students can indicate their preference by selecting the radio button next to a display option. The first choice “One Question” is the default setting and will display one question at a time as shown in the previous example Figure 7. If students want more than one question displayed per window, the can select the “All Questions” or “Other” options. Selecting “All Questions” will show the full test. Selecting “Other” will allow Students to specify how many questions to view per page. Figure 13 above shows an example of a Student choosing to display three questions per screen shot. To effect a new selection, Students must click the “Apply” button. A student may also opt to leave the current settings and can select the “Cancel” button or simply close the window. Figure 14 below shows the results of the Figure 13 dialog box (i.e. a test with three questions displayed).
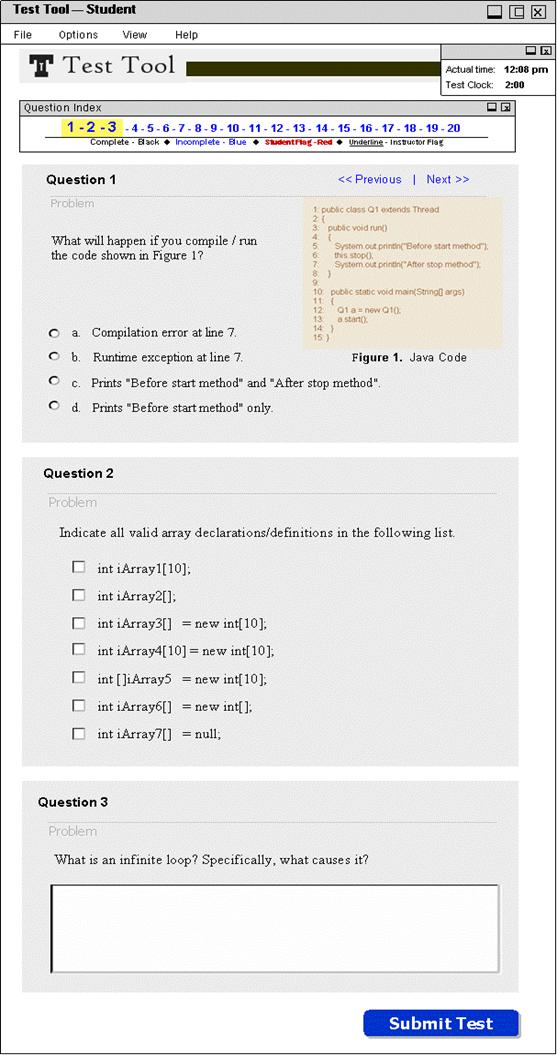 |
Figure 14. Example of test with three questions per page displayed.
The “Previous” and “Next” links (shown at top right of the question body in blue) navigate a user to different screen shots. If the viewing settings are for one question per page then these links will only show the previous or next question. For example, a user selecting the “Next” link from the screen shown in Figure 7 would then see question 2 displayed. When the screen view is set-up for multiple questions, the user would be presented with the next or previous ‘set’ of questions. For example, the “Next” link in Figure 14 would generate a new display with questions 4-6 (the next ‘set’ of three questions). If the total number of questions is not evenly divisible by the selected number to display, the last screen shot will display the remaining questions. To clarify: the questions displayed by each subsequent invocation of “Next” will display the following groups of questions: 4, 5, 6; 7, 8, 9; 10, 11, 12; 13, 14, 15; 16, 17, 18; 19 and 20. The final display will only show 19 and 20. These links are also capable of wrapping around at the beginning or end of a test, e.g. (1) the next group in the sequence above would be questions 1-3 also (2) the “Previous” link in Figure 7 would display question 20. (See section 2.7.2.3.3. Question Index for more information about navigating to questions).
Two additional options included in the View menu are “Show Incomplete” and “Show Flagged.” “Show Incomplete” will generate a display with any and all incomplete questions left in the test. Similarly, “Show Flagged” will display any questions which have been flagged by a student. (For details about flagging questions, see section 2.7.2.3.4 Question Flagging **link). These display modes can be used separately or in conjunction. When activated in conjunction, these modes will display any questions which are incomplete, flagged or incomplete and flagged. To return to the regular display select “Exit Show Incomplete” and “Exit Show Flagged.” The figures below (Figure 15-17) show examples of the View menu for these modes.
 |
 |
 |
|
Figure 15. Commands available in view menu while . |
Figure 16. Commands available in View menu when Actual time is visible but Time Remaining clock is hidden by Student or no time limit was set. |
Figure 17. Commands available in view menu when neither clock is visible on screen. Clock window is closed. |
The function of the “Previous” and “Next” links are also affected by these modes. While in the “Show Flagged” mode, the “Previous” link will navigate to the previous Flagged question or to a set of previous Flagged question.
2.6.3.2.3. Question Index
The Questions Index contains links to all of the test questions. Like the Clock window, users can choose whether or not to display the index. By default the Question Index is displayed with the test. If users want to change the display and hide the Index or visa versa, they can toggle between displays by using the View menu Options, “Show Question Index” or “Hide Question Index.”
The Question Index is a useful tool for Students during a test. With it they can quickly navigate anywhere in the test by selecting a question number. Depending on the display set-up for “Questions per Page” (details: see Section 2.xxxx Question Body **link), the index links will navigate the user to a display with the single selected question, or Test Tool will generate the page with multiple questions anchored at the selected question (i.e. the display will be scrolled to the appropriate question.).
In addition to quick links to questions, the index provides helpful information such as the following:
- Questions in current display
- Complete / Incomplete / (Instructor and Student) Flagged Questions
An example of the question index is shown in Figure 18.
 |
Figure 18. Example of Question Index window as shown at the beginning of a Student’s test.
This example shows a test consisting of 20 questions. Users can click on any of the numbers to navigate to the corresponding test question. The current questions being displayed are indicated by the yellow highlighting. The current display set-up dictates how many questions are displayed. The example is figure 18 would be for a test with a one-question-per-page view. The next example, Figure 19, shows three highlighted numbers. The corresponding test view would show three questions per page.
 |
Figure 19. Example of Question Index window for test view with three questions per page.
The question index window also displays other relevant test information. The example indices in figures 18 and 19 show all the numbers displayed in blue. The blue is used to indicate that these questions have not been answered. These views would most commonly show up at the beginning of an exam. The view displayed in Figure 20 however is an example of a Student in the middle of a test.
 |
Figure 20. Example of Question Index view during a test in progress.
From the key provided (various colors of text below the numbers) a Student can quickly reference the status of questions in his or her test. Questions in black are complete; blue, incomplete; red, flagged by student; underlined, flagged by instructor. From this question box a Student can evaluate the status or their test as follows:
- The current question being displayed is number 14, as indicated by yellow highlighter.
- The questions shown in black, 1-3, 5,6,8,and 11-14, are complete questions.
- Question 7 was flagged by the Student and is displayed in red.
- The blue questions are all incomplete and they include 4,9,10, and 15-20.
2.6.3.2.4. Question Flagging
Test Tool is equipped to provide for two types of flagging: student flags and instructor or proctor flags. Student flags are to provide students with a means of marking their exam with reminders to return to previous questions. For example, if a student answers a question that they are unsure about, they can add a flag to the question as a reminder to review their answer before submission. This feature is particularly helpful with times exams when a student is unsure whether they will have time to review the question and do not want to leave a blank answer. To flag a question Students can select the “Flag Question” option from the Options menu (shown in Figure 21). Conversely, a flag can be removed by selecting “Remove Flag.”
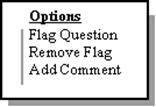 |
Figure 21. View of the Student user Options menu.
The second type of flag, Instructor or Proctor flags, appear during proctored exams. (For information about using Instructor/ Proctor flags, see section 2.7). Instructors or Proctors create these flags to alert students to changes or corrections to an in progress exam and are indicated by underlining. For example, questions 8, 14, and 17 in Figure 22 have been flagged by an Instructor or Proctor.
 |
Figure 22. Question Index with example of Instructor/Proctor flags (questions 8 & 14).
2.6.3.2.5. Comments from Instructors and Proctors
In addition to flags, Instructors or Proctors also have the ability to add comments to a test. Section 2.7 covers how an Instructor/Proctor adds a comment. They have the ability to add two kinds of comments, general or specific to a question. When a comment is added to a test, a window will appear on the Student’s screen with a link to view the message. An example of the Student screen with the message alert is shown in Figure 23.
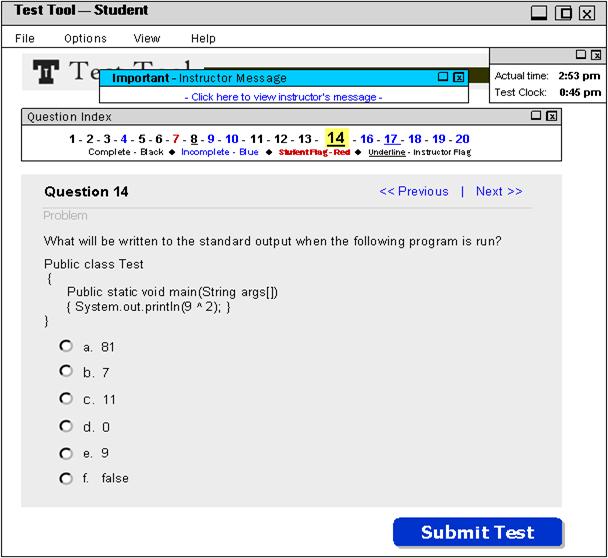 |
Figure 23. Student screen view shown with an Instructor/Proctor comment alert.
The message alert window appears above the Question Index but does not display the entire message until a student selects the link in the window, “Click here to view Instructor’s message.” This is done in an effort not to unduly distract a student during the exam. A student can select the link and display the message at their leisure. An example view of a message after the link has been clicked is shown in Figure 24.
 |
Figure 24. Example of an Instructor’s or Proctor’s message.
The example message shown in figure 24 is a general message meaning that when the Proctor created it they did not associate it with any particular question or questions. If a comment pertains to a specific question or group of questions, the instructor the instructor can associate it with that question. (For details on how a Proctor would do this see section 2.7). Figure 25 below shows an example comment that is associated with a particular question.
 |
Figure 25. Example of Proctor
There are a few differences between a general comment and a specific comment. The title bar header of a general comment will display “Instructor message”* while a specific comment will refer to the associated question(s) as shown in Figure 25. When an instructor posts a specific comment about a question, any associated questions are automatically flagged.
2.6.3.2.6. Student Comments
Students can include comments and notes with their submitted test. These comments are viewed by the Instructor during the grading process. ‘Add’, ‘edit’, and ‘remove’ operations for comments can be accessed by selecting the “Comment Editor” command from the Options Menu. Figure 26 provides a view of the Comment Editor.
 |
Figure 26. Comment Editor window with three sample comments.
Comments already included with the test are shown in the viewing pane of the window. The next three sub-sections contain scenarios for adding, editing and removing comments.
2.6.3.2.6.1 Adding Comments
To add a comment, Students can select “Add Comment” from the Options menu or the “Add” button from the Comment Editor to invoke the dialog box shown in Figure 27.
 |
|||
 |
|||
|
Figure 27. Dialog box invoked by the “Add Comment” command of the Options menu.
|
|
Figure 28. Window opened from the “Add Comment” dialog box to provide additional information. |
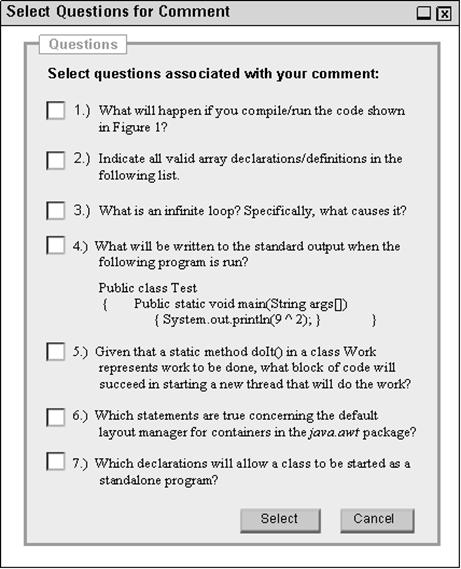
Like the Instructor and Proctor comments, Student comments can be general or specific. As described in the previous section (Section 2.7.2.3.4 Viewing Comments from Instructors and Proctors general comments pertain to the test overall and specific comments are associated or linked to a question or questions in the exam. (The help link, “What is a Comment Type?” shown in blue in figure 27, helps users understand the type difference. Figure 28 provides a view of the help window.) Students select a radio button to specify the type of their comment. When a user selects the Specific type, they must also enter to which question(s) the comment relates. This information can be entered manually into the input field next to “Comment related question.” Valid inputs include individual numbers or ranges of numbers, separated by commas. For example, the inputs “1, 2, 3, 6, 9, 10-12”; “1-3, 6, 9-12”; and “ 9-11, 6, 3, 12, 1-2” are all equal and will link the comment to the questions 1, 2, 3, 6,9,10,11, and 12. A user can choose the “Select Questions” button to invoke a second dialog box which will display a list with the text of all the test questions. An example of this dialog box is provided in Figure 29 and an example of the box with selected questions is in Figure 30.
 |
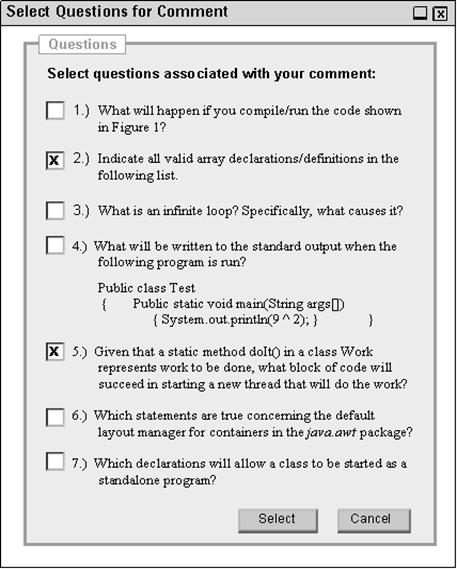 |
Figure 29. Example of a “Select Questions for Comment” dialog box. Figure 30. Example of a “Select Questions for Comment” dialog box with user’s selection.
The dialog box in Figures 29-30 is based on a test with seven questions. The body of the text and the question number are both shown to help Students identify the question(s) related to their comment.
2.6.3.2.6.2 Editing Comments
The dialog box to edit comments is shown in Figure 31.
 |
Figure 31. Dialog box used to edit Student comments.
The Edit comments dialog is very similar to the add comments dialog. To edit a comment a student must select an existing comment and choose the “Edit” button from the Comment Editor . The question data is display in the appropriate fields where the user can change it. Students can then select the “Save Changes” button to keep any changes.
2.6.3.2.6.3 Removing Comments
Students can remove comments from a test by highlighting the comment and then selecting the “Remove” button from the Question Editor. Before the comment is permanently removed, a confirmation appears like the one shown in Figure 32.
 |
Figure 32. Dialog box invoked by the Remove command. Confirms the users desire to delete a comment before permanently removing the data.
Students complete the remove operation by selecting “Delete” or they can abort the operation by selecting “Cancel.”
2.6.3.3. Answering Questions
There are seven types of questions possible on a test. These types (explained in detail in Section 2.2) are as follows:
- Multiple Choice
- Short Answer
- True / False
- Matching
- Fill-in-the-Blank
- Essay
- Program Code
The following sub-sections show examples of each question type as it appears to a student and of how a student answers each of the question types.
Note: The differences between various types are somewhat arbitrary. They were chosen for purposes of clarity, grading, and requests by the client. Additional information about the format of questions can be found in section 2.2 Managing Questions.
2.6.3.3.1 Multiple Choice
An example of a multiple choice question is shown below in Figure 33.
 |
Figure 33. Example of multiple choice question.
Figure 33 shows an unanswered multiple choice question. This question also includes a figure which shows an excerpt of code. The answer portion of this question is displayed with 4 possible choices: a. Compilation error at line 7, b. Runtime exception at line 7, c. Prints “Before start method “ and “After stop method,” d. Prints “Before start method” only. Each of these choices is lined up next to a radio button. The student clicks on a radio button to indicate their answer. In the figure below, the Student has selected answer “d.”
Figure 34. Example on an answered Multiple Choice question.
In this example shown in Figures 33 and 34 above a student can select only one of the possible answers at a time. In the above figure, a Student can change their selection by clicking on a different radio button such as the button next to “a.”. The button next to “d” would automatically be unselected and the button next to “a” would now be selected.
A second version of the Multiple Choice question, which we will refer to as Multiple Answer, allows Students to select more than one answer. A Multiple Answer question appears much like the multiple choice question. This question type, however, allows users to select more than one answer. For this reason, checkboxes are used next to the possible answers instead of radio button. An example of this question type is shown below in Figure 35.
 |
Figure 35. Example of Multiple Answer question.
In this example (Figure 35 above), more than more of the possible answers can be selected and the selection is indicated by an “x” in the checkbox, as shown below in Figure 36.
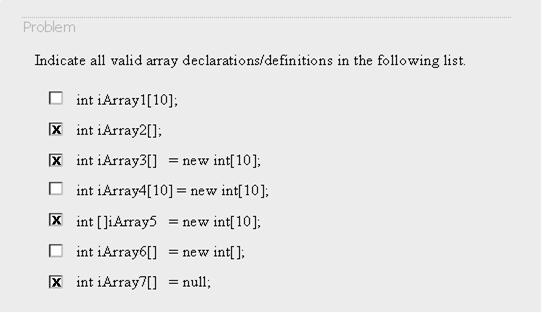 |
Figure 36. Example of Multiple Answer question.
Figure 36 shows four answers have been selected: int iArray2[]; int iArray3[] = new int[10]; int []iArray5[] = new int[10]; and int iArray7[] = null. To deselect an answer, the Student clicks on the checkbox and the “x” is removed to indicate that it is not selected.
2.6.3.3.2 Short Answer
Another question type is the Short Answer question. In the example below (Figure 37), the question is followed by a blank text box.
Figure 37. Example of a unanswered Short Answer question.
To answer this question, a Student selects the text box by clicking on it and then typing their response. Figure 38 below shows an example of the question after a student has inserted a response.
Figure 38. Example of a Short Answer question with a Student’s response.
If a Student’s response exceeds the space provided, a scroll bar will automatically be added to the textbox to allow the student to scroll through their answer. Additional details and an example of a textbox with a scroll bar are provided in a later section, 2.6.3.4.6 Essay.
2.6.3.3.3 True / False
The True / False question type, shown below in Figure 39, resembles a Multiple Choice question. The answer section of this question, like the Multiple Choice question, is displayed with radio buttons.

Figure 39. Example of an unanswered True / False question.
As with the Multiple Choice question, a Student clicks the radio button next to their answer selection. In this case the Student has selected “True” (See Figure 40).
Figure 40. Example of a True / False question with a Student’s response.
As with the Multiple Choice questions (not the Multiple Answer), only one answer can be selected at a time. If a Student wants to change their selection from “True” to “False,” they simply click the radio button next to “False” and the button next to “True” will automatically deselect.
2.6.3.3.4 Matching
The next answer type available is the Matching Answer question shown below in Figure 41.
Figure 41. Example of Multiple Answer question.
To answer this type of question, a Student must select one or more “matches” between answers in the left-hand column and answers in the right-hand column. A “match” is indicated by an arrow between the two columns. To create this arrow a student clicks on an arrow box from one column and then clicks on a arrow box from the opposite column. In the following figures and captions this process is described step by step. A red arrow is used to indicate a user’s mouse pointer.
|
Figure 42. Step 1 - A Student selects an answer to match by clicking the arrow box next to it. In this example, the user has selected “SortedSet.” Note: when the cursor is placed over the arrow box, the corresponding answer becomes bold.
|
|
Figure 43. Step 2 - The cursor appears with a black arrow pointing to the selected answer (“SortedSet”).
|
 |
Figure 44. Step 3 - The Student now drags the black arrow over an arrow box next to the “matching” answer in the opposite column. In this case, the matching answer is “*java.util.” Note that the answer next to the arrow box again becomes bold.
|
|
Figure 45. Step 4 - The Student now clicks on the arrow box and moves the cursor away from the selections. The arrow remains in place indicating a match between “SortedSet” and “*java.util.”
|
The process described above is repeated several times for each of the choices in the left-hand column. The completed question is shown below in Figure 46.
 |
Figure 46. Example of Multiple Answer question.
A Student cannot change an arrow once it has been created; however, the user can remove it entirely and create another. To remove an arrow the user simply double clicks on it and a dialog appears to confirm the deletion as show in Figure 47.
 |
Figure 47. Confirmation dialog to remove a match from a Matching Answer question.
A few noteworthy details about the matching process are as follows:
· If a user does not click on an appropriate arrow box after the first part of a match has been selected (i.e. after step 1), the arrow will disappear and the user must reselect the first match.
· Matches are between items in opposite columns. A user cannot an arrow will not appear if a user tries to match two choices in the name column.
· In the example provided, the Student started by selecting an answer from the left-hand column and then matched it to an answer in the right-hand column. The user can begin selection from either column (i.e. The Student can start in the right-hand column and match it to an answer in the left-hand column).
2.6.3.3.5. Fill-in-the-Blank
The Fill-in-the-Blank question type has a textbox inline with the question. Figure 48 below shows an unanswered question.
Figure 48. Example of an unanswered Fill-in-the-Blank question.
To answer this question, a Student clicks on the textbox and types in their answer. If the answer exceeds the textbox (i.e. the textbox is not big enough to see the entire answer) the Student may use arrow keys to scroll through their answer. Unlike the textbox in a Short Answer question, no scroll bar will appear. The Fill-in-the-Blank question is shown with a Student’s response below in Figure 49.
Figure 49. Example of an answered Fill-in-the-Blank question.
2.6.3.4.6 Essay
Essay questions are similar to the Short Answer question. The key difference is related to the methods used to grade the different types. For more information about the differences between these types see sections 2.2 Managing Questions
The figure below shows an example of an Essay question.
Figure 50. Example of an unanswered Essay question.
Figure 50 shows the blank textbox without scroll bars. When a student answers a question, they click on the textbox and begin typing their answer. If their answer exceeds the length of the textbox, a scroll bar will appear. Figure 51 shows the answered version of the same Essay question from Figure 50.
Figure 51. Example of an answered Essay question.
Because the Student’s answer exceeds the space provided, a scroll bar now appears as part of the textbox. To view the rest of the answer the Student can use their arrow key or the scroll bar.
2.6.3.4.7 Program Code
The final type of question available is the Program Code question. The question varies from other types for two main reasons. The first reason is the methods of grading which are describe in sections 2.2 and 2.7. The second difference is that the answer textbox can include text provided by the instructor. In the example shown in Figure 52, the instructor has included the framework for a piece of java code.
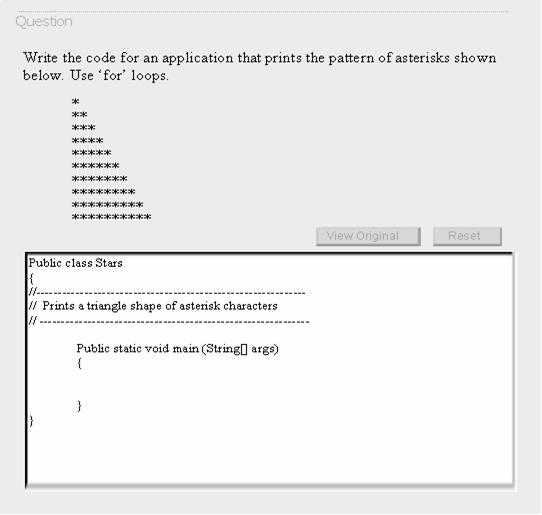 |
Figure 52. Example of a Program Code question with a code framework provided by the instructor.
In the example in Figure 52, there are two buttons above the textbox, “View Original” and “Reset.” In the example, they are shown grayed out because the Student has not made any changes to the code provided in the textbox. Note: If an Instructor does not provide any code or other information for the answer section, then the textbox will be empty at the beginning of a test and the “View Original” and “Reset” buttons will not appear. After the Student has deleted, added, or edited the content of the textbox, then the button will be active as shown in the figure below.
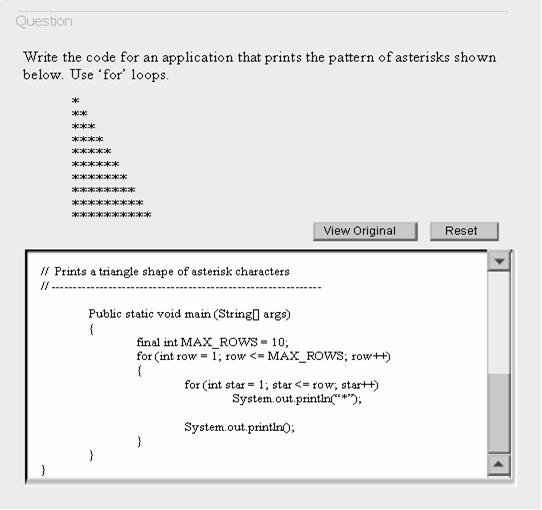 |
Figure 53. Example of an answered Program Code question.
Figure 53 shows two key changes to note; (1) the Student has added code to the textbox and a scroll bar now appears and (2) the “View Original” and “Reset” buttons are now active.
If a Student has made changes to the text which was provided by the instructor, they can view the original, unaltered text by selecting the “View Original” button. This button allows the Student to view the information provided by the Instructor without changing the text they have added. When the Student clicks “View Original” a dialog box will open showing the original text (See Figure 54).
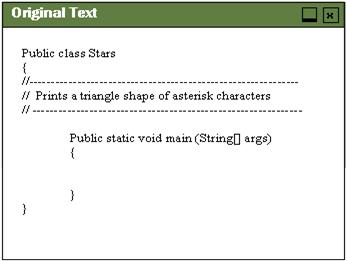 |
Figure 54. Dialog box showing the original, unaltered version of text provided in the answer- textbox.
If a Student wants to start over with the original framework, they can select the “Reset” button. This will erase any changes they have made since beginning the test. To prevent the Student from accidentally erasing work, they will be prompted to confirm that they want to reset the textbox. A picture of the confirmation textbox is shown in Figure 55.
 |
Figure 55. Dialog box to confirm reset.
2.6.3.4. Open and Closed Tests
Test Tool allows Instructors to restrict access to the internet and other programs during a proctored test, described in this section as a closed test. An open test, or unrestricted test, allows students to minimize the Test Tool application while browsing the internet or using additional programs. At the beginning of a test, the Student is alerted to whether the test will be open or closed (see the Summary section of Figure 6). If a Student attempts to minimize Test Tool or open other programs during a closed test, the dialog box shown in Figure 56, below, appears.
 |
Figure 56. Dialog box which appears when a Student tries to open other programs of minimize Test Tool during a closed test.
2.6.3.5. Submitting a test
Tests can be submitted in two ways, manually or automatically. All tests can be submitted manually, however, automatic submission has a few restrictions. Timed exams can be pre-set to submit a test at the end of a appointed time period or a Proctor can ‘collect’ the tests during in class exams (see proctor section 2.7). The following sections contain scenarios of test submission.
2.6.3.5.1 Manual Submission
A student can manually submit a test by selecting the “Submit Test” button at the bottom of the test. Before the test is submitted and sent through the network to the Instructor/Proctor, the Students are prompted to confirm that they have completed the test. A dialog box will appear like the one in Figure 57.
 |
Figure 57. Dialog box invoked by Submit button to confirm submission of test.
The dialog box is to confirm the Student’s intention to submit a test. The “Test Summary” section includes important information which will be included with the submitted test such as the name of the test and Student, date, time, test time, and Student comments. “Test Time” refers to the time elapsed from when a test is opened to the time of submission. The “Comments” line displays the number of comments which will be included with the test. At this time, Students have the opportunity to add, edit or remove comments by selecting the “Edit Comments” button. This button will open the “Edit Comments” dialog box previously discussed in Section 2.6.2.3.5 Student Comments. Also included in this dialog box are a brief question summary and a warnings section. The question summary displays the number of complete and incomplete questions.
The “Notices” section displays important warnings or notices to the user. A notice is displayed in the following cases:
- A Student is trying to submit a test with incomplete questions.
- A Student is trying to submit a test before all Student flags have been removed.
- A network connection is no longer detected and submission cannot complete.
Examples of each of these warnings are shown in the following figures (58-60) and are accompanied by a brief description. Figure 58 shows the variation of warnings displayed when a Student attempts to submit a test with incomplete questions.
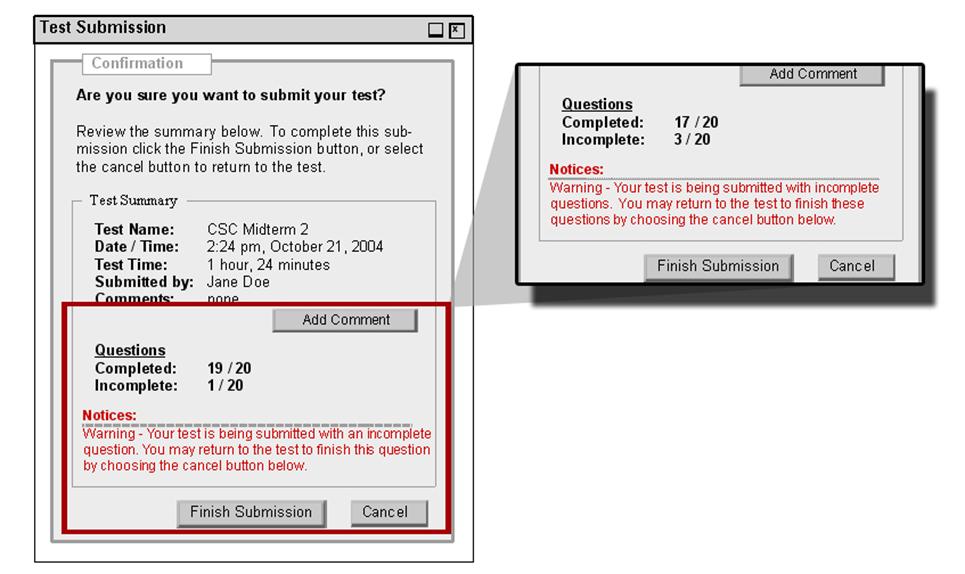
Figure 58. Submission dialog box with warning notice for one incomplete question and example of warning for multiple incomplete questions.
The complete dialog box in Figure 58 shows the warning that appears for a single incomplete question. The excerpted warning appears when more than more question is left incomplete. These warnings are provided to help Students from mistakenly submitting and an unfinished test, however, they are not required to complete all questions before submitting. A Student can elect to submit an incomplete test by clicking the “Finish Submission” button. The “Cancel” button allows Students to interrupt the submission process and return to their test. Students would generally select “Cancel” for the following reasons: (1) they inadvertently began the submission process; (2) they want to answer the incomplete questions; or (3) they had mark questions with flags did not review them before submitting. The next figure (Figure 59.) shows the warning when questions are left flagged by a Student.
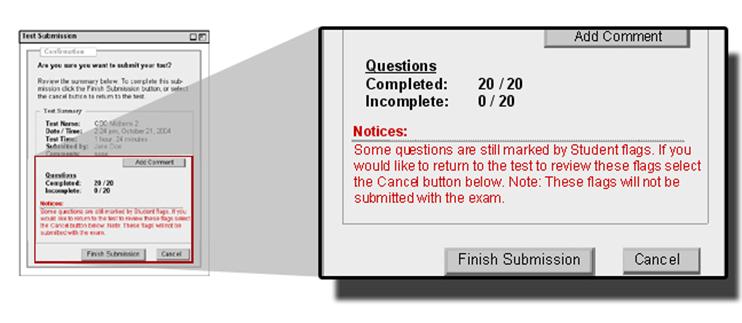 |
Figure 59. Submission dialog box with a notice that Student flags remain.
The previous warnings and notices are intended to aid the student with reminders. Figure 60 shows a different type of notice.
 |
Figure 60. Excerpt of submission dialog box with a network error warning.
The warning in figure 60 alerts the Student that the network connection is unavailable. During a proctored exam tests are distributed and submitted through the network. If that network is not functioning, the student may still choose “Finish Submission.” In this case, the test would be saved with the current time recorded as the submission time. When a network connection is available, the test will be submitted automatically. A Student cannot reopen their test once they have selected the “Finish Submission” button.
2.6.3.5.2 Automatic Submission
Automatic submission occurs when a Proctor initiates the process. To see more information about Proctors initiating submission, see section 2.7). During the process Students tests are closed and saved and then submitted through the network to the Proctors directory.
2.6.3.6. Setting Preferences
Many of the Student viewing options, which have been discussed through section 2.6, can be saved and will be automatically loaded when a Student logs in to Test Tool. By doing this, Students do not have to set up their viewing options every time they take a test. The particular options which a Student can set are the Question Display (number of questions displayed per page), Clock Window (views of the Actual time and the Countdown Clock), and the Question Index.
To change or set preferences a Student can either select “Preferences” from the test selection view (See Figures 1 and 2) or they can select the “Edit Preferences” command from the View menu. These will invoke the dialog box shown below in Figure 61.
 |
Figure 61. Dialog box to edit the saved viewing options (Preferences) for a Student user.
Figure 61 shows the preferences selected by default (These are also the preferences applied to the test described at the beginning of the Student Test Taking Section (See Figure 7). Below is a quick outline of each of the preferences and their corresponding menu commands from the View menu.
|
Selection from Preferences |
Corresponding View Menu Commands |
Description |
|
Question Display One Question All Questions Other –
|
Questions Per Page
|
Controls the number of questions display on screen at one time. |
|
Clock Window Display Actual Time
Display Time Clock
|
Show Actual Time Hide Actual Time
Show Test Clock Hide Test Clock
|
Allows user the option to display or not display the current time.
Allows user the option to display or not display the time remaining on the test. This clock is only displayed when a time limit has been set on a test. |
|
Question Index Display Question Index
|
Show Question Index Hide Question Index
|
Allows the users to decide whether or not to show the question index. |
When a Student uses the commands from the View menu to change a viewing option, this change is only applied to the current session. The change is only saved when the Student changes the option with the Preferences dialog box (Figure 61).
2.6.4 Reviewing a Graded Test
After an Instructor has graded a Student’s test and posted the test (see sections 2.7), the Student can review the graded test. When a graded test has been posted by an Instructor, it will appear on the Student’s test selection page (See Figures 1 and 2). An example of the Student’s view of a graded test is shown below.
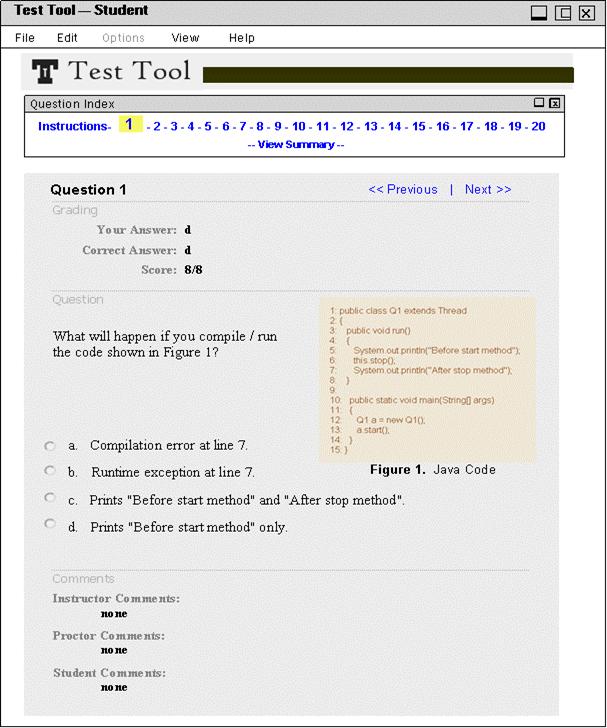 |
Figure 62. Example of Student view of a Graded Test.
The Student’s view of a graded test is a pared down version of the regular view. The first difference concerns the viewing options. Students can still control the number of questions displayed per page and whether or not to show the index. However, the Student no longer has access to options such as the viewing options for the clock window or the flagging or commenting. In Figure 62, the Options menu is grayed out because none of the options in that menu apply to graded tests. Several menu commands from the View menu are also are grayed out while a Student is viewing a graded test as shown in Figure 63.
 |
Figure 63. Example of the View menu while a when a user is viewing a Graded Test.
The Question Index is also different during a graded test. The legend is no longer shown and in its place is a link, “View Summary.“ User’s can select this option to see a grade summary of the test with a break down of the scores and other information. Figure 64 below shows an example of a test summary.
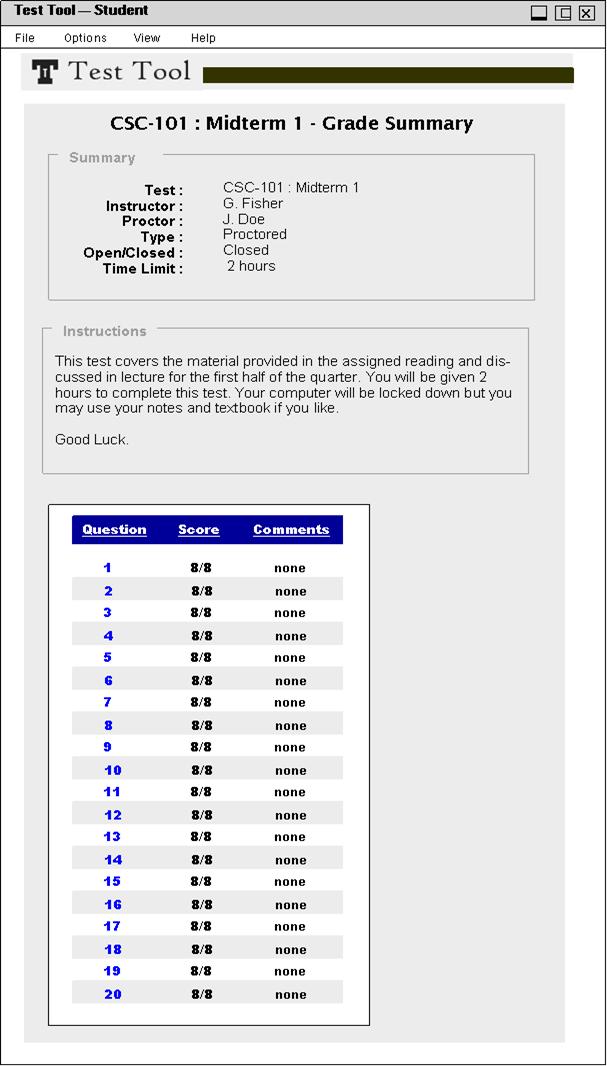 |
Figure 64. Example of a Graded Test Summary.
With the summary view, Students can get a quick look at all the scores per question. They can also select the number of a question to change to the question view (shown in Figure 62) and see the comments and details on that particular section.