2.6. Slide Show
The slide show feature can be explained through the use of a camera metaphore. It is to be used as a way to allow the user (developer) to "snap" a picture of what a specific screen or series of screens looks like. Several such "snapshots" will be able to be organized into a presentation format after the user is done taking pictures so that the user can display an example of what the program will look and feel like. Each slide represents a separate copy of the form that is displayed on that slide. The user is allowed to interact with all of the components on a slide-based form in the normal way. However, since each slide contains a separate form copy, changes made to the form affect only a particular slide. In this way, if two or more slides have a copy of the same form, changes to one slide do not affect any other slides.
2.6.1 Selecting a scene for slide show
In the figure below the options are shown that are availible to the user to deal with the slide show. The user has the choice of 'Take Screen Shot', 'Edit Screen Shots...' or 'Play Slide Show'. The first step for creating a slide show is to take the screen shots that you will wish to use in your presentation. When the user has made the prototype in the workarea look as desired for the shot, then either the keystroke CTRL+S should be pressed, or 'Take Screen Shot' should be chosen from the 'Slide Show' menu. This will cause the program to take a picture of only the open forms in the work area. It will not take a picture of the prototyping program or any of the open toolbars. The only visual indication that anything has taken place will be a quick black flash on the screen that will simulate a camera shutter closing and then opening. A sound will also be played to enforce that metaphore. The picture will automatically be stored for the user to view later when the presentation is actually made and put together. (ie. the film is developed and organized into an album)
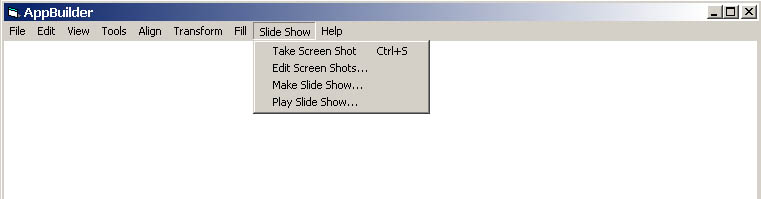
Figure 16: Slide Show Menu Options
2.6.2 Editing Slide show scenes
After all of the screen shots are taken the user will generally wish to organize the layout (order) of the shots and perhaps even to delete some of the shots that were taken. These operations are all availible through the use of the Slide Show Editor. Additionally, the use can type notes that go along with every screen shot in order to aid in the presentation. The figure below shows the Screen Shot Editor with 6 Screen Shots that were taken. The user can type notes for each screen shot by clicking the mouse on the text below each screen shot that says "Enter Description Here". The current text will disappear and user will be able to type in any desired notes about that screen shot. There are four buttons along the bottom of the window that allow the user to 'Delete' screen shots, 'Insert' additional picture files, 'Cancel' which closes the Screen Shot Editor without saving the changes, and the 'OK' button which saves the changes and closes the Screen Shot Editor.
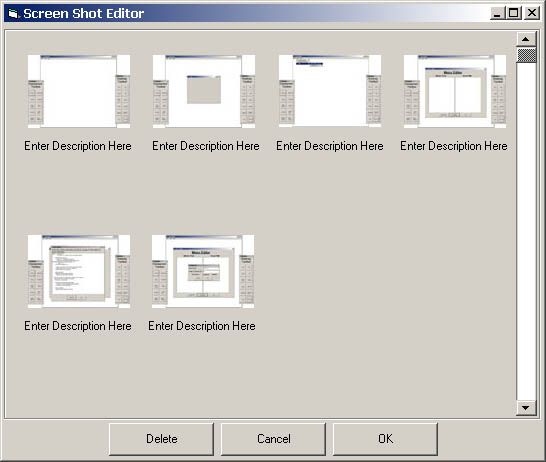
Figure 17: Screen Shot Editor with 6 Screen Shots.
2.6.3 Viewing a Slide Show
When the user has organized all of their screen shots and is ready to display the presentation he will choose the 'Play Slide Show' option from the 'Slide Show' menu. This will cause the screen to go blank and then the first screen shot or picture that the user defined while editing the slide show to be displayed. A toolbar such as the one below in Figure 18 will also appear in the lower left hand portion of the screen. The toolbar has commands that will allow the user to manipulate the slides. Alternately, the toolbar can be closed by clicking the X button on the top right of the window. With the toolbar closed the slide show can be controlled by the keyboard. The leftmost button on the toolbar, the double arrow pointing to the left, will take the user to the first slide in the show. This can also be done by pressing the down arrow on the keyboard. The button that is second from the left will take the user back one slide. This can also be done by pressing the left arrow button on the keyboard. The button that is second from the right will take the user to the next frame. This can also be accomplished by pressing the right arrow key on the keyboard. The rightmost button on the toolbar will take the user to the last slide in the show. This can also be accomplished by pressing the up arrow on the keyboard. At the top of the toolbar is displayed the number of slides in the show, and which slide the user is currently viewing.
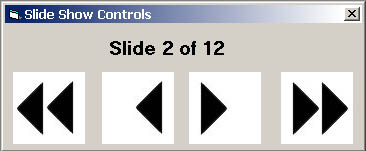
Figure 18:
These words and images are property of James C. Irwin, jcirwin@calpoly.edu
05/07/2002