
This manual describes tools to support the RSL language. The reader is assumed to be familiar with the basic concepts of RSL. For a complete description of the language, see the RSL Language Reference Manual, Version 2.0. There are three RSL tools, that can be used individually or in concert:
The Basic Translator provides facilities similar to a programming language compiler -- syntax analysis, type checking, and interactive interpretation. The browsers provide two different views of an RSL document. The Text Browser allows users to navigate through an RSL specification using a number of menus and textual links. The Graphic Browser allows users to view supporting pictures that aid in the understanding of the text.
- The Basic RSL Translator
- The RSL Text Browser
- The RSL Graphic Browser
The tools are built to run under the UNIX operating system. The Basic Translator can be run a standard terminal. The Browsers require the X Windows System.
The remaining sections of the manual describe the details of tool use. Section
2 describes the operation of the Basic Translator, including conversational
interpretation. Section 3 describes the Text Browser and Section 4 the Graphic
Browser. Section 5 explains how to construct browseable RSL documents by using
the browsers in edit mode. Sections 6 and 7 describe details of text editing
and graphics editing, respectively. Section 8 explains the details of the RSL
dataflow editor. Section 9 summarizes the tools execution environment.
2. Basic Translator
The RSL translator accepts input in the form of RSL source files and outputs messages regarding the outcome of the translation. The translator performs syntactic analysis, type checking, and interactive interpretation.
There are two means to invoke the translator: from the UNIX command line or
from the file selection menu within the browsers. Command line invocation is
described here; invocation from inside the browsers is described in later
sections of the manual.
Translator invocation from the UNIX shell has the following format:
rsl [options] file ...
The .rsl files contain the formal document text that defines the base specification. The .rsi files contain optional implementation modules, as described in Section 9 of the RSL Language Reference Manual. The .rsg files contain graphical views of the specification. These views are created with the RSL graphic editor, discussed in Section 5 of this manual. If no .rsi or .rsg files are listed explicitly on the command line, the translator will automatically search for them. That is, if f.rsl is the only command line file, the translator will search for f.rsi and f.rsg during translation.
Extension File Contents .rsl RSL requirements specification .rsi companion rsl implementation module(s) .rsg companion rsl graphics module(s)
Checking Module MThe checking of objects and operations proceeds in the lexical order encountered in the input files. If one or more errors occurs, an error message is output to stderr. Each error message indicates the text file, line number, and column number where the error was detected.
Checking object o1
Checking object o2
...
Checking operation o1
Checking operation o2
...
Figure 1 depicts the initial configuration of the text browser.
Figure 1: Initial Browser Configuration.
The primary function of the browser is to allow objects and operations to be easily located within the document text. The most typical means to locate is by double clicking on one of the names listed in the 'Objects' or 'Operations' windows. Doing so causes the selected name to be displayed in the 'Selected Entity' window. In addition, the definition of the selected name appears in the 'Text' window on the bottom of the screen.
The 'Text' window displays the contents of a single UNIX file. When another entity within the file is selected, the 'Text' window is scrolled to the definition of the newly selected entity. When an entity defined in a different file is selected, the contents of the 'Text' window is updated to contain the new file. While the 'Text' window contains only one file at a time, it is possible to display multiple files in multiple windows. Multiple window selection is described further below.
Whenever a browsing command causes the current entity to change, the context of the entire browser is updated accordingly. Specifically, the 'Objects' or 'Operations' window is scrolled to make the current entity visible and highlighted, if it is not already. Similarly, the definition of the current entity is made visible in the 'Text' window, and its name is highlighted there.
The context change also revises the top-level menubar. Specifically, new menus appear for the browseable attributes of the current entity. If the current entity is an object, the new top-level menus are:
If the current entity is an operation, all of the above menus apply, except that the 'Operations' menu is replaced by menus for 'Inputs' and 'Outputs'. Figure 2 shows an example where an operation has been selected in a specification with a large number of objects and operations.
- Components
- Parents
- Instances
- InstanceOf
- Operations
- Links
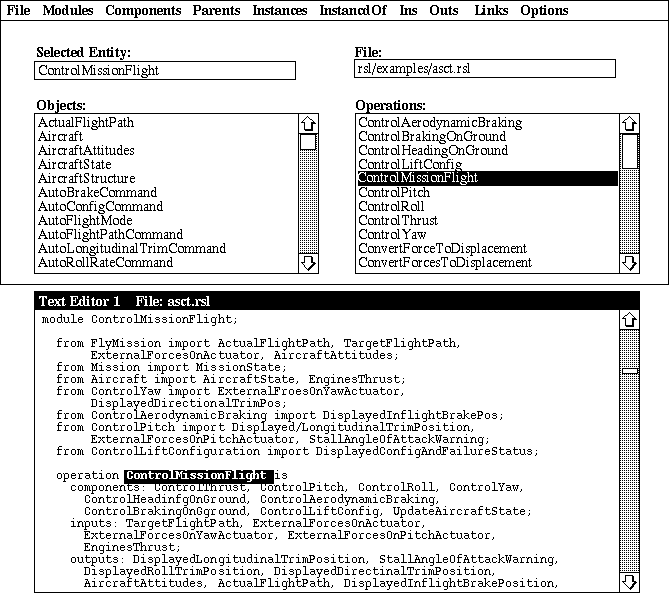
Figure 2: Browser Open on an RSL Specification.
The subsections that follow describe the details of each of the top-level
menus.
3.1. File Menu
The File menu contains the following entries:
These selections are used to deal with RSL specifications at the level of a UNIX text file (.rsl extension). Text files can be opened, closed, saved, textually searched, and displayed in multiple windows.
- Open
- Search Forw
- Search Back
- Goto Line
- New
- Windows ->
- Quit
Selecting 'Open' produces a file chooser dialog box. The user may select a file from the chooser, which file will be included with the currently active files in the browser. Before inclusion, the file is run through the RSL translator. 1 If the translator detects any errors, an error reporting window appears. The error window lists the translator error messages and the file is not included into the browser. If successfully translated, entities in the file can be located via browser commands. Note that the newly opened file does not automatically appear in the 'Text' window. This will happen when the browser locates one of the entities defined in the new file.
The 'Search Forw' and 'Search Back' selections perform textual search within the 'Text' window. Both commands present a dialog box in which the string to be searched is typed by the user. The dialog box contains standard buttons to confirm or cancel the search.
The 'Goto Line' selection moves through the 'Text' window to a specified line number. The line is centered and highlighted within the text window.
The 'New' selection opens a new text window. This allows multiple text files to be visible simultaneously, or multiple windows on the same file. The newly opened window becomes the currently active window. Subsequent browsing commands display results in the new current window.
The 'Windows ->' selection contains a submenu that lists the currently open windows by the name of file contained in each. Selecting one of the filenames causes its window to become current. This includes making the window fully visible if it is not already. Subsequent browsing commands will apply to the newly selected window.
The 'Quit' selection terminates execution of the browser.
3.2. Modules Menu
The 'Modules' menu lists the names of all modules defined in the RSL specification. Selecting one of the names from the 'Modules' menu causes the definition of the module to appear in the 'Text' window. There is no enforced correspondence between an RSL module and a UNIX file. Each file can contain zero or more modules. The only constraint that exists is that a single user- defined module cannot span multiple files.
As described in the RSL language manual, an RSL specification need not contain
any modules. That is, the specification can consist of a collection of object
and operation definitions appearing at the top-level of one or more files. For
specifications with this structure, the system creates a module named "Main" in
which the loose objects and operations implicitly appear. If the name "Main"
appears in the 'Modules' browser menu, this indicates that the RSL
specification contains loose definitions.
3.3. Components and Instances Menus
The 'Components' menu lists the names of the components of the currently selected entity. These are the entities that are listed in the components field of the current entity. Selecting one of the names on the 'Components' list causes the selection to become the current entity.
The 'Instances' menu lists the names of instances of the selected entity.
These are the entities defined as 'instance of' the current entity.
Selecting one of the names on the 'Instances' list causes the selection to
become the current entity.
3.4. Parents Menu
The 'Parents Menu' contains two further submenus: 'Component' and 'Class'.
These two menus list the names of hierarchical and class parents of the current
entity. Hierarchical parents are those entities in which the current entity
appears as a component. Class parents are those entities of which the
current entity is declared an instance of. Selecting one of the
parent names causes the selection to become current.
3.5. Inputs and Outputs Menus
These menus appear when the current entity is an operation. The menus list the
names defined as inputs and outputs for the current entity.
Selecting one of the input or output names causes the selection to become
current.
3.6. Operations Menu
This menu appears in place of the 'Inputs' and 'Outputs' menus when the current
entity is an object. The 'Operations' menu lists the names defined as
operations in the current entity. Selecting one of the operation
names causes the selection to become current.
3.7. Links Menu
This menu lists the names of the user-defined relational attributes for the current entity. As described in the language reference manual, a relational attribute defines a connection between two or more entities in an RSL specification. Consider the following example:
     object Obj is
         components: ... ;
         attr1: obj1, obj2, obj3;
         attr2: obj3, obj4, op1, op2, op3;
         attr3: obj5, op7, obj6
     end o;
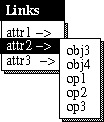
Figure 3: Sample Links Menu.
An important submenu of the 'Links' pulldown is 'Pictures'. This menu provides
the interface between the text and graphics browsers. It lists the names
defined in the pictures attribute of the current entity. Selecting
one of the picture names causes the picture to appear in a graphic browser
window. Further details of graphic browsing are defined in the next section of
the manual.
3.9. Options Menu
The 'Options' menu contains the following selections:
'Edit Mode' toggles between the read-only browser and the writable browser/editor. Details of editing are discussed in Section 5 of the manual. The default value is Off (i.e., browsing with no editing), unless the -e command line option is selected.
- Edit/Browse Mode
- Transient Menus On/Off
- Auto Graphics On/Off
- Translator Flags ->
- Show Options
- Redraw
'Transient Menus' toggles the manner in which the menubar is configured. With transient menus on, only non-empty menus appear in the menubar. For example, if the current entity contains components, but no instances or parents, then the 'Parents' and 'Instances' menus will not appear in the menubar. The default for 'Transient Menus' is Off.
The 'Auto Graphics' toggle relates to the maintenance of a companion Graphic Browser, if one is currently active. If 'Auto Graphics' is On, the companion Graphic Browser is automatically updated when the current entity is changed in the Text Browser. Specifically, the preferred picture of the newly selected entity becomes the current selection in the Graphic Browser. The "preferred" picture is the name listed first in the picture attribute of the current entity. If no picture attribute is defined for the current entity, then the state of the Graphic Browser is not updated. The default for 'Auto Graphics' is Off.
The 'Redraw' menu selection redraws the screen in the (rare) case that some
damage occurs.
4. Graphic Browser
Figure 4 depicts a sample graphic browser display.
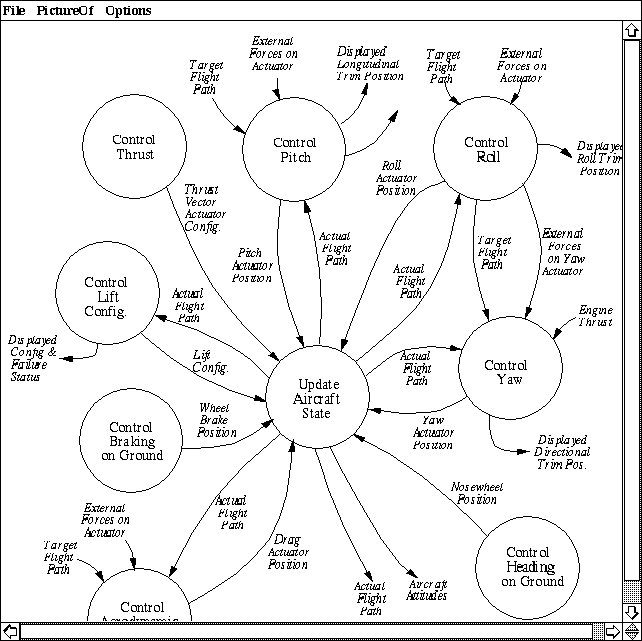
Figure 4: Sample Graphic Browser Display.
The graphic browser is intended primarily as an adjunct to the text browser. The text browser provides the primary means to navigate through an RSL specification. The graphic browser shows supporting picture information. Picture information is presented in two formats:
As in the Text Browser, the Graphic Browser maintains a current selection. In the case of the graphics window, the selection is chosen by clicking directly on one of the displayed graphic objects in the screen.
- Free-form drawings
- Dataflow diagrams (DFDs)
The subsections below describe the details of the Graphic Browser menus and
drawing formats. The next major section of the manual describes the creation
and editing of graphics.
4.1. File Menu
The File menu contains the following entries:
These selections are used to view pictures at the level of an RSL-graphic file (.rsg extension). Graphic files can be opened, searched by name, and displayed in multiple windows.
- Open
- Search
- Goto Position
- New
- Windows ->
- Quit
Selecting 'Open' produces a file chooser dialog box. The user may select a file from the chooser, which will be included with the currently active files in the browser. Before inclusion, the file is run through the RSL translator. If the translator detects any errors, an error reporting window appears. The error window indicates that an error in graphic translation occurred, and the file is not included into the browser. If successfully translated, pictures in the file are available for display in the graphic canvas (immediately below the menubar). As in the Text Browser, a newly opened file does not automatically appear in the canvas window. This will happen when the Text Browser locates one of the entities defined in the new file, and a picture link is followed. Graphic objects can also be located by searching within Graphic Browser itself. It is possible to view the graphic display in a stand-alone fashion, without an accompanying Text Browser; this is done using the 'Graphics Only' option described below.
The 'Search' selection performs a search for a graphic object by its name. The selection presents a dialog box in which the string to be searched is typed by the user. The dialog box contains standard buttons to confirm or cancel the search. If the named picture is found, the graphic window is scrolled so that the picture appears centered and highlighted in the window.
When a .rsg file is constructed, each object in the display is given a name, either explicitly by the user or by system default. These names can be used to search for objects. The names are also used to establish picture links from entities visible in the Text Browser. A further discussion on graphic naming is given in the next section of the manual.
The 'Goto Position' selection moves the graphics window such that the specified x,y position appears in the center of the window. X,y positions can be specified in pixels or points. A pixel is the smallest unit of graphic resolution available on the physical display screen. A point is 1/72 of inch, which is the standard unit of measure for text.
The 'New' selection opens a new graphics window. This allows the multiple graphic files to be visible simultaneously, or multiple windows on the same file. The newly opened window becomes the currently active window. Subsequent browsing commands display results in the new current window.
The 'Windows' selection contains a submenu that lists the currently open windows by the name of file contained in each. Selecting one of the filenames causes its window to become current. This includes making the window fully visible if it is not already. Subsequent browsing commands will apply to the newly selected window.
The 'Quit' selection terminates execution of the Graphic Browser only. It does
not terminate execution of the Text Browser, if one is currently active.
4.2. PictureOf Menu
This menu lists the names of RSL entities to which a picture link exists from the currently selected graphic object. The link information is taken from the pictures attribute in an RSL specification. Consider the following example:
     operation Op1 is
         components: ... ;
         pictures: Op1_Node, Op_Concept_Diagram;
     end Op1;


     operation Op2 is
         components: ... ;
         pictures: Op2_Node, Op_Concept_Diagram;
     end Op2;
The picture links can be many-way in both directions. An RSL entity can have
picture links to multiple pictures. A graphics object can be the picture of
one or more entities.
4.3. Options Menu
The 'Options' menu contains the following selections:
'Edit/Browse Mode' toggles between the read-only browser and the writable browser/editor. Details of editing are discussed in Section 5 of the manual. The default mode is 'Browse', unless the -e command line option is selected.
- Edit Mode On/Off
- Auto Text On/Off
- Graphics Only On/Off
- Redraw
'Auto Text' is the analog of the 'Auto Graphics' option in the Text Browser. If 'Auto Text is On, the companion Text Browser is automatically updated when the current object is changed in the Graphic Browser. Specifically, the entity of which the current graphic object is the preferred picture becomes the current selection in the Text browser. The "preferred" picture is the name listed first in the picture attribute of an entity. If the current graphic is preferred by more than one entity, then a dialog box will be used to resolve the ambiguity. If the current object is not the preferred picture of any entity, then the state of the Text Browser is not updated.
The 'Graphics Only' option allows the text browser to be used in stand-alone mode, without an accompanying Text Browser. With 'Graphics Only' set On, the most recently opened .rsg file will automatically be displayed in the graphic window.
The 'Redraw' menu selection redraws the screen in the (rare) case that some
damage occurs.
4.4. Picture Formats
As noted above, there are two picture formats available in the Graphic Browser. Free-form drawings can be linked to any RSL entity. They represent a form of "graphical comment" that aids the user in understanding a specification. A dataflow diagram is a specialized form of picture, depicting the input/output relationships between operations.
Both picture formats are created using the Graphic Browser, in editing mode.
This mode is described in the next section of the manual.
5. Creating Browseable Documents
In the default mode of the browsers, displayed text and graphics are not editable. With the 'Edit Mode' option selected, the text and graphics can be created and modified.
In 'Edit Mode', all of the browsing menus are removed, and a new Edit menu is
installed. Also, new options are added to the File menu. These menu changes
are the only immediate difference in the Text Browser when editing is enabled.
The operational difference is that the 'Text' windows are editable, using a
subset of the commands available in the Emacs text editor.
For the Graphic Browser, three new windows are added in edit mode:
The following subsections describe the basics of text and graphic editing. Sections 6, 7, and 8 describe details of text, graphics, and dataflow editing, respectively.
- A drawing palette, containing tools for drawing and manipulating graphic objects.
- A dataflow diagram palette, containing tools for creating dataflow nodes and links.
- A new menubar, with general commands for manipulating graphic documents.
An RSL text document is represented in fully standard ASCII text. Given this, RSL text can be edited in either the RSL Browser or any standard text editor. For large RSL documents, it is generally more convenient to edit in a standard UNIX editor, such as emacs or vi, since the browser editing facilities are not as powerful as those of standard UNIX text editors. It is also convenient to use a standard text editor when X Windows support is not available to support the RSL Text Browser.
An RSL graphic document must be created using the editing facilities of the Graphic Browser. Other X Windows drawing editors cannot be used, since they do not provide the means to name graphic objects such that the objects are linkable to RSL text.
To facilitate the creation of graphics, the editing facilities of the Graphic Browser are based on the idraw graphics editor (Version 2.6). Idraw is a popular, full-feature graphics editor, available on many UNIX workstations. The specialized RSL editor is called ridraw. It includes the following enhancements to standard idraw:
Given the collection of available tools, the following is the most practical methodology for creating browseable RSL documents, consisting of both text and graphics:
- The ability to name graphic objects, in order to establish RSL picture links.
- Specialized facilities for constructing dataflow diagrams.
- Create an RSL text document using a standard UNIX text editor. The Emacs editor provides the most power, since an RSL-mode has been written for Emacs.
- Create an RSL graphic document using the ridraw graphic editor. Provide names for graphic objects that correspond to names specified in RSL picture attributes.
- Run the translator on the text document to perform checking.
- Use the browser to navigate through the document.
- Use edit mode in the browsers to make minor updates to the RSL text and/or graphics.
Picture links are defined using a simple, symbolic connection technique. This allows RSL text documents to be 100% standard text, and facilitates a simple representation for RSL graphics. To create picture links, the following steps are performed:
- In the RSL text document, define picture attributes for all entities for which picture support is desired.
- Within the picture definition, provide unique picture names for each linkable picture.
- From Edit Mode of the Graphics Browser, provide matching names for all those names specified in picture attributes. This is accomplished by selecting 'Name Object' from the 'Option' menu in the Graphics browser. A dialog box will appear, into which the object name is entered.
Once edit mode is enabled, the potential exists to invalidate the linkage information upon which the Browsers rely. Since much of the linkage is based on textual positioning within files, even a small amount of editing can cause the Browsers' information to become invalid. This is the reason that all of the browsing commands become inoperable in Edit Mode. The inoperability is made apparent to the user by removal of the browsing menus.
To reenable browsing, the current collection of RSL files must be rescanned by the translator. This is accomplished using the 'Rescan' selection of the 'File' menu. This selection was added to the 'File' menu upon entry to 'Edit Mode'. When 'Rescan' is chosen, the translator performs its normal actions to check the RSL specification. If any errors are encountered, a scrollable text window is displayed, containing a list of standard translator error messages. Given errors, the browsing commands remain disabled. The errors can be repaired by additional editing, whereupon 'Rescan' is selected again.
Rescanning can also be accomplished by selecting 'Edit/Browse Mode On' from the 'Options' menu. When this selection is made, a dialog appears asking for confirmation of the rescan. If 'OK' is selected in the dialog, the rescan is performed and Edit/Browse Mode is set off, providing that all files translated successfully. If one or more files failed to translate, a warning dialog is displayed and the system remains in Edit mode.
Three other Edit-Mode selections are added to the File menu: 'Save', 'Save As', 'Save All'. These are used to save the contents of an edit window in a UNIX file. With 'Save', the current window is saved in the file from which it was originally opened. This is the file that is displayed in the 'File' subwindow on the browser screen. With 'Save As', a file chooser is displayed, from which the save file can be selected. The file selected with 'Save As' becomes the currently displayed file.
'Save' and 'Save As' save only the one file that is current. If more than one
text window is open, the 'Save All' command can be used to save the text in all
windows. The filename associated with each text window appears in the top-most
banner of the window. 'Save All' save each window to its associated file.
There is no 'Save All As' command.
6. Editing the Text Window
The editing facilities available in the 'Text' window are based on the Simple
Text Editor (sted) available in the InterViews library package. Sted editing
is in turn based on the Emacs text editor.
6.1. Editing Model
The text edit window has a single text selection that is displayed with reversed colors. If the selection is empty, an insertion caret is displayed instead. Characters typed into a window replace the current contents of the selection or add characters at the insertion point.
An emacs-like "minibuffer" is available at the bottom of the screen for
entering commands textually. Legal minibuffer commands are those available in
the Text Browser 'File' menu. The commands are precisely the same as those in
the menu -- the minibuffer simply provide an alternative means to invoke the
commands, for those users who prefer not the use the mouse while text editing.
6.2. Mouse Bindings
The left mouse button is used to select text. Clicking the left button in the text window selects a new insertion point; dragging the button selects a range of text. If the mouse is dragged outside the window, the display is scrolled to keep the selection point in view.
The middle and right mouse buttons provide different ways of scrolling with the
mouse. Scrolling can also be performed using the scrollbar in the normal way.
The middle mouse button does "grabber" scrolling. Clicking and dragging the
middle button causes the text to move along with the mouse. This scrolling
style is useful for fine control over small scrolling ranges. The right mouse
button does "rate" scrolling. Clicking with the right button and 'pulling
back' on the mouse causes the text to scroll upwards at a rate dependent on the
position of the mouse. 'Pushing forward' causes downwards scrolling. This
style of scrolling is useful for rapidly scanning through a large document.
6.3. Keyboard Bindings
For convenience, many operations can be performed from the keyboard. These operations include scrolling, cursor movement, and command execution. The keyboard bindings mimic similar bindings in standard emacs:
Key Binding
ESC-V backward page CTRL-V forward page CTRL-P backward line CTRL-N forward line CTRL-B backward character CTRL-F forward character ESC-< beginning of buffer ESC-> end of buffer CTRL-A beginning of line CTRL-E end of line CTRL-D delete character DEL delete backward character ESC-= goto CTRL-S search CTRL-X-CTRL-V visit CTRL-X-CTRL-F file CTRL-X-K close CTRL-X-CTRL-C quit 7. Editing the Graphics Canvas
The graphics editing facilities available for the 'Graphic Canvas' are based on the idraw editor, available in the InterViews library package. As noted above, the two idraw enhancements are object naming and dataflow diagram creation.
The idraw-based editor contains four windows, as shown in Figure 5:
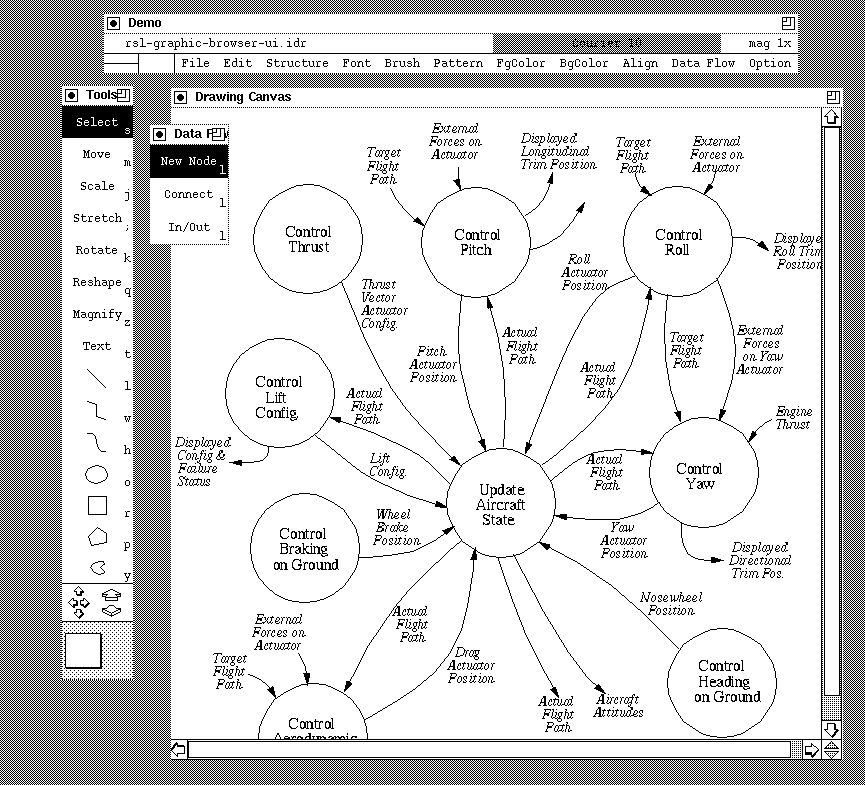
Figure 5: The Idraw-Based Graphics Editor.
Details of the tools palette and command menubar are described in this section. Dataflow editing is described in Section 8.
- A Tools palette, initially positioned at the left.
- A Dataflow palette, initially to the right of the 'Tools'
- A horizontal command menubar, along the top.
- A Drawing Canvas, in which the graphic objects are drawn.
7.1. Drawing Tools
The drawing tools are:
The first five tools ('Select' through 'Reshape') manipulate existing graphics. 'Magnify' makes a part of the view expand to fill the entire view. The last eight tools ('Text' through 'Closed Spline') create new graphics. The shift key constrains the last group of drawing tools if pressed at the same time as mouse the click that begins drawing. The current drawing tool is selected by clicking on its palette item or typing its associated character. The current drawing tool is highlighted when selected. Clicking the left mouse button in the drawing area invokes the current drawing tool. Details of drawing tool operation follow.
- Select
- Move
- Scale
- Stretch
- Rotate
- Reshape
- Magnify
- Text
- Line
- Multi Line
- Open Spline
- Ellipse
- Rectangle
- Polygon
- Closed Spline
- A zoomer panner
7.1.1. Select
'Select' selects a graphic whether or not it is already selected. All other selections are deselected. The selection is indicated by the appearance of small squares around the enclosing rectangle of the selected graphic. These are the selection handles.
By holding down the shift key, 'Select' retains the previous selections while including an unselected graphic or excluding a selected graphic. If the button is pressed outside any graphic, all of the selections are cleared. A group of objects can be selected by dragging a rubberband rectangle around the group. As a shortcut, the right mouse button invokes 'Select' while the mouse is in the drawing area.
7.1.2. Move
'Move' moves graphics from one location in the drawing canvas to another. As a shortcut, the middle mouse button invokes 'Move' while the mouse is in the drawing area. A selection of multiple graphics is moved in the same manner as a single graphic.
7.1.3. Scale, Stretch, and Rotate
These tools perform the graphic transformations suggested by their names. 'Scale' scales graphics about their centers. 'Stretch' stretches graphics vertically or horizontally while tying down the opposite edge. 'Rotate' rotates graphics about their centers according to the angle between two radii: the one defined by the original clicking point and the one defined by the current dragging point.
7.1.4. Reshape
To invoke 'Reshape', the user moves one of a graphic's selection handles. The handle will be moved and the affected area of the graphic will be reshaped accordingly. Nothing happens with reshape applied to an ellipse or circle because these objects do not have handles suitable for dragging. Reshape on text enters text editing mode, in which the text can be changed using emacs- like keystrokes. Text edit mode is terminated when the mouse is used to perform some other command.
7.1.5. Magnify
'Magnify' enlarges the part of the drawing specified by dragging a rectangle to fill the entire view. Idraw limits magnifications to powers of two between predefined minimum and maximum magnifications.
7.1.6. Text
'Text' creates text. The user clicks at the text insertion point in the drawing canvas. Emacs-style keystrokes are used to edit the text as well as enter it. Text mode is terminated when the mouse is used to perform some other command.
7.1.7. Line, Multi Line, Open Spline, Ellipse, Rectangle, Polygon, Closed Spline
These tools draw the graphic shape suggested by their names. The drawing is initiated by clicking the left mouse button on the drawing canvas and then dragging the mouse to another point. Four of the tools draw objects containing multiple points: 'Multi Line', 'Open Spline', 'Polygon' and 'Closed Spline'. To draw these shapes, the user drags the mouse to each successive point and clicks the left mouse button. Any button except the left mouse button terminates the drawing.
For 'Line' and 'Multi Line', the shift key constrains the line segments to lie on either the vertical or horizontal axis. For 'Open Spline' and 'Closed Spline', the shift key constrains each control point to lie on either the vertical or the horizontal axis with the preceding point. For 'Ellipse', the shift key constrains the ellipse to the shape of a circle. For 'Rectangle', the shift key constrains the rectangle to the shape of a square. For 'Polygon' the shift key constrains each side to lie on either the vertical or the horizontal axis.
7.1.8. Zoomer Panner
At the bottom of the drawing tools palette is a "Zoomer/Panner" control device. The device contains the following controls
The panning controls move the drawing within the boundaries of the physical window in which the drawing is displayed. Each of the four panning arrows moves the drawing a small amount in the indicated direction. The panning arrows are an alternative to the horizontal and vertical scroll bars attached to the drawing canvas. Panning automatically updates the scroll bars, and vice versa.
- four small arrows, for panning
- two larger arrows, for zooming
- a white box over a grey background, also for panning
The zooming buttons enlarge or shrink the drawing by powers of two. The upward facing zoomer enlarges (zooms in); the downward facing zoomer shrinks (zooms out).
The panning box shows the relative size of the drawing with respect to the viewing window. The grey area in the panning box shows the amount of the drawing that cannot currently be seen. The white area in the panning box shows the size of the window. Moving the window box over the grey area pans the window over the drawing. If a drawing is fully visible within the current window, then the panning box is entirely white. Zooming and resizing the window, affect the panning box by enlarging or reducing the relative sizes of window and drawing.
7.2. Command Menus
Pulldown menus appear in the horizontal menubar initially placed above the drawing canvas. The menus are:
These commands are executed by pulling down the menu and releasing the mouse button on the command or by typing the character associated with the command.
- File
- Edit
- Structure
- Font
- Brush
- Pattern
- FgColor
- BgColor
- Align
- Dataflow
- Option
7.2.1. File Menu
The 'File' menu contains the following commands to operate on files. The keystroke shown in parentheses after the command name is the keyboard shortcut for the command.
'New' opens a new window with an unnamed blank drawing. 'Open...' displays a file chooser which is used to browse the file system looking for an existing drawing to open. The drawing is opened in the currently active window. 'Open Unnamed Drawing...' displays the same form of file chooser as 'Open...'. 'Open Unnamed' is used to open a drawing that was created by a standard version of idraw, in which object names were not specified. 'Open Unnamed' is provided as a convenience to open plain idraw drawings, which can then be saved with names for integration with the RSL browser. 'Save As...' saves the current drawing in a file chosen in a dialog box. 'Save' saves the current drawing in the file it came from. If more than one drawing window is open, the 'Save All' command can be used to save all of them.
- New (CTRL-N)
- Open ... (CTRL-O)
- Open Unnamed Drwing ... (CTRL-U)
- Save (CTRL-S)
- Save As ... (CTRL-A)
- Save All (CTRL-B)
- Open Dataflow (<)
- Save Dataflow (>)
- Print ... (CTRL-P)
'Open Dataflow' and 'Save Dataflow' operate on dataflow diagrams. Details are given in Section 8 of the manual.
'Print...' prints the current drawing by sending it through a UNIX pipe to a command entered in a dialog box. For example, "lpr -Pps" will send the file to the printer named "ps" (presumably the local PostScript printer). The bold rectangular outline (called the "page boundary") appearing in the drawing area indicates the portion of the drawing that will appear on the printed page. To print a drawing larger than a single page, use 'Select All' to select the entire drawing, and move a different portion of the drawing within the page boundary.
7.2.2. Edit Menu
The Edit menu contains the following commands to edit graphics:'Undo' retracts the last done change to the drawing. Successive 'Undo' commands undo earlier and earlier changes back to the last stored change and then do nothing. 'Redo' restores the last undone change to the drawing. Successive 'Redo' commands redo later and later changes up to the first change undone by 'Undo' and then do nothing. Any new changes cause all undone changes to be forgotten.
- Undo (U)
- Redo (R)
- Cut (x)
- Copy (c)
- Paste (v)
- Duplicate (d)
- Delete (CTRL-D)
- Select All (a)
- Flip Horizontal (_)
- Flip Vertical (|)
- 90 Clockwise (])
- 90 CounterCW ([)
- Precise Move ... (M)
- Precise Scale ... (J)
- Precise Rotate ... (K)
'Remove' extracts the selected graphics from the drawing and places them in a file called ".clipboard" in the user's home directory for later retrieval. 'Copy' copies the selected graphics into the clipboard. 'Paste' pastes copies of the graphics in the clipboard into the drawing. Together, 'Cut', 'Copy', and 'Paste' allow the user to transfer graphics between multiple instantiations of ridraw simply by cutting graphics out of one view and pasting them into another.
'Duplicate' duplicates the selected graphics and adds the copies to the drawing. 'Delete' destroys the selected graphics. 'Select All' selects every graphic within the drawing canvas.
'Flip Horizontal' flips the selected graphics into their mirror images along the horizontal axis. 'Flip Vertical' flips the selected graphics into their mirror images along the vertical axis. '90 Clockwise' rotates the selected graphics 90 degrees clockwise. '90 CounterCW' Rotates the selected graphics 90 degrees counterclockwise.
'Precise Move...' moves graphics by exact amounts which are typed in a dialog box. Movements are specified in units of screen pixels or points. 'Precise Scale...' scales graphics by exact amounts which are typed in a dialog box. Scalings are specified in terms of magnifications along the axes. 'Precise Rotate...' rotates graphics by exact amounts which are typed in a dialog box. Rotation is specified in degrees.
7.2.3. Structure Menu
The 'Structure' menu contains the following commands to modify the structure of the drawing, that is, the order in which graphics are drawn:
'Group' nests the selected graphics in a newly created group. A group is just a graphic which contains other graphics. 'Group' allows the user to build hierarchies of graphics. 'Ungroup' dissolves the selected groups. 'Ungroup' reverses a 'Group' operation. If a group contains several subgroups, each successive ungroup dissolves each nested group, in reverse order of group creation.
- Group (g)
- Ungroup (u)
- Bring To Front (f)
- Send To Back (b)
- Number of Graphics (#)
'Bring To Front' brings the selected graphics to the front of the drawing so that they are drawn on top of (after) the other graphics in the drawing. 'Send To Back' sends the selected graphics to the back of the drawing so that they are drawn behind (before) the other graphics in the drawing.
'Number of Graphics' counts and displays in a pop-up window the number of selected graphics, recursively adding the number of graphics nested inside groups among the selected graphics. 'Select All' followed by 'Number of Graphics' counts the total number of graphics in the drawing.
7.2.4. Font Menu
The 'Font' menu contains a set of fonts with which to print text. When the current font is set from the menu, the font of all the selected graphics objects in the drawing canvas is also set. A font indicator in the upper right corner displays the current font.
7.2.5. Brush Menu
The 'Brush' menu contains a set of brushes with which to draw lines. When the current brush is set from the menu, the brush for all the selected graphics objects in the canvas is also set. The nonexistent brush draws invisible lines and non-outlined graphics. The arrowhead brushes add arrowheads to lines', multi lines', and open splines' starting point, ending point, or both. These graphics can be freely stretched or scaled without affecting the arrowheads' size. A brush indicator in the upper left corner displays the current brush.
7.2.6. Pattern Menu
The 'Pattern' menu contains a set of patterns with which to fill graphics but not text. Text always appears solid, but a different color than black can be used to obtain a half-toned shade. When the current pattern is set from the menu, the pattern is also set for all the selected graphics objects in the canvas. The nonexistent pattern draws unfilled graphics while the other patterns draw graphics filled with a bitmap or a half-toned shade. 7.2.7. Fgcolor and BgColor Menus
These menus contain a set of colors with which to draw graphics and text. When the current foreground or background color is set from the FgColor or BgColor menu, the foreground or background colors are set for all the
selected graphics objects in the canvas. The "on" bits in the bitmaps for
dashed lines and fill patterns appear in the foreground color while the "off" bits appear in the background color. A black and white printer will print a half-toned shade of gray for any color other than black or white. The brush, pattern, and font indicators all reflect the current colors.7.2.8. Align Menu
The Align menu contains the following commands to align graphics with other graphics:
The first graphic selected stays fixed while the other graphics move in the order they were selected, according to the type of alignment chosen. The last Align command, Align To Grid, aligns each selected graphic's lower left corner with the nearest point in a grid of points spaced every 8 printer's points (one ninth of an inch).
- Left Sides (1)
- Right Sides (2)
- Bottoms (3)
- Tops (4)
- Vertical Centers (5)
- Horizontal Centers (6)
- Centers (7)
- Left To Right (8)
- Right To Left (9))
- Bottom To Top (0)
- Top To Bottom (-)
- Align To Grid (.)
7.2.9. Option Menu
The Option menu contains the following commands:
'Reduce' reduces the magnification by a factor of two so the drawing's size decreases by half. 'Enlarge' enlarges the magnification by a factor of two so the drawing's size doubles. 'Normal Size' sets the magnification to unity so the drawing appears at actual size. 'Reduce to Fit' reduces the magnification until the drawing fits entirely within the view window. 'Center Page' centers the view window over the center of the 8.5 by 11 inch page.
- Reduce (i)
- Enlarge (e)
- Normal Size (n)
- Reduce To Fit (=)
- Center Page (/)
- Redraw Page (CTRL-R)
- Gridding on/off (,)
- Grid visible/invisible (?)
- Grid spacing ... (S)
- Orientation (+)
- Name Object (O)
- Show Object Name (N)
'Gridding on/off' toggles the grid's constraining effect on or off. When gridding is on, new graphics will use only grid points as their points, existing graphics will move or scale only in grid-sized units, and so forth. 'Grid visible/invisible' toggles the grid's visibility on or off. When visibility is on, ridraw draws a grid of equally spaced points behind the drawing. 'Grid spacing...' changes the grid spacing to a value (in units of printers' points of which there are 72.07 to an inch), entered in a dialog box.
'Orientation' toggles the drawing's orientation. If the editor was formerly showing a portrait view of the drawing, it will now show a landscape view of the drawing and vice versa.
'Name Object' provides a name for the selected object in the drawing canvas. As described earlier, this name is referenced in RSL picture attributes to establish text-to-graphics links. 'Show Object Name' displays the name of the currently selected object. If objects are not explicitly named by the user, the system provides names of the form "ObjXXX", where "XXX" is an integer between 0 and the number of created objects.
8. Editing Dataflow Diagrams
Figure 5 depicts the interface display to the dataflow tool, which is integrated within the general-purpose drawing editor. The dataflow tool allows a variety of data flow diagrams to be developed and edited. The user is allowed to specify the shape of the nodes in a diagram, connect nodes with splines or straight lines, and annotate the diagram with graphics and text using a normal features of idraw. Diagrams can be organized into levels on multiple display canvases. "Next level" and "parent" links can be established to nodes at different levels.
When connections are made between nodes, the system retains the connections by moving the endpoint(s) to the edge of the node(s) to which they are connected. When a node is moved, the edges connected to the node are automatically modified so that they remain connected to the node. Also, the connector labels are moved so that they retain their relationship to the connections that they label.
As shown in the Figure, the data flow editing is integrated with the graphics editor. This allows the user to annotate the dataflow diagrams with explanatory graphics and text.
The data flow palette contains three functions that are initiated by clicking the mouse on the display canvas. The 'Data Flow' pulldown menu is located in the menubar between 'Align' and 'Option'. The menu contains five operations, described below.
8.1. Data Flow Functions
There is a current function associated with the dataflow palette. The current function is always highlighted, and can be changed by clicking the mouse on an unhighlighted palette item. Following is a brief description of each of the functions.
8.1.1. NewNode
To create a new node, the user selects 'New Node' in the dataflow palette, and clicks anywhere on a drawing canvas. A node appears containing a text cursor that prompts the user to enter a name for the node. If no name is entered (i.e., some other operation is immediately performed), then a default name is given to the node. The user can later edit the name using the normal text edit function in the drawing palette (i.e., 'Reshape' after selecting the text). The name can also be relocated within the node, but the system will not allow the name to be moved outside of the boundaries of the node.
8.1.2. Connect Nodes
To connect two nodes, the user selects 'Connect Node' in the dataflow palette, and clicks the left mouse button within the boundaries of a node. The user then drags the mouse, with the left button down, and releases the left button at the location of each point desired in the connecting spline. When the final point of the spline is defined, the user clicks the middle mouse button. This final point must be within the boundaries of a node, or the spline disappears. If a valid connector has been drawn, a cursor appears prompting for connector name. As with the 'New Node' function, if no name is entered, a default name is generated for the connector.
8.1.3. In/Out Connector
To define an input or output connector for a node, the user selects 'In/Out' in the data flow palette, and clicks the left mouse button on the display canvas. The user then draws a spline in the same manner as with the 'Connect Nodes' function. However, the 'In/Out' function requires that exactly one of the endpoints of the spline be within the boundaries of a node, not two, and if this requirement is not met the spline will disappear. If a valid connector has been drawn, a cursor appears prompting for a connector name. As with the 'New Node' and 'Connect' functions, if no name is entered, a default name is generated for the connector.
8.2. Data Flow Operations
The 'Dataflow' menu contains dataflow operations that do not require mouse gesturing on the display canvas. Some of these operations are dependent on what object is selected on the display canvas. A dataflow object is selected with 'Select' from the tools palette, in the same manner that a standard graphics object is selected.
8.2.1. New Level
The 'New Level' operation opens a new display canvas and allows the user to locate the canvas on the screen. If a node is selected in the original display canvas, a virtual "next level" connection is made between that node and the new canvas. Next level connections allow users to traverse through a multiple- canvas diagram in a hierarchical manner.
8.2.2. Levelize
When a display canvas becomes crowded, the can use the 'Levelize' command to move a group of nodes and connectors to another canvas at the next level of detail. When 'Levelize' is chosen, a new canvas is opened, and all selected nodes and connectors on the original canvas are moved to the new canvas. The transplanted nodes are replaced by a single "parent" node, and the user is prompted to enter a name for the parent. All nodes still on the original canvas that were connected to transplanted objects are connected to the new parent node. A next level connection is automatically made between the parent node and the new canvas.
8.2.3. Goto Next Level
The user can traverse a next level connection by selecting the 'Goto Next Level' operation. When this operation is performed, the system checks the next level connection of the node selected on the display canvas. If the next level connection exists, the canvas containing the next level of dataflow is made visible (if necessary), de-iconified (if necessary), and raised to the forefront of the screen.
8.2.4. Set Next Level
The 'Set Next Level' command allows the user to explicitly set the next level connection of the object selected on the display. When this operation is chosen, a dialog box appears, prompting the user to enter the name of the canvas that should be connected to the selected object.
8.2.5. Set Default Node
The user can change the shape of the node that is created with subsequent 'New Node' commands. This is performed by drawing a graphic with drawing tools on the graphics palette, selecting the object using the 'Select' function, and choosing the 'Set Default Node' command. When this operation is chosen, the system copies the internal representation of the object selected on the display and uses it as the shape of all new nodes created. This default object can be a rectangle, an ellipse, or a polygon, and can have any size and color.
8.3. Saving and Loading Diagrams
The idraw 'File' menu contains two additional commands to save and load data flow diagrams. Diagrams can be saved in two formats: a textual format that can be reloaded into the dataflow tool, or in postscript format for printing purposes. The 'Save Datafow' command saves files for subsequent reloading with the 'Load Dataflow' command. The normal idraw 'Save' and 'Save As' commands create a postscript file. Postscript files can also be loaded in to the dataflow tool, but the document loaded will be raw graphics, with no special relationships between nodes and connectors.
9. Summary of the Execution Environment
The RSL tools have been developed to run under the UNIX operating system. The translator is written in ANSI C, using standard UNIX versions of the YACC and LEX compiler tools. To date, the translator has been made on four UNIX platforms: SUN3, SUN4, AIX, and HPUX. It is reasonable to expect that the translator can be built on other UNIX systems, given ANSI C, YACC, and LEX. It should also be possible to port the Basic Translator to a non-UNIX system, given that ANSI C, YACC, and LEX are available.
The browsers run under the X Windows system. The browsers are written in C++, using version 2.6 of the InterViews interface library. To date, the browsers have been built on the SUN3 and SUN4 platforms. It is reasonable to expect that the browsers can be built on other UNIX systems, as long as the InterViews library is available.
When X Windows support is not available, the basic translator can run without the browser. This allows RSL text to be composed and checked on a plain ASCII terminal.
Footnotes: