| Requirements | Specification | Prototype | Design | Implementation | Testing | Administration | Documentation |
|
|||||||||
|
This introductory scenario shows an instructor creating a grade book. An instructor usually creates a grade book at the beginning of each school term. In these scenarios, the instructor is assumed to be registered with Student Information Systems (SIS) at Cal Poly. Each grade book starts off blank, unless an instructor has decided to load a saved grade book template (covered later in this section).
The instructor can upload student rosters or create templates in either order. Uploading student rosters updates the current grade book roster, deleting and adding students as necessary. In this scenario, the instructor downloads the student roster before creating assignments.
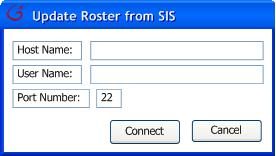
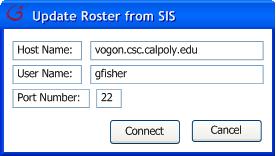
To upload students from the roster SIS provides, the instructor selects 'Update roster from SIS.' In response, the system displays the dialog shown in Figure 8. The figure shows a form that contains fields needed to connect to SIS. The 'Host Name' field is the name of the SIS server where the instructor can receive and submit grades. The 'User Name' field is the user name Cal Poly gives the instructor, which is the same as his/her Cal Poly e-mail account. The 'Port Number' by default is 22 to securely transfer files, but the instructor can change it. All fields must be completed to download the rosters. Click 'Connect' to continue.
|
|
|
Figure 8 |
Figure 9 |
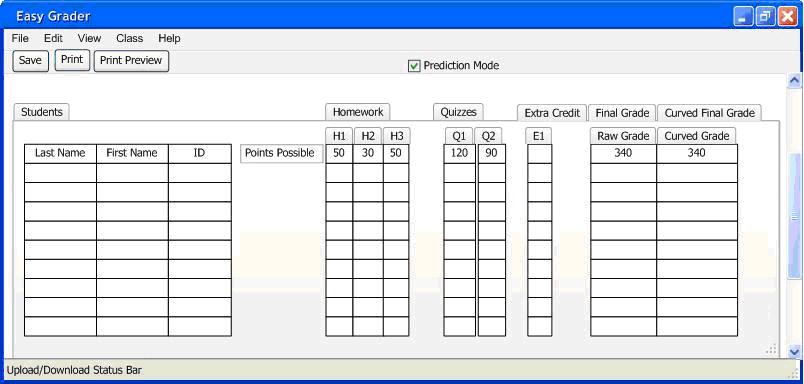
When the roster finishes downloading, the three leftmost columns fill up with students' information. The instructor is ready to start creating assignments.
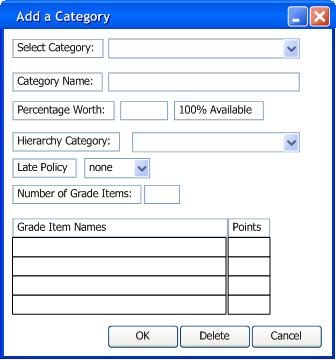
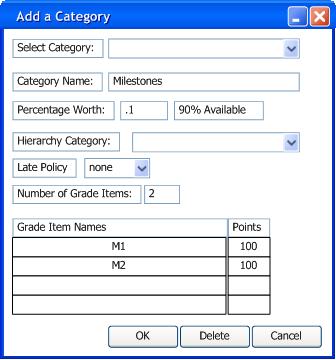
When the instructor selects 'Class->Add->Category,' a dialog window shown in Figure 10 appears. The figure has several optional fields, with 'Category Name' being mandatory to enter. The field 'Category Name' is the title of the Category, which accepts a one-line string. The field 'Percentage Worth' accepts numbers and determines the amount of importance the overall Category has over the final grade. The text next to the 'Percentage Worth' field indicates how much more weight they can allot to the Category. An optional field is the 'Hierarchy Category,' which determines which category the current one will be placed under. 'Late Policy' is a progressive grading option that will be further explained in Section 2.3. 'Number of Grade Items' is a field that accepts positive integers. The table below lists 'Grade Item Names' and expands depending on how many 'Number of Grade Items' the instructor enters. The number of cells clickable in 'Grade Item Names' corresponds to the 'Number of Grade Items' entered. For example, in Figure 11, the instructor can only enter two 'Grade Item Names' because he/she selected to have only 2 'Number of Grade Items.' The 'Points' field accepts positive integers and determines how many points a grade item is worth. Figure 11 shows how much weight is available after entering the percentage in the field. Click 'OK' to continue. Click 'Delete' to remove the Category.
|
|
|
Figure 10 |
Figure 11 |
After setting up the category column, the instructor creates grade items (which are individual assignments) within the category. The instructor also has the option to create categories within categories. Find more information about creating individual assignments and N level deep categories in Section 2.?. Figure 12 shows the result of adding several categories and grade items. By default, the three leftmost columns that contain students' names and IDs are added to the grade book once a category is made. The text 'Points Possible' lingers next to the first row, indicating that the row displays the maximum points possible for any particular grade item.
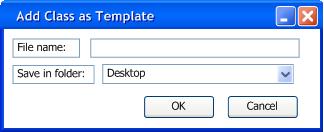
At this point, the instructor has the option to save the assembled assignments
for future use as a template. To save the sheet, the instructor selects
'Class->Save Category as
Template.' Figure 13 shows the dialog window that pops up.
The field 'Name' accepts strings
and titles the template. The field 'Save
in folder' gives the instructor the option to choose which folder to save
the template to. The instructor is ready to being grading.