2.3.0 Editing by an Individual Class/Class Section
The user may change contents of the gradesheet under the 'Class' menu bar. The
scenarios in this section show a user the process of editing a gradesheet.
These contents are teacher-interface restricted. Teacher-assistant and students
do not have access to these commands. The topics includes:
* Adding/editing a category
* Adding/editing grade items
* Adding/editing students
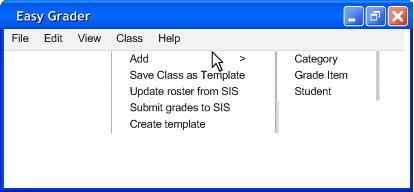
The user starts with moving the mouse and clicking on the 'Class' menu command.
See figure 14. Figure 14 displays what happens when 'Class' menu is clicked. The
drop-down menu has additional commands such as 'Add', 'Save Category as
template', 'Update roster from SIS', 'Submit grades to SIS', and 'Create
template'. This scenario only covers the 'Add' section. When the user moves the
mouse over the 'Add', the menu 'Category', 'Grade item', and 'Student' appears.
Afterwards, the user selects which content they wish to add/edit.
Figure 14
2.3.1 Adding/editing a category
The user select the 'Class' menu command, move the mouse over 'Add' and select
'Category' to add/edit a category to the current gradesheet. Refer to figure 14
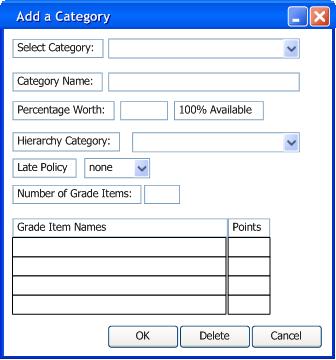
to see the 'Class' menu commands. Once 'Category' has been selected, a new
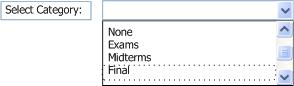
window pops up. See figure 15. Figure 15 shows a new window, with information to
be fill in order to add a category. At the top is the 'Select Category:' field.
By clicking the arrow in this field, a list of existing categories appears. If
the user selects a previous category, then the information of that previous
category will be loaded on the window. If not, the user has to fill in
information about the new category.
Figure 15
Below the 'Select Category' is the 'Category Name:' The user has to input a name
for the new category or change the name if the user is editing. Below 'Category
Name:' is 'Percentage Worth:' The user enters a value of how much this category
is worth to the whole class. Next to this field is a text informing the
user how much percentage are available as a portion of the class.
If the user wishes to place the current category within a category, the
'Hierarchy Category' field allows the user to bind the current category under
the 'Hierarchy Category'. Below 'Hierarchy Category:' are 'Late Policy' and
'Extra credit'. Details of these fields will be explain later.
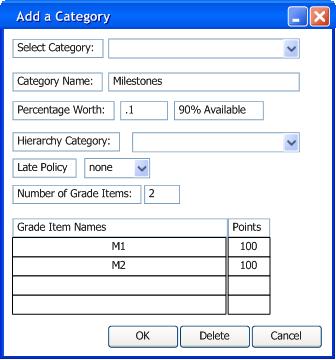
Figure 16 is an example of editing a category. Figure 16 displays how the
windows looks like after loading a previous category from 'Select Category:'. It
has a name, the percentage worth, tally of other categories, does not have a
higher category, no late policy, extra credit is on, and displays 2 grade items.
The 'Number of grade items:' field is an information section for the user. This
field tells the user what grade items is underneath the current category, if
any.
Figure 16
When the user is finish with filling or editing, the user has to click 'Ok'
button at the bottom of the window to save any changes. To delete the current
category, the user click on the 'Delete' button, which is also at the bottom of
the window. If the user clicks 'Cancel', the category window closes.
2.3.3 Creating/editing a grade item
The user select the 'Class' menu command, move the mouse over 'Add' and select
'Grade item' to add/edit an grade item. Refer to figure 14 to see the 'Class'
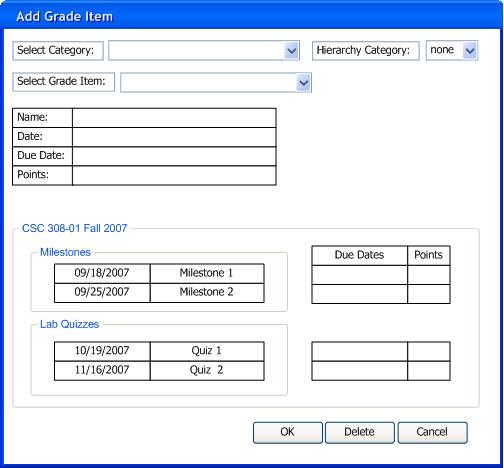
menu commands. Selecting 'Grade item' opens a new window. See figure 17 for the
example window. In this new window, there are blank fields to be fill out by the
user. The user has not select a category so the 'Hierarchy Category:' is
none. There is no grade item selection if the user did not 'Select Category:'.
The data information field is blank; there is no name, date, due date, and
points. At the bottom of the screen is a listing of grade items that already
exists.
Figure 17
To add a new grade item, the user first click on 'Select Category'. Depending on
which grade item the user wishes to add or edit, the user must select the
corresponding category to place under. See figure 18. Figure 18 is a small
picture displaying the down-arrow button with categories. Next to 'Select
Category:' is the 'Hierarchy Category:' which tells the user which category the
current category is under, if any.
Figure 18
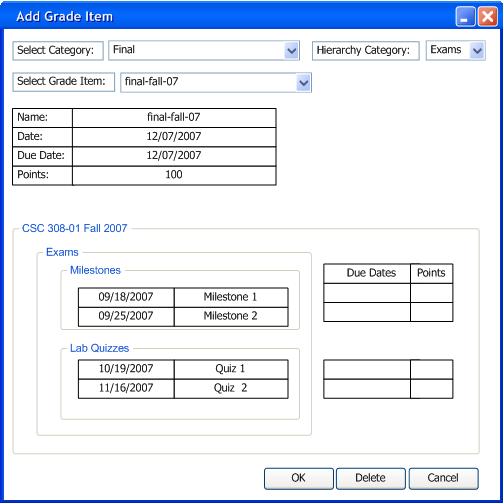
Second, if the user is adding then user must enter a name in the 'Name:' field
beneath the 'Select Grade item:' field. The user also has to enter the date, due
date, and the amount of points it is worth. See figure 19 as an example. Figure
19 is editing a grade item and has all the fields loaded. The user is editing a
grade item that is under the category "Final", and the 'Hierarchy Category' of
final is "Exams". The "Final" category only has 1 grade item and the name, date,
due date, and points worth is shown for that grade item.
Figure 19
Details of how grade items points relate to category percentage worth will be
explain in the future.
Alternatively, if the user wants to edit a grade item, the user selects a grade
item in 'Select Grade item:' field. Refer back to figure 19. By pressing the
down-arrow button, a listing of grade items appears and selecting one loads
information about that grade item onto the screen.
At the bottom of the screen is a listing of grade items. The listing of grade
items have categories as the header to show which grade items is in which
category. It also has the date it was assigned, the name of the grade item, the
due date, and the amount of points worth. If the user wishes to delete any grade
items, the user can move their mouse to the bottom right screen and click
'Delete'. Click 'Ok' to save any changes, and 'Cancel' to close the window.
2.3.4 Adding/Editing Students
At any time the user may wish to add a new student to the gradesheet that is not
on the roster. To do so, the user select the 'Class' menu command , move the
mouse over 'Add' and select 'Student'. Refer to figure 14 to see the 'Class'
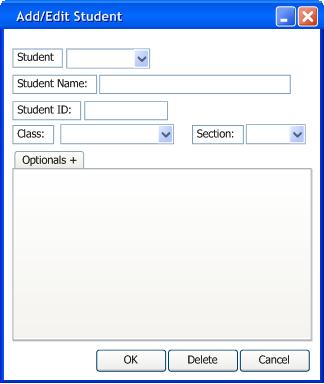
menu commands. In response, the system pops up a new window. Figure 20 shows
this new window. At the top of figure 20 is the ' Student:' field with the
down-arrow button for editing any previous students. Underneath 'Student:' field
is the information field for the user to enter a new student. The user must
provide a 'Student Name' and 'Student ID'. The 'Class' field and 'Section:'
field is for the system to know which gradesheet to add the student to. There
are also additional information the user may wish to enter, but those are
optional. Details of these optional information will be explain in the future.
Figure 20
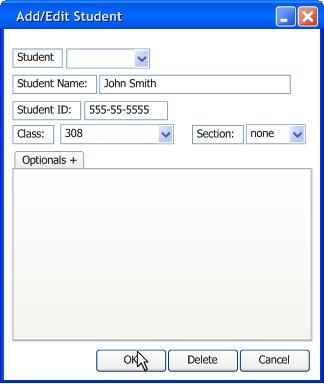
See figure 21 as an example of adding a new student. Since the user is not
editing a student, the 'Student:' field is blank. The user indicates the new
student's name and ID number, and specify the class to add. Since the class 308
does not have any other sections, the 'Section:' field is none.
Figure 21
Once the user is finish filling in information, the user clicks on "Save" at the
bottom of the screen to save changes made. Click 'Delete' to delete a student,
and 'Cancel' to close the window.