Developing Entity Relationship Diagrams
(ERDs)
WHY:
Entity Relationship Diagrams are a major
data modelling tool and will help organize the data in your project into
entities and define the relationships between the entities. This process
has proved to enable the analyst to produce a good database structure so
that the data can be stored and retrieved in a most efficient manner.
INFORMATION:
Entity
A
data entity is anything real or abstract about which we want to store data.
Entity types fall into five classes: roles, events, locations, tangible
things or concepts. E.g. employee, payment, campus, book. Specific examples
of an entity are called instances. E.g. the employee John Jones,
Mary Smith's payment, etc.
Relationship
A
data relationship is a natural association that exists between one or more
entities. E.g. Employees process payments. Cardinality defines the
number of occurrences of one entity for a single occurrence of the related
entity. E.g. an employee may process many payments but might not process
any payments depending on the nature of her job.
Attribute
A
data attribute is a characteristic common to all or most instances of a
particular entity. Synonyms include property, data element, field. E.g.
Name, address, Employee Number, pay rate are all attributes of the entity
employee. An attribute or combination of attributes that uniquely identifies
one and only one instance of an entity is called a primary key or
identifier.
E.g. Employee Number is a primary key for Employee.
AN ENTITY RELATIONSHIP DIAGRAM METHODOLOGY:
(One way of doing it)
|
1. Identify Entities
|
Identify the roles,
events, locations, tangible things or concepts about which the end-users
want to store data.
|
|
2. Find Relationships
|
Find the natural
associations between pairs of entities using a relationship matrix.
|
|
3. Draw Rough ERD
|
Put entities in
rectangles and relationships on line segments connecting the entities.
|
|
4. Fill in Cardinality
|
Determine the number
of occurrences of one entity for a single occurrence of the related entity.
|
|
5. Define Primary
Keys
|
Identify the data
attribute(s) that uniquely identify one and only one occurrence of each
entity.
|
|
6. Draw Key-Based
ERD
|
Eliminate Many-to-Many
relationships and include primary and foreign keys in each entity.
|
|
7. Identify Attributes
|
Name the information
details (fields) which are essential to the system under development.
|
|
8. Map Attributes
|
For each attribute,
match it with exactly one entity that it describes.
|
|
9. Draw fully attributed
ERD
|
Adjust the ERD from
step 6 to account for entities or relationships discovered in step 8.
|
|
10. Check Results
|
Does the final Entity
Relationship Diagram accurately depict the system data?
|
A SIMPLE EXAMPLE
A company has several departments. Each
department has a supervisor and at least one employee. Employees must be
assigned to at least one, but possibly more departments. At least one employee
is assigned to a project, but an employee may be on vacation and not assigned
to any projects. The important data fields are the names of the departments,
projects, supervisors and employees, as well as the supervisor and employee
number and a unique project number.
1. Identify Entities
The entities in this system are Department,
Employee, Supervisor and Project. One is tempted to make Company an entity,
but it is a false entity because it has only one instance in this problem.
True entities must have more than one instance.
2. Find Relationships
We construct the following Entity Relationship
Matrix:
| |
Department |
Employee |
Supervisor |
Project |
| Department |
|
is
assigned |
run
by |
|
| Employee |
belongs
to |
|
|
works
on |
| Supervisor |
runs |
|
|
|
| Project |
|
uses |
|
|
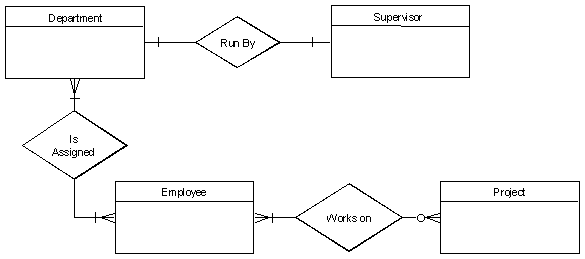
3. Draw Rough ERD
We connect the entities whenever a relationship
is shown in the entity Relationship Matrix.

4. Fill in Cardinality
From the description of the problem we
see that:
-
Each department has exactly one supervisor.
-
A supervisor is in charge of one
and only one department.
-
Each department is assigned at least
one employee.
-
Each employee works for at least
one department.
-
Each project has at least one employee
working on it.
-
An employee is assigned to 0 or more
projects.
5. Define Primary Keys
The primary keys are Department Name,
Supervisor Number, Employee Number, Project Number.
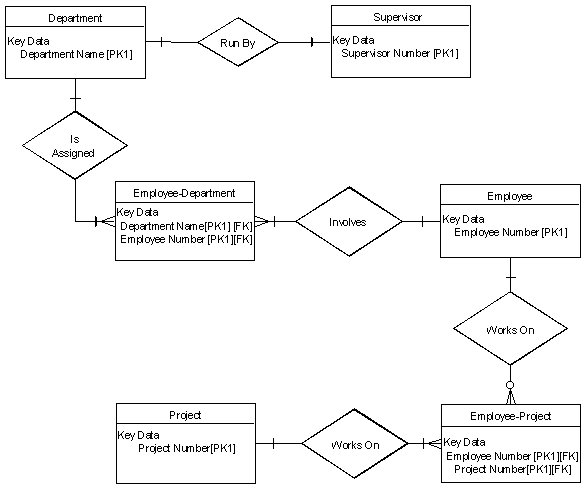
6. Draw Key-Based ERD
There are two many-to-many relationships
in the rough ERD above, between Department and Employee and between Employee
and Project. Thus we need the associative entities Department-Employee
and Employee-Project. The primary key for Department-Employee is the concatenated
key Department Name and Employee Number. The primary key for Employee-Project
is the concatenated key Employee Number and Project Number.
7. Identify Attributes
The only attributes indicated are the
names of the departments, projects, supervisors and employees, as well
as the supervisor and employee NUMBER and a unique project number.
8. Map Attributes
Attribute
|
Entity
|
Attribute
|
Entity
|
Department Name
|
Department
|
Supervisor Number
|
Supervisor
|
Employee Number
|
Employee
|
Supervisor Name
|
Supervisor
|
Employee Name
|
Employee
|
Project Name
|
Project
|
|
|
Project Number
|
Project
|
9. Draw Fully Attributed ERD

10. Check Results
The final ERD appears to model the data
in this system well.
FURTHER DISCUSSION:
Step 1. Identify Entities
A data entity is anything real or abstract
about which we want to store data. Entity types fall into five classes:
roles, events, locations, tangible things, or concepts. The best way to
identify entities is to ask the system owners and users to identify things
about which they would like to capture, store and produce information.
Another source for identifying entities is to study the forms, files, and
reports generated by the current system. E.g. a student registration form
would refer to Student (a role), but also Course (an event), Instructor
(a role), Advisor (a role), Room (a location), etc.
Step 2. Find Relationships
There are natural associations between
pairs of entities. Listing the entities down the left column and across
the top of a table, we can form a relationship matrix by filling in an
active verb at the intersection of two entities which are related. Each
row and column should have at least one relationship listed or else the
entity associated with that row or column does not interact with the rest
of the system. In this case, you should question whether it makes sense
to include that entity in the system.
. A student is enrolled in one or more courses
subject verb objects
Step 3. Draw Rough ERD
Using rectangles for entities and lines
for relationships, we can draw an Entity Relationship Diagram (ERD).
Step 4. Fill in Cardinality
At each end of each connector joining
rectangles, we need to place a symbol indicating the minimum and maximum
number of instances of the adjacent rectangle there are for one instance
of the rectangle at the other end of the relationship line. The placement
of these numbers is often confusing. The first symbol is either 0 to indicate
that it is possible for no instances of the entity joining the connector
to be related to a given instance of the entity on the other side of the
relationship, 1 if at least one instance is necessary or it is omitted
if more than one instance is required. For example, more than one student
must be enrolled in a course for it to run, but it is possible for no students
to have a particular instructor (if they are on leave).
The second symbol gives the maximum
number of instances of the entity joining the connector for each instance
of the entity on the other side of the relationship. If there is only one
such instance, this symbol is 1. If more than 1, the symbol is a crows
foot opening towards the rectangle.
If you read it like a sentence, the
first entity is the subject, the relationship is the verb, the cardinality
after the relationship tells how many direct objects (second entity) there
are.
I.e. A student is enrolled in one or more courses
subject verb objects
Step 5. Define Primary Keys
For each entity we must find a unique
primary key so that instances of that entity can be distinguished from
one another. Often a single field or property is a primary key (e.g. a
Student ID). Other times the identifier is a set of fields or attributes
(e.g. a course needs a department identifier, a course number, and often
a section number; a Room needs a Building Name and a Room Number). When
the entity is written with all its attributes, the primary key is underlined.
Step 6. Draw Key-Based ERD
Looking at the Rough Draft ERD, we may
see some relationships which are non-specific or many-to-many. I.e., there
are crows feet on both ends of the relationship line. Such relationships
spell trouble later when we try to implement the related entities as data
stores or data files, since each record will need an indefinite number
of fields to maintain the many-to-many relationship.
Fortunately, by introducing an extra
entity, called an associative entity for each many-to-many relationship,
we can solve this problem. The new associative entity's name will be the
hyphenation of the names of the two originating entities. It will have
a concatenated key consisting of the keys of these two entities. It will
have a 1-1 relationship with each of its parent entities and each parent
will have the same relationship with the associative entity that they had
with each other before we introduced the associative entity. The original
relationship between the parents will be deleted from the diagram.
The key-based ERD has no many-to-many
relationships and each entity has its primary and foreign keys listed below
the entity name in its rectangle.
Step 7. Identify Attributes
A data attribute is a characteristic common
to all or most instances of a particular entity. In this step we try to
identify and name all the attributes essential to the system we are studying
without trying to match them to particular entities. The best way to do
this is to study the forms, files and reports currently kept by the users
of the system and circle each data item on the paper copy. Cross out those
which will not be transferred to the new system, extraneous items such
as signatures, and constant information which is the same for all instances
of the form (e.g. your company name and address). The remaining circled
items should represent the attributes you need. You should always verify
these with your system users. (Sometimes forms or reports are out of date.)
Step 8. Map Attributes
For each attribute we need to match it
with exactly one entity. Often it seems like an attribute should go with
more than one entity (e.g. Name). In this case you need to add a modifier
to the attribute name to make it unique (e.g. Customer Name, Employee Name,
etc.) or determine which entity an attribute "best' describes. If you have
attributes left over without corresponding entities, you may have missed
an entity and its corresponding relationships. Identify these missed entities
and add them to the relationship matrix now.
Step 9. Draw Fully-Attributed ERD
If you introduced new entities and attributes
in step 8, you need to redraw the entity relationship diagram. When you
do so, try to rearrange it so no lines cross by putting the entities with
the most relationships in the middle. If you use a tool like Systems Architect,
redrawing the diagram is relatively easy.
Even if you have no new entities to
add to the Key-Based ERD, you still need to add the attributes to the Non-Key
Data section of each rectangle. Adding these attributes automatically puts
them in the repository, so when we use the entity to design the new system,
all its attributes will be available.
Step 10. Check Results
Look at your diagram from the point of
view of a system owner or user. Is everything clear? Check through the
Cardinality pairs. Also, look over the list of attributes associated with
each entity to see if anything has been omitted.