Resolving Conflicts with Subversion in NetBeans
The most frustrating aspect of version control is resolving
conflicts. This activity will walk you through the steps to
manage this situation. This lab will require about 20 minutes
to complete.
Prerequisites
The instructor must have prepared the repository by importing the source code and setting SVN_WRITE permission for anonymous.You must have installed NetBeans ver 6.5 or later. (These directions are for version 6.5 and up.)
You should have completed the basic Subversion Practice activity.
Overview
This activity is carried out in pairs. You will simulate collaborative development of a Java class. Select a partner and find a lab where you can work at adjacent workstations. Print one copy of the instructions below. Take turns reading the directions aloud for the other person to follow. Cross off each step as it is completed and pass the paper back and forth to the appropriate developer for each step. You should look at each other's monitor to observe the effect of the commands.Checkout the NetBeans project
Checkout the repository into NetBeans (both developers do this step).
- Start NetBeans.
- (Ver 6.5) From the menubar select Versioning > Subversion >
Checkout.
(Ver 6.9) From the menubar select Team > Subversion > Checkout.
In the Checkout dialog, enter
Repository URL: https://wiki.csc.calpoly.edu/svn/csc308/Sandbox/ConflictTraining
User/Password.
- Click Next. (Observe "connecting to Subversion Repository"
progress bar).
- In the Folders to Checkout dialog, enter
Repository folder: ConflictTraining
Uncheck the box: Skip "ConflictTraining" and checkout only its content
Check the box: Scan for NetBeans Projects after Checkout.
Verify Local Folder: /path/to/folder/NetBeansProjects
Click Finish. - Checkout Completed dialog will appear. Click Open Project.
- ConflictTraining will appear in the Projects panel.
- In the project pane,
expand the project node (ConflictTraining),
expand Source Packages,
expand the conflicttraining package to list the current classes.
Modify the project
You will be enhancing the application to include a new Java Class.(Developer
A)
Create a new class file.
- Right-click on conflicttraining package and from the context menu select New and then Java class. The New Java Class dialog appears.
- In the Class Name field, enter SingerXXYY where XX is the first developer's initials and YY is the second developer's initials. Click Finish.
- The edit window opens showing the skeleton source code for the new class. The file name in the project pane will be colored green because the new file isn't yet part of Subversion.
- In the edit window add a main method to the class; copy and paste
the following code:
static
final
String
kSong
=


"Row,
row,
row
your
boat,\n"

            +
"Gently down the stream,\n"

            +
"Merrily, merrily, merrily, merrily,\n"

            +
"Life is but a dream.\n";

    public static void main(String[] args)

    {

        System.out.println(kSong);

    }
- Save the file. (Ctrl-S)
- Right-click on the file in the project pane and from the context
menu select Run File (or press Shift-F6). The file will execute and the
output will appear in the NetBeans output window.
- After verifying the output is correct, close the output window.
- Right-click on the file in the project pane and choose
Subversion > Show Changes
- NetBeans displays a Subversion status window. Your new file
should appear with a status "Locally New".

- Click the "Update All" icon.

- It's unlikely, but possible, that someone else picked the same
filename as you and created the same file since you began this
activity. If they completed the activity before you did, when you do
"Update All" you'll get this error:
... an
unversioned
file
of the same name already exists
If that happens, right-click and delete the file, then choose a different filename, and go back to step 1 of this section. - Right-click on the file and choose "Commit". Enter a Commit Message such as "Adding new file SingerXXYY.java" Click the Commit button.
- The Subversion status window should clear and the file color turns from green to black.
(Developer B)
Modify
the
file.
- In the project pane, right-click on Source Packages, and from
the context menu select Subversion > Update. This updates your
working copy with the most recent additions in the repository.
- In the project pane,
expand the project node (ConflictTraining),
expand Source Packages,
expand conflicttraining package.
Double-click on SingerXXYY.java - The file should open in the editor so you can modify the source code. Change "boat" to "raft".
- Run File (Shift-F6) and verify that your change appears properly
in the output window. Close the output window.
- In the project pane, right-click on the Source Packages, and from
the context menu select Subversion > Show Changes.
NetBeans displays a Subversion status window. Your new file should appear in blue with a status "Locally Modified"
- Right-click on SingerXXYY.java and from the context menu select Commit. Enter a Commit Message such as "File: SingerXXYY.java changed "boat" to "raft". Click the Commit button.
- The Subversion status window should clear and the file color
turns from green to black.
(Developer
A)
Create a non-conflicting modification
- Let's pretend you are starting a new work session but you forgot
to do the all important update.
- Open SingerXXYY.java in the editor so you can modify the source code. Change "stream" to "river".
- Run File (Shift-F6) and verify that your change appears properly
in the output window. Close the output window.
- In the Subversion window the status says "Locally Modified".
- Right-click on SingerXXYY.java and from the context menu select Update.
- When the update completes, click once in the editor window to
give it focus, and it will refresh and show "boat" has been changed to
"raft". Since this change is on a different line than your change,
there's no
conflict and status still says "Locally Modified". You were lucky
this time you made a non-conflicting modification.
- Right-click on SingerXXYY.java and from the context menu select Commit. Enter an appropriate log message. Click the Commit button.
- The Subversion status window should clear and the file text color turns from blue to black.
(Developer B)
Create
a
conflicting
modification
- Let's pretend you are starting a new work session but you forgot
to do the all important update.
- Open SingerXXYY.java in the editor so you can modify the source code. Change "Gently" to "Swiftly".
- Run File (Shift-F6) and verify that your change appears properly
in the output window. Close the output window.
- In the Subversion window the status says "Locally Modified".
- Right-click on SingerXXYY.java and from
the context menu select Update.
- On no! The dreaded Warning dialog appears: "Subversion update
operation created local conflicts." Your modification occurred on
the same line as your collaborators. Bad news.
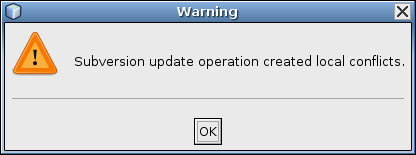
Click OK to close the warning message.
- In the Subversion window the filename is red and the status is
"Local Conflict." Subversion inserted annotations into the source
file that appear in the editor window indicating where the conflict is
located.
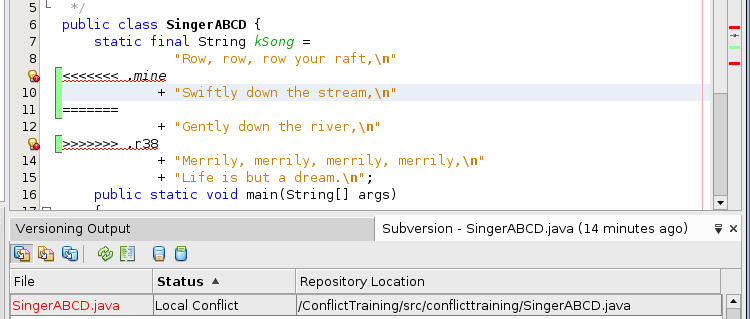
Observe in the project pane that Subversion has also created three additonal files:
a copy of your changed file (SingerXXYY.java.mine),
the original you worked with (SingerXXYY.java.rM)
and the newest file in the repository (SingerXXYY.java.rN). - You have two options available to you and you need to consider
carefully to determine the best action.
1. Delete your local changes. (Lose your work). This is called "revert". Your code will be overwritten by the newest file in the repository (written by someone else). This is painful but sometimes the easiest solution. Console yourself with the realization that everything is impermanent. (Directions provided in Subversion Practice activity.)
2. Manually resolve the differences (merge the changes). Analyze the differences between files to determine which should be retained. This usually requires contacting the other developer to come to agreement about the proper action. NetBeans provides a side-by-side display to assist you in identifying the necessary changes.
- To analyze the conflict: In the Subversion window, right-click on
the "red" SingerXXYY.java and choose Resolve Conflicts to open the
Merge Conflicts Resolver tab.
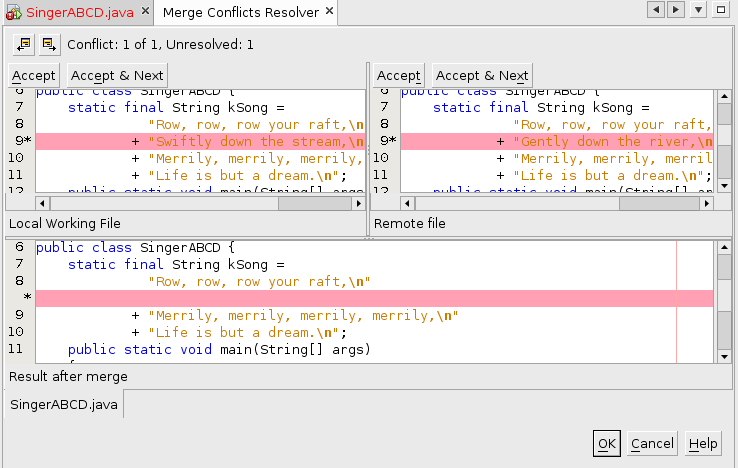
- In some situations it becomes clear by examining the side-by-side
display that one version or the other is the one to be retained, in
which case you can simply click the Accept button.
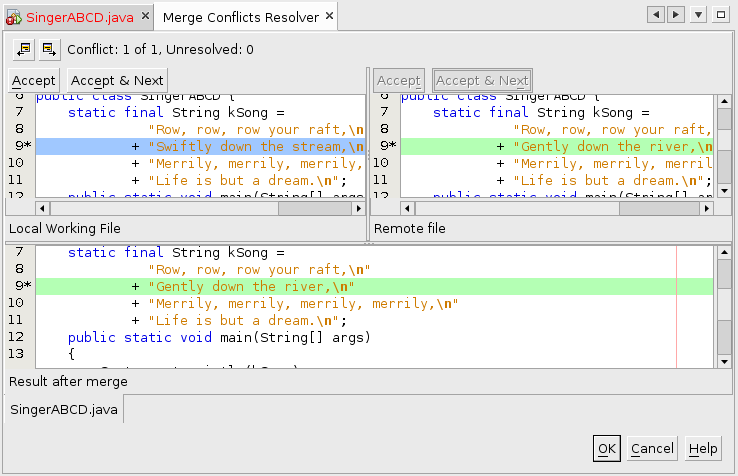
But what if you want to retain both "Swiftly" and "river"? - Cancel the Merge Conflicts Resolver. In the edit window, manually merge the desired changes and remove the annotation lines. The result should be "Swiftly down the river".
- In the Subversion window, right-click on the "red" SingerXXYY.java and choose Resolve Conflicts. The Status changes to "Locally Modified".
- Run File (Shift-F6) and verify that your change appears properly in the output window. Close the output window.
- Right-click on SingerXXYY.java and from the context menu select Commit. Enter an appropriate log message. Click the Commit button.
- The Subversion status window should clear and the file text color turns from blue to black.
(Developer A) View merged changes
- In the project pane, right-click on Source Packages, and from the context menu select Subversion > Update. This updates your working copy with the most recent additions in the repository.
- In the project pane,
expand the project node (ConflictTraining),
expand Source Packages,
expand conflicttraining package. - Right-click on SingerXXYY.java and from the context menu select Local History > Show Local History. A new tab appears listing the dates every past version of the file was committed. Click on the most recent date and observe a side-by-side display of the historical version of the file.
- (Version 6.9) Right-click on SingerXXYY.java and from the context menu select Subversion > Versioning Info. A popup window displays file info, including Last Changed Revision, Date, and Author.
- Open a terminal window and navigate to the project src folder. Enter: svn log songXXYY.java
- Observe the Subversion log entries.
If you neglected to enter log messages, return to step 1 and perform the entire activity over, and include log messages.svn log SingerABCD.java
------------------------------------------------------------------------
r39 | cdalton | 2011-01-22 16:58:18 -0800 (Sat, 22 Jan 2011) | 1 line
File SingerABCD.java changed Gently to Swiftly.
------------------------------------------------------------------------
r38 | aburton | 2011-01-22 15:40:55 -0800 (Sat, 22 Jan 2011) | 1 line
File SingerABCD.java changed stream to river
------------------------------------------------------------------------
r37 | cdalton | 2011-01-22 15:33:52 -0800 (Sat, 22 Jan 2011) | 1 line
File SingerABCD.java changed boat to raft.
------------------------------------------------------------------------
r36 | aburton | 2011-01-22 14:47:43 -0800 (Sat, 22 Jan 2011) | 1 line
Adding new file SingerABCD.
------------------------------------------------------------------------
- Copy-and-paste the log output into a text file
and print it.
Alternatively, enter: svn log songXXYY.java | lpr
to print directly. - Write both developers names on the printout and submit it at the start of the next class meeting.
Avoiding Conflicts
How to avoid conflicts?- Have separate work assignments so that only one developer is responsible for a file and is the only person modifying it.
- ALWAYS update at the start of a work session, and before you make any commits.
- Update and commit often, like every 30 minutes, instead of every two hours, so that you won't accumulate a large mass of uncommited (and potentially conflicting) code.
- Be particularly careful not to create conflicts in GUI auto-generated code. Repairing them can be difficult or impossible, as the IDE won't let you manually modify the code.