Practice with Model-View-Controller architecture
Goal: To understand how the MVC design pattern is implemented in Java.
Objective: Modify an application to use a Controller.
TemperatureMVC is a simple application that allows the user to
raise/lower/set the current temperature.
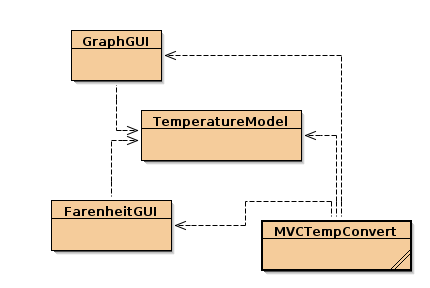 There are four classes in the
application:
There are four classes in the
application:
TemperatureModel is the
data model.
FarenheitGUI is a text
field and button GUI.
GraphGUI is a gauge
display.
TemperatureApp is the main
driver.
The FarenheitGUI class
combines both the view and the controller.
Your objective is to decompose the FarenheitGUI class so that the
controller is in a separate class. This will provide a more
flexible and testable solution. In particular it will enable
creation of alternate (e.g. non-graphical) user interfaces, and it will
facilitate automated testing by being able to drive the application without a GUI.
Directions
1. Download the application source code
(zip file). It is a BlueJ
project. It can be opened in either BlueJ or NetBeans with the Bluej plugin. Or you
can use command line Java.
2. Run the application and perform the Raise, Lower, and Set functions
to observe their effect.
3. Create a new class, Controller,
that
implements ActionListener.
Move
the actionPerformed()
method from FarenheitGUI to Controller. Add a constructor
method.
4. Modify the main method in the application class to instantiate the
controller. There are a few other minor modifications you
must make in order for the application to compile. (Steps 2 and 3
take only ten minutes once you identify the necessary changes.)
5. Once the program compiles, its runtime behavior should be exactly
the same as the original.
6. Create a new class, TestDriver,
with
a main method that tests all the functions of the
controller. You may simply output the results to the
console. The driver should invoke the raise, lower, and set
functions by calling actionPerformed()
directly, and then accessing the model to obtain its current
state and printing it.
7. We have learned that test drivers like the one we created in
step 6 are not an effective way to write tests because it relies on a
human inspector to verify the printed output. So convert the
driver into a JUnit test, ControllerTest.
(You may omit this step if you haven't used JUnit before
and you don't have the 30 minutes it takes to
read
the tutorial.
8. Print the source code for the classes and the output from the test
driver and staple them in this order:
- ControllerTest
- TestDriver
- Controller
- FarenheitGUI
- TemperatureApp
- Output from tests (Steps 6 and 7)