
The jGrasp environment is installed and properly configured for your use in the Computer Science department labs. Even so, many students opt to setup a similar environment on their home computers. This guide is meant to assist you in so doing.
jGrasp is actually an integrated development environment that wraps the gnu compiler collection (gcc). jGrasp is not itself a compiler. As such, the first step is to install gcc. These instructions are intended for Windows users.
If you are using Linux, then you should already have gcc installed and can just install jGrasp. If you are using MacOS X, then you can install gcc by installing the XCode package from your installation CD. Once done, download jGrasp from jGrasp download page and install it. Note that jGrasp uses the Java runtime environment (JRE). If you already have the JRE installed (e.g., if you can view Java applets in your browser), then you can just download jGrasp. If not, then you will have to use the link at the top of the jGrasp download page to download and install the JRE.
Windows users should continue to the next step. There are some other options for installing gcc, but this is one of the simpler options.
Get the latest version of the gcc installer here:
http://sourceforge.net/projects/mingw/files/Installer/mingw-get-setup.exe/download
To simplify the use of gcc and to allow jGrasp to find this compiler, you may have to modify the Path environment variable for Windows. To do this, right-click on the My Computer icon and select Properties or, from the Start menu, open the Control Panel and select System. Once opened, click the Advanced tab, and depress the Environment Variables button (see the highlighted image below). Scroll down to the Path variable and click Edit. At the end of the text field add ;C:\Program Files\gcc\bin (if you extracted the files to a different location, then you will use that location instead). Caution: Do not delete the path that is currently set. Just add to the end of it.
There are two things to note here. First, each portion of the path variable is separated by a semicolon (;). This is required, so if you run into problems, carefully check your addition to the path. Second, you want to include the bin (meaning binary) directory (folder) as part of the path (note the end of the path in the image). This directory contains the executables (the applications or programs in Windows terminology) for the compiler and its associated utilities. After you modify the path, be sure to click the Ok button for each dialog window.
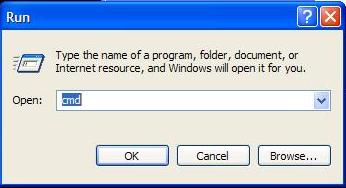
As a quick sanity check, open a command shell by selecting Run from the Start menu and executing cmd.
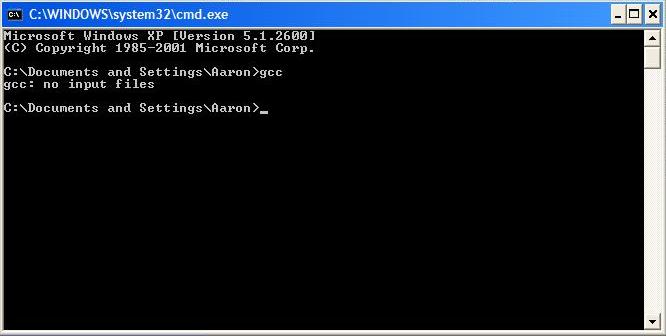
In the command window, type gcc. If your path is set correctly, you will see a response from the compiler such as that shown below.
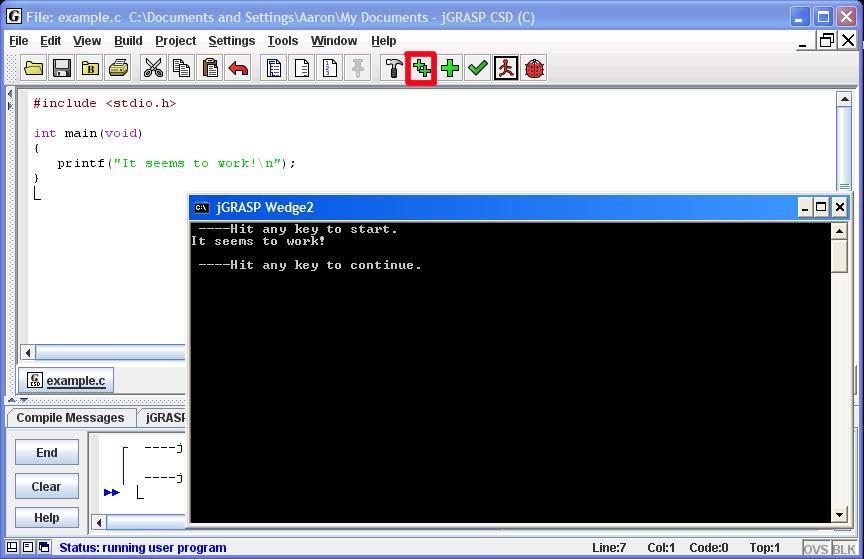
With gcc installed, the next step is quite straightforward. Download and installjGrasp. Next, try compiling and running the example illustrated in the following image. After typing the source code, you can compile and link the program by clicking on the icon that has two plus symbols (highlighted below). If it builds correctly (which it should as long as you have correctly installed the compiler), then you can execute the program by clicking the running stick figure icon.
GETTING STARTED WITH jGRASP
The very first thing we have to do is to figure out how to start up the development environment and create a program. This part of the lab is somewhat tedious but perhaps somewhat satisfying in an i-got-my-vcr-programmed-correctly kind of way.
jGrasp is installed on the lab machines, and on the workstations in the CSL. To launch jGRASP, select Applications -> Programming -> jGrasp. If that does not work, jsut type jGrasp from any terminal window.
Most likely you have not used jGRASP before, so you need to
configure it with the appropriate options for the way we intend to use
it. This is a one-time-only chore required the first time you use
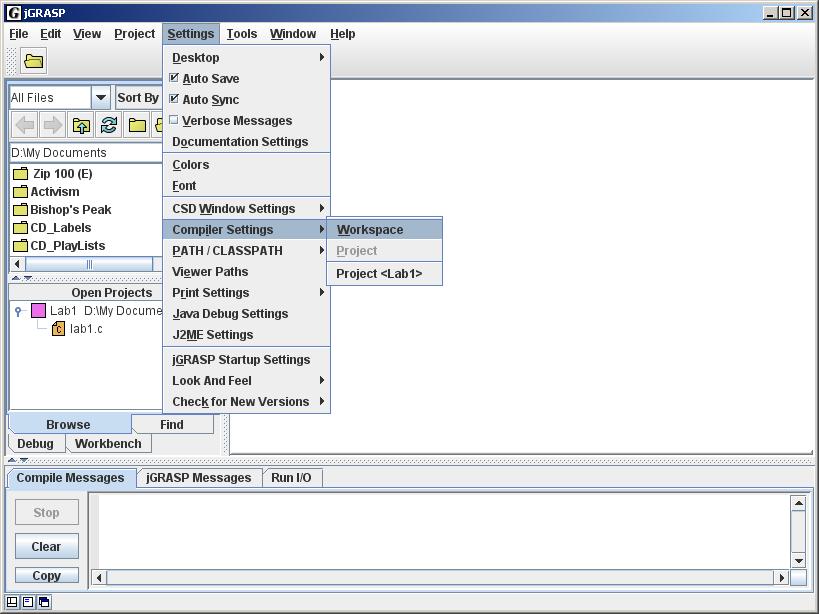
jGRASP. Choose the "Settings -> Compiler
Settings -> Workspace" menu.
We want to set default options so jGRASP know we are creating C
programs (and not some other language).
Therefore,
choose "C" from the drop-down "Language"
menu. Next,
click on the "Flags / Args / Main" tab just below the
drop-down menu.
We want to set the same options in the "C/L",
"Compile", and "Check" fields. In each of
these,
click the checkbox to the right of the text field (to enable the text
field)
and then enter the following text, exactly as it appears here:
-Wall -ansi -pedantic
The capitalization is important. To summarize briefly: the hyphens are a traditional UNIX syntax for "with the following option." The first one is short for "warnings: all", the second one for "use the ansi standard," and the third one for "please be pedantic."
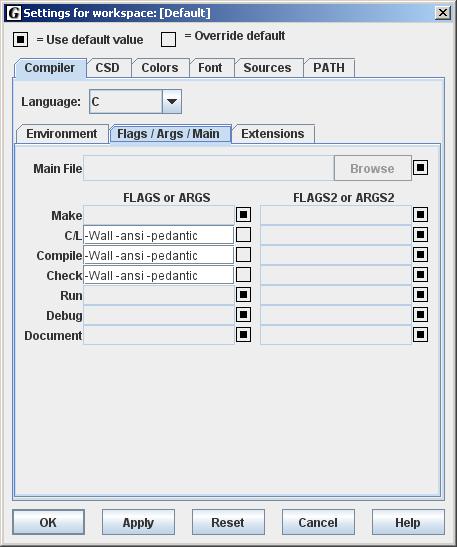
After entering this text in all three of the boxes, click "OK."
Now that you have set
these options you should not have to alter them again.
At this point, you can create a simple program. From the File menu, choose
"New -> C".
At this point jGRASP should open a new blank text window with
"jGRASP CSD (C)" in the title bar. Now you can type a program
into this text window.
You may copy-and-paste the text in the box below into the jGRASP
editor window.
#include <stdio.h>


  /* Print a simple message to the screen. */

  int main(void)

  {

     printf("Greetings, Earthling.\n");

     return 0;

  }
Now, save your work by clicking on the save icon.Compile Messages"
box in the window at the bottom of the screen for a message
indicating either
success or failure. In particular, failure is indicated by an error
message in green. Success is indicated
by the
lack of such a message.
Here's what a compiler warning looks like:
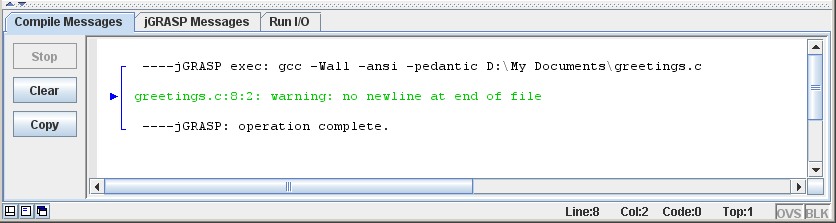
This warning message is telling you that jGRASP expects the last
line of the file to be an empty line. That is, there must be a
empty line following the last line of the program. Once you have
corrected the error in the editor window, compile-and-link the
program again. ![]()
Once the program compiles with no warnings or errors, you will see a
new file named "a.exe" appear in the Browse window on the left
side of the screen. Your program is now ready to execute!
Click on the
run-application-for-current-file button, ![]() identified by a red
person running. A new window will appear with the message "---Hit
any key to start". Press the space bar (for example) and the
output produced by the program will appear. We expect the message
"Greetings, Earthling." Press the space bar again to close the
output window.
identified by a red
person running. A new window will appear with the message "---Hit
any key to start". Press the space bar (for example) and the
output produced by the program will appear. We expect the message
"Greetings, Earthling." Press the space bar again to close the
output window.
Congratulations, you've succeeded with your first C program!
At this point, one gigantic warning; it is VERY IMPORTANT to Compile
and Link your program ![]() EVERY TIME before you
execute it
EVERY TIME before you
execute it![]() . If
you
fail to do this, then the program you're running does not reflect the
changes
you made to the source files since the last time you compiled it.
. If
you
fail to do this, then the program you're running does not reflect the
changes
you made to the source files since the last time you compiled it.
It is very, very easy to spend half an hour trying to fix a problem with a program only to discover that you've been forgetting to click the compile-and-link button. To illustrate this lesson, delete the word "main" in the editor window, and click run button. Hey, the program still works! Now click the compile-and-link button, followed by the run button. Oh dear, the program is broken. Now retype "main" and click the run button. The program still doesn't work, even though the source file is correct. Hit yourself on the forehead, click the compile-and-link button and now the run button, and now it works again.
At this point, you are finished with the introductory section; you
now know how
to create a project, add a file to it, enter a program in that source
file, and
run it.