|
Range Image Generator |
||||||||||||||||||||||||||||||||||||||||||||||||||||||
|
Mike Patterson |
||||||||||||||||||||||||||||||||||||||||||||||||||||||
|
March 15, 2005 |
||||||||||||||||||||||||||||||||||||||||||||||||||||||
|
CPE – 570Q |
||||||||||||||||||||||||||||||||||||||||||||||||||||||
|
|
||||||||||||||||||||||||||||||||||||||||||||||||||||||
|
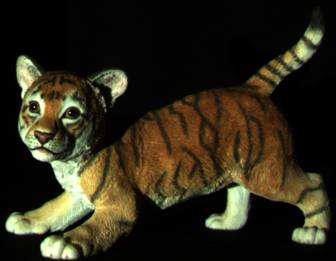
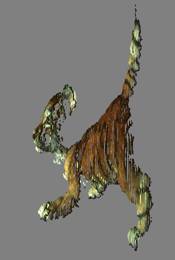
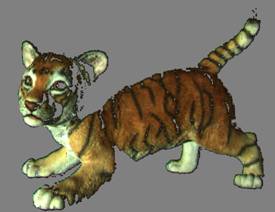
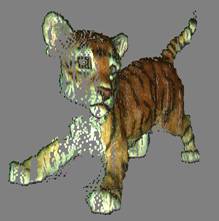
Abstract: This program takes in a sequence of 2D images acquired from a structured light scanner I’ve been developing and generates a dense 3D point cloud. The depth is derived from the weighted difference in x between a pixel in the projected slide and its corresponding pixel in the camera image, a naïve but effective method. Correspondence is found by generating a lookup table from the projected slides – a temporal, binary encoding of each pixel position. The lookup key is then generated for each pixel position from the camera images and used to find the corresponding pixel in the projector’s image space. |
||||||||||||||||||||||||||||||||||||||||||||||||||||||
|
|
||||||||||||||||||||||||||||||||||||||||||||||||||||||
|
|
||||||||||||||||||||||||||||||||||||||||||||||||||||||
|
|
||||||||||||||||||||||||||||||||||||||||||||||||||||||
|
|
||||||||||||||||||||||||||||||||||||||||||||||||||||||
|
Download final.zip (56.2 MB). |
||||||||||||||||||||||||||||||||||||||||||||||||||||||
|
|
||||||||||||||||||||||||||||||||||||||||||||||||||||||
|
usage: Final -pPATH -uXXXXXXXX -b# -w# <-f# -l# || -s#> [additional flags] |
||||||||||||||||||||||||||||||||||||||||||||||||||||||
|
|
||||||||||||||||||||||||||||||||||||||||||||||||||||||
|
example: Final -ptiger -f1 -l1 -u0079837F -w29 -b30 -e.png |
||||||||||||||||||||||||||||||||||||||||||||||||||||||
|
|
||||||||||||||||||||||||||||||||||||||||||||||||||||||
|
Flags: |
||||||||||||||||||||||||||||||||||||||||||||||||||||||
|
||||||||||||||||||||||||||||||||||||||||||||||||||||||
|
|
||||||||||||||||||||||||||||||||||||||||||||||||||||||
|
Check out the shortcuts "Final 01", "Final 01-02" and "Final Use and Show ALL" for examples. WARNING: "Final Use and Show ALL" takes a while to load. |
||||||||||||||||||||||||||||||||||||||||||||||||||||||
|
|
||||||||||||||||||||||||||||||||||||||||||||||||||||||
|
Object Image Sets (numbered starting from zero) |
||||||||||||||||||||||||||||||||||||||||||||||||||||||
|
Paths to image sets are relative to the "data" directory. The format of the file name must be as follows (all zero based): |
||||||||||||||||||||||||||||||||||||||||||||||||||||||
|
0SSSSIIII (a zero followed by a four-digit, zero-padded set number followed by a four-digit, zero-padded image number) |
||||||||||||||||||||||||||||||||||||||||||||||||||||||
|
000030010 (eleventh image of the fourth set) |
||||||||||||||||||||||||||||||||||||||||||||||||||||||
|
Any extension is specified with the -e flag above and any DevIL supported, 24 bit image should work. |
||||||||||||||||||||||||||||||||||||||||||||||||||||||
|
|
||||||||||||||||||||||||||||||||||||||||||||||||||||||
|
Slides (numbered starting from one) |
||||||||||||||||||||||||||||||||||||||||||||||||||||||
|
The slide images must be placed in the "data/slides" directory and named as follows: |
||||||||||||||||||||||||||||||||||||||||||||||||||||||
|
immold_### |
||||||||||||||||||||||||||||||||||||||||||||||||||||||
|
where ### is a zero-padded number starting at 001. Any extension is specified with the -e flag above and any DevIL supported, 24 bit image should work. |
||||||||||||||||||||||||||||||||||||||||||||||||||||||
|
Images Must be of the dimensions 1024 x 768 x 3 bytes. |
||||||||||||||||||||||||||||||||||||||||||||||||||||||
|
General Controls: |
||||||||||||||||||||||||||||||||||||||||||||||||||||||
|