The scenarios in this section cover administrative commands. The commands provide access to the three Calendar Tool databases: users, groups, and locations. Regular users can access the databases with viewing commands. Administrative users can modify the databases with add, change, and delete commands. In addition to database access, there are administrative commands for configuring and connecting to Calendar Tool central host computers, and for performing other managerial functions.
As described in Section 2.1, there are two separate interfaces to administrative commands, provided by two separate application programs. Regular users access administrative commands through the regular Calendar Tool interface, shown in Figures 1 and 2. Users with administrative privilege can run the Calendar Tool Administration program, through the interface shown Figures 3 and 4.
Calendar Tool databases are physically stored on designated central host computers. Administrative users run the Calendar Tool Administration program on a central host. Regular users run the Calendar Tool program on their local client computers and connect to a central host via a computer network. A user's local computer may be physically the same machine as a central host, but logically the function of local computer and central host are distinct.
The sole purpose of the Calendar Administration program is to manage the databases and communication services on a central host. The administration program provides no commands for calendar scheduling or viewing. Any computer on which the Calendar Tool Administration program is installed can function as a central host, as long as that computer has proper network access to the client computers of Calendar Tool users.
The purpose of administrative commands for the regular user is to connect to central hosts, view the Calendar Tool databases, and perform other limited administrative functions. Since the database repository resides on a central host computer, the regular user must establish a central host connection in order to have access to administrative data. Details of establishing host connections are covered in Section 2.6.6.1. Before a host connection is established, only the `Connect' and `Contact Admin' commands are enabled in the regular-user Admin menu. Once a connection is established, the other commands become enabled.
In the scenarios to follow, use of the Calendar Tool Administration program is
covered in Sections
2.6.1
through
2.6.5.
Access to administrative commands by regular Calendar Tool users is covered in
Section 2.6.6.
Further details on the Calendar Tool multi-user environment, consisting of
local clients and central hosts, are covered in
Section .
2.6.1. Gaining Administrative Access
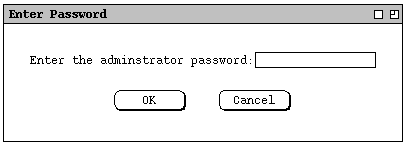
When a user invokes the Calendar Tool Administration program, the system
presents the password dialog shown in Figure 198.
Figure 198: Password entry dialog.
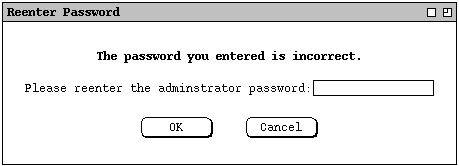
Figure 199: Password re-entry dialog.
At any given time, there is a single legal administrative password for a particular installation of the Calendar Tool Administration program. Given this, the definition of "administrative privileges" is simply the knowledge of the current administrative password. Section covers installation procedures, including establishing the initial administrative password.
Whenever an administrator invokes the Calendar Tool Administration program, the
computer on which the invocation takes place is considered to be the Calendar
Tool central host for the purposes of all subsequent administrative commands.
The name of the host computer is displayed in the banner of the Calendar Tool
Administration menubar, as shown in Figures
3
and
4.
2.6.2. User Database
As shown in
Figure 3,
the default administrative interface consists of a menubar and a dialog for
accessing the Calendar Tool user database. The same dialog is displayed when
the administrator selects the `Users ...' item in the `Admin'
menu. Figure 200 shows the state of the user database after a number of user
records have been added.
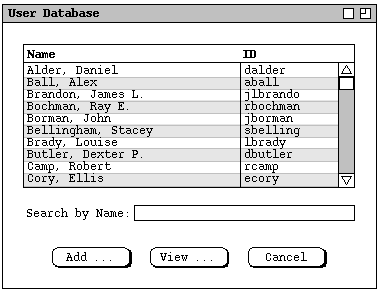
Figure 200: User database dialog.
To add a new user to the database, the administrator presses the `Add
...' button. In response, the system displays the dialog shown in Figure
201.
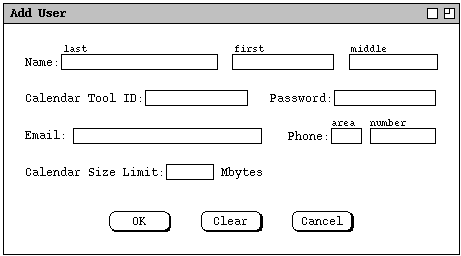
Figure 201: Add user dialog.
last, first middleThe comma and spaces are absent if there are no first and middle names.
The `Calendar Tool ID' is the identifier by which a user is known in the Calendar Tool system. The ID must be unique among all Calendar Tool users and groups. That is, no two or more users can have the same ID, and no user can have the same ID as any user group. The `Password' is required along with the ID when the user establishes a connection to the central host. The password is encrypted using a suitably secure encryption mechanism.
The `Email' address is optional, but highly recommended. It is the electronic mail address to which meeting notifications and other general notifications are sent. The phone number is also optional; it can be provided as an additional means for communicating with a Calendar Tool user, outside of the context of the Calendar Tool itself.
The `Calendar Size Limit' specifies the maximum size in megabytes of the user's calendar on the Calendar Tool central host. Its value is a real number. The limit value is optional. If it is absent, there is no limit. The size limit can be zero, in which case the user has an empty, and therefore unusable calendar on the central host. Complete details on central host data storage are covered in Section .
Figure 202 shows the administrator having entered values for a new user.
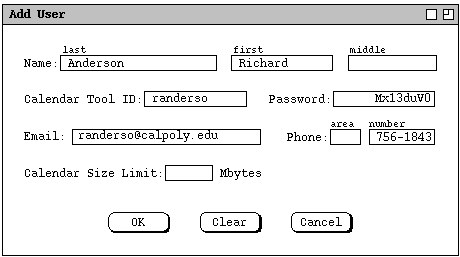
Figure 202: Adding a new user.
The new-user notification message is of the form shown in Figure 203.
You have been added as a new registered user on the Calendar Tool
central host computer deptsrv.csc.calpoly.edu.  Your registration
information is as follows:

    Name: Richard Anderson
    ID: randerso
    Password: Mx13duV0

To view your complete user record, connect to this host using the
Calendar Tool `Admin->Connect' command, then select the `Admin->Users'
command, and then select your name or ID in the list of registered
users.  As soon as you establish the initial connection, it is highly
recommended that you change your initial password using the
`Admin->Password' command.
Figure 203: New user notification message.
To view the database record of an existing user, the administrator selects the
user name or ID in the list and presses the `View ...' button. Clicking
on either the name or ID highlights both. For example, Figure 204 shows the
administrator having selected James L. Brandon for view.

Figure 204: Brandon selected in users list.
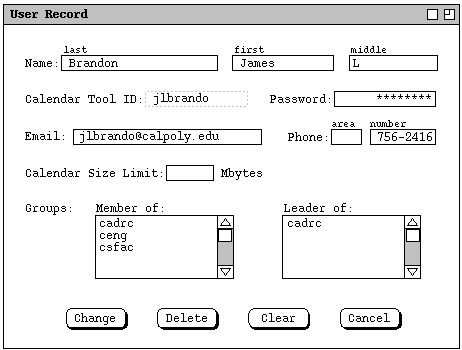
Figure 205: User database record for James L. Brandon.
The user record dialog has all of the data fields present in the add-user dialog. In addition, there are two scrollable lists that show the Calendar Tool groups of which the user is a member and a leader. The administrator can change all data fields except `Calendar Tool ID', `Member of', and `Leader of'. Once an ID is assigned for a particular user, it cannot be changed. Group membership and leadership are changed with the group database commands described in Section 2.6.3.
Figure 206 shows the results of the administrator having performed edits to
the user record for James L. Brandon.
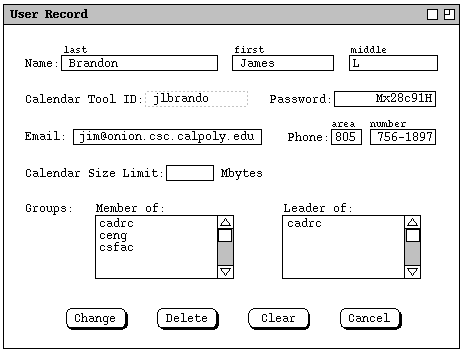
Figure 206: User record for James L. Brandon edited.
When the administrator presses `Change', the system displays the
confirmation dialog in Figure 207.
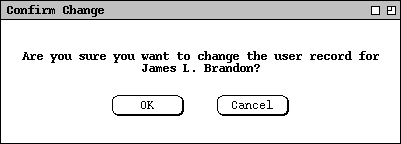
Figure 207: Confirmation dialog for changing a user record.
The user notification for the change confirmed in
Figure 207
is shown in Figure 208.
The following information has been changed in your Calendar Tool user
record on central host deptsrv.csc.calpoly.edu:

    Password: from previous value
              to Mx28c91H

    Email: from jlbrando@calpoly.edu
           to   jim@onion.csc.calpoly.edu

    Phone: from 756-2416
           to   805 75601897

If you have questions about these changes, please contact a Calendar
Tool administrator on this host using the `Contact Admin' command.
Figure 208: Notification of change to James L. Brandon user record.
To delete a user, the administrator presses `Delete' in the user record
display for the user to be deleted. In response, the system displays a
confirmation dialog of the form shown in Figure 209.
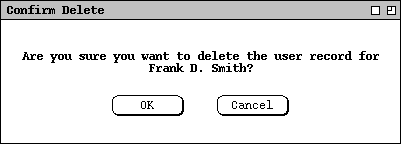
Figure 209: Confirmation dialog for deleting a user record.
You have been deleted as a registered user of the Calendar Tool system
on host deptsrv.csc.calpoly.edu.

You can continue to use the Calendar Tool to manage your own local
calendars, and to manage Calendars on any other central hosts where
you are registered.

If you have questions about this action, please contact a Calendar
Tool administrator.
Figure 210: Notification sent to deleted user.
Deleting a user does not delete the user's ID from any meeting attendees lists on which it appears. Meeting attendee lists can be manually edited, as described in Section 2.5.2.2.
There is a rare but possible condition where an administrator deletes a user while another user is scheduling a meeting. Under this condition, the user deletion could affect the possible times or time conflict lists that are already displayed at the time of user deletion. In such cases, the system does not dynamically update the affected lists. Therefore, the in-progress scheduling operation proceeds without reflecting the user deletion. All meeting scheduling that begins subsequent to the user deletion is performed as it should be in the context of the deleted user.
It is worth noting that all the notifications for user database operations are
sent via email, not via on-screen dialogs. The reason is that in each case,
the user cannot or may not be able to view an on-screen notification, because
in order to do so the user must be connected to the central host from which the
notification originates. In the case of addition, the user does not yet know
the user ID that must be provided to establish a connection to the originating
host. In the case of a change, the notification will not be deliverable
on-screen if the action is a password change. In the case of delete, the
user's ability to establish a connection to the originating host has been
terminated, which again makes the user unable to see an on-screen notification
originating from that host.
2.6.3. Group Database
User groups are a convenient means to define a named list of related users. In comparison to an individual user, a group can be considered a virtual entity. No single user owns the group; a group has no email address and no password. As explained in Section 2.4.1, meetings scheduled by group leaders are recorded in group calendars, as are meeting changes made by leaders. However, none of the group leaders owns the group calendar explicitly. In particular, if all group leaders are deleted, the group calendar persists.
To access the group database, the administrator selects the `Groups
...' command in the privileged `Admin' menu. In response, the
system displays the dialog in Figure 211.
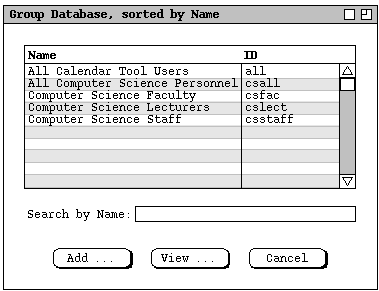
Figure 211: Group database dialog.
To add a new group, the administrator presses `Add ...', whereupon the
system displays the dialog of Figure 212.
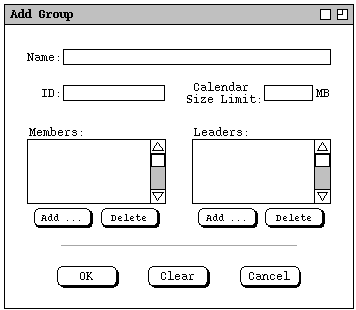
Figure 212: Add group dialog.
The `Members' and `Leaders' lists contain the IDs of the group members and leaders. Both of these lists can have zero or more entries. A group with no members or leaders is considered dormant. A group with members but no leaders cannot have meetings scheduled for it. The utility of dormant and leaderless groups is limited, but the system allows them to exist at the discretion of system administrators, i.e., administrators may delete dormant and leaderless groups if they so choose. A group leader need not be a member. This allows a leader to schedule a meeting at which the leader is not an attendee.
Figure 213 shows the administrator having entered values for a new group.

Figure 213: Adding a new group.
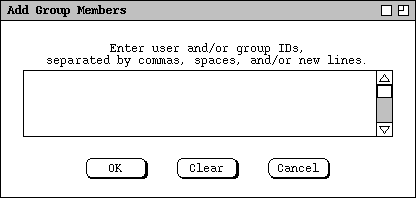
Figure 214: Add group member dialog.
Duplicate IDs are ignored by the system. The precise definition of group membership is the set of entered IDs, with duplicate IDs considered to be a single member. The rationale for allowing duplicates in the members list is to avoid complexity when entering (super)group members, as described just below.
Figure 215 shows the administrator having entered IDs for the ceng
group.
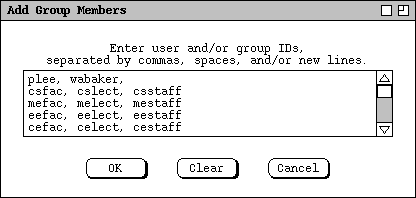
Figure 215: Add group member dialog filled in.
Circularity is disallowed in supergroup definition. That is, a group may not contain itself as a member, either directly or indirectly.
When the user presses `OK' in
Figure 214,
the system validates all entered IDs and checks for any circularity in a
supergroup definition. If one or more IDs are invalid or a circularity is
detected, the system issues an appropriate error message as described in
Section .
If all IDs are valid, the system enters them in alphabetic order into the
members list for the group. If the same ID is entered more than once in the
add-member dialog, the name appears only once in the completed members list.
Figure 216 shows the results of adding the `ceng' group members.
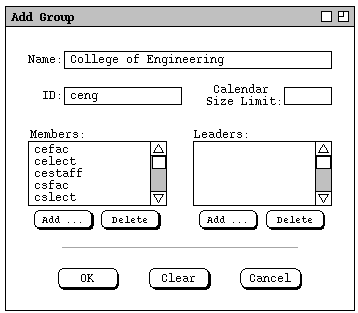
Figure 216: Add group dialog with members added.
To add one or more group leaders, the administrator follows mostly the same procedure as for adding members. The only difference is that the IDs of group leaders must be individual users, not groups.
At the bottom of the add-group dialog are `OK', `Clear', and `Cancel' buttons. These apply to the group as a whole. When the user presses `OK', the system adds the group to the database. `Clear' and `Cancel' have the normal functionality.
To view an existing group, the administrator selects the group name or ID in
the group database dialog of
Figure 211
and then presses the `View ...' button. For example, Figure 217 shows
the result of the user viewing the csfac group.
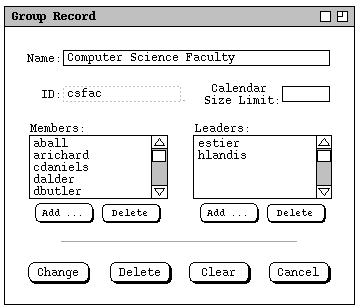
Figure 217: Group database record for the Computer Science Faculty.
To delete one or more group members, the administrator selects the name(s) in
the `Members' list and presses the `Delete' button
immediately below the list. To select multiple names for deletion, the user
holds down the SHIFT key as each name is selected in the list. In
response to executing `Members: Delete', the system displays a
confirmation dialog of the form shown in Figure 218.
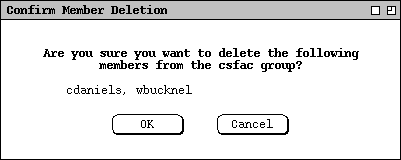
Figure 218: Group member delete confirmation.
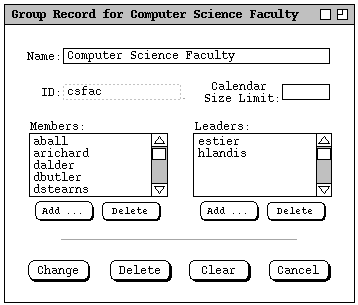
Figure 219: Members deleted in group record dialog.
To delete one or more group leaders, The administrator follows the same procedure as for member deletion. In the leader-deletion confirmation dialog, the word "member" is replaced by "leader".
The four command buttons at the very bottom of the group dialog correspond to
the group record as a whole. When the user presses `Change', the
system displays a confirmation dialog of the form shown in Figure 220.
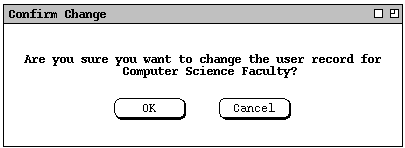
Figure 220: Confirmation dialog for changing a group record.
You have been actioned
the group Calendar Tool group.
If you have questions about this
please contact the Calendar Tool administrator at
central host
The actioned string is one of the following, as appropriate to the change(s) made:
"added as a member of"The group string is the group ID. The central host string is the name of the Calendar Tool central host computer on which the change or delete operation is performed, i.e., the central host on which the administrator is current running Calendar Tool Administration.
"added as a leader of"
"added as a member and leader of"
"deleted as a member of"
"deleted as a leader of"
"deleted as a member and leader of"
When the administrator executes `Delete' for a group record, the system displays the same form of confirmation dialog as shown in Figure 220, with the word "change" replaced with "delete" in both the dialog banner and message text. When the delete is confirmed, the system
The Calendar Tool group group,
of which you were a affiliation,
has been deleted.
It is important to note that change or deletion of a group record has no effect on any user calendars. In particular, no meetings scheduled with the group as an attendee are changed or deleted. Since deleted group IDs remain in scheduled items, system administrators must exercise good judgment in reusing the ID of a deleted group. If a deleted group ID is reused for a group with different membership, the extant appearances of the ID in user calendars will be misleading in terms of the users for whom the meeting was originally scheduled.
The Calendar Tool provides no specific commands for a user to request addition
to or removal from a group. Such requests can be made using the Calendar Tool
`Contact Admin' command, or by some means outside of the Calendar
Tool.
2.6.4. Location Database
The location database contains information records for rooms and other
locations in which meetings can be scheduled. To access the location database,
the administrator selects the `Locations ...' command in the
privileged `Admin' menu. In response, the system displays the dialog
in Figure 221.
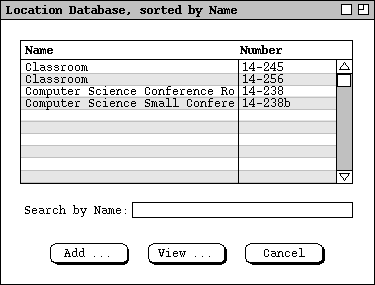
Figure 221: Location database dialog.
To add a new location, the administrator presses `Add ...', whereupon
the system displays the dialog of Figure 222.
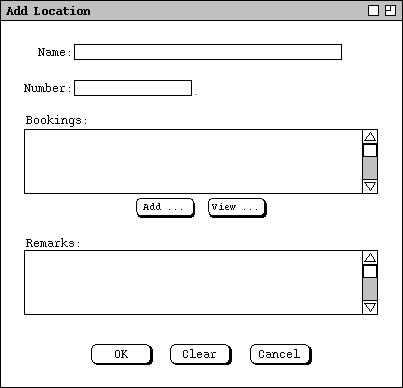
Figure 222: Add location dialog.
Figure 223 shows the administrator having entered values for a new location
record.
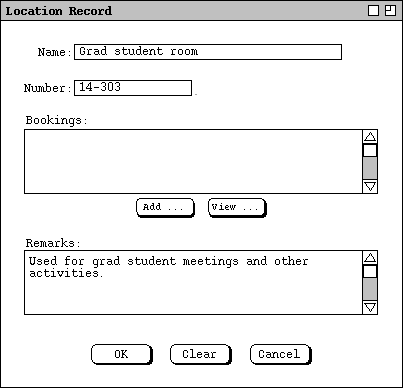
Figure 223: Location database record.
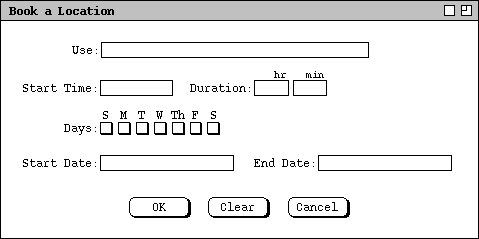
Figure 224: Book location dialog.
Figure 225 is an example of a location booking.
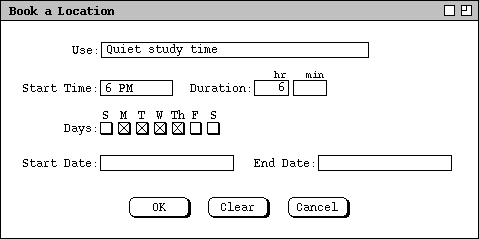
Figure 225: A location booking for the Grad Student Room.
To view an existing location record in the database, the administrator selects
a location name or number in
Figure 221
and presses `View ...'. For example, Figure 226 shows the result of
the administrator viewing the second listed location in Figure
Figure 221.
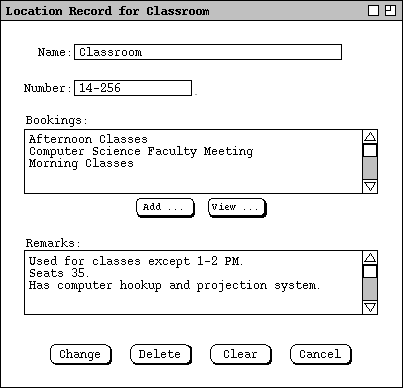
Figure 226: Viewing a location record.
The `Add ...' booking command is described above. To view an existing booking, the administrator selects the booking description in the list and presses the `View ...' button immediately below the list. When the selected booking is for a meeting, the system displays an item-level view for the version of the meeting on the central host copy of the meeting scheduler's calendar. If it is a recurring meeting, the displayed instance is for the start date. When the viewed booking is for a non-meeting usage, the system displays a booking dialog.
Figure 227 shows the result of `View ...' for the second booking
listed in
Figure 226,
which is a scheduled meeting.
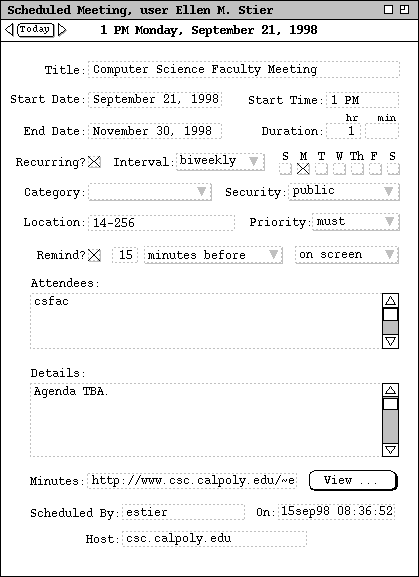
Figure 227: Viewing a meeting from the location record dialog.
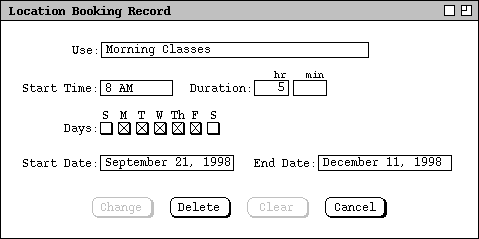
Figure 228: Viewing an other-usage booking from the location record dialog.
Since an other-usage booking is for a contiguous time period, it takes multiple bookings to define discontinuous usages. For example, the `Morning Classes' booking in Figure 226 covers the 8 AM to 1 PM time slot. The `Afternoon Classes' booking covers 2 PM to 6 PM. These two definitions allow meetings to be scheduled between 1 and 2 PM.
The administrator can change or delete a booking using the command buttons at the bottom of the booking dialog. To change, the administrator edits one or more data fields and presses `Change'. The edits must comply with the same data-entry rules described after Figure 224 To delete, the administrator presses `Delete'. `Clear' removes any edits made after initial dialog display. `Cancel' removes the dialog with no change or deletion made.
An other-usage booking is not a scheduled item, so it does not appear on any
calendar. The effect that a booking has on scheduling is to prohibit a meeting
from being scheduled in the location during any of the booked times and dates.
An other-usage booking expires after its end date or single start date, if
present. The system does not automatically delete expired bookings, but an
expired booking no longer affects meeting scheduling. Deletion of expired
bookings is the responsibility of system administrators.
2.6.5. Other Privileged Admin Commands
In addition to maintaining Calendar Tool databases, the administrator can
perform commands to configure the central host computer and perform other
managerial functions. Scenarios follow.
2.6.5.1. Administrative Control of the Central Host Server
When the administrator selects the `Host Status' command in the
privileged Admin menu, the system displays a dialog of the form shown
in Figure 229.
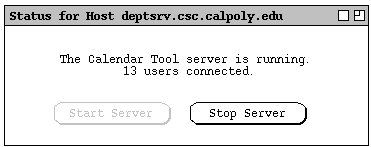
Figure 229: Central host status dialog.
The dialog shows the status of the Calendar Tool server and if running, how many users are connected. The Calendar Tool server is an independently-executing program that handles user communication with the central host. The server program runs on the same host computer where the administrator is running the Calendar Tool Administration program. The host name shown in the banner of the dialog is the unique network identification of that central host. This is the identification employed by users to establish a central host connection. Complete details on the function of the server program are presented in Section .
In the case of
Figure 229,
the status of the server is running, with 13 Calendar Tool users connected.
When the server is not running, the host-status dialog appears as shown in
Figure 230.
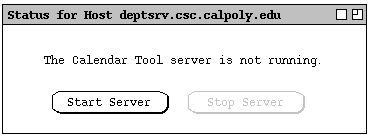
Figure 230: Central host status not running.
The start and stop buttons control the execution status of the server. When the administrator presses `Start Server', the system responds by invoking the server program on the current host and updating the status dialog message from "not running" to "running" with "0 users connected". Also, the enabled/disabled states of the command buttons are swapped, so that the stop button becomes enabled.
When the administrator presses `Stop Server', the system responds with
the dialog shown in 231.
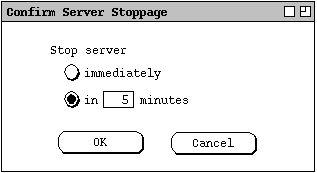
Figure 231: Confirmation for stopping the central host server.
When the administrator chooses to stop the server in some number of minutes,
the system notifies all connected users with an on-screen notification of the
form shown Figure 232.
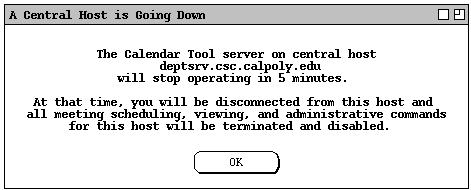
Figure 232: Notification that server will stop.
When the time comes for the server to stop, either immediately or after the
specified number of minutes have elapsed, the system notifies all connected
users with the dialog shown in Figure 233.
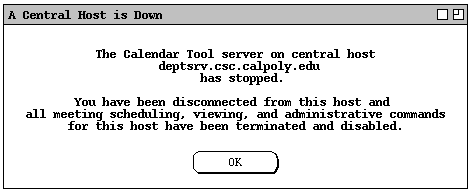
Figure 233: Notification that server has stopped.
As noted in the introduction, there is a single administrative password for any
given installation of the Calendar Tool Administration program. The password
is set when the program is initially installed (
Section
), and may be changed any time thereafter. To do so, the administrator selects
the `Password' item in the `Admin' menu, whereupon the system
displays the dialog shown in Figure 234.
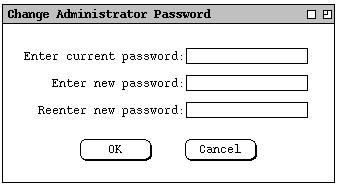
Figure 234: Administrator password change dialog.
When the administrator presses `OK', the system confirms that the current password is correct and that both versions of the new password are identical. If so confirmed, the system changes the password for all subsequent administrator access. If the current password is incorrect or the versions of the new passwords differ, the system displays an error dialog to that effect, upon dismissal of which the user can try again.
It is the responsibility of an administrator who changes the password to notify
any other individuals who need to be aware of the change. The Calendar Tool
provides no means to perform this notification.
2.6.5.3. Setting the Administrator Email Address
Regular Calendar Tool users can contact an administrator using the `Contact Admin' command described in Section 2.6.6.5. The contact is made through an electronic mail address for the Calendar Tool administrator(s) on a particular host. The address is any legal email address which the administrator(s) designate as the contact point for administrative communication. It can be an address specifically created for Calendar Tool administration or the address of some individual administrator.
The email address is set when the Calendar Tool Administration program is
initially installed (
Section
), and may be changed any time thereafter. To do so, the administrator selects
the `Email' item in the `Admin' menu, in response to which
the system displays the dialog shown in Figure 235.
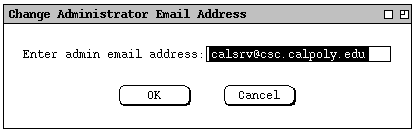
Figure 235: Email address dialog.
The creation of the address itself as a valid electronic mail destination is
beyond the scope of Calendar Tool Administration. The address must be created
by the staff of the underlying operating environment or some other individual
who has the capability to create a valid and usable email address.
2.6.5.4. Notifying Users
Preceding scenarios have described a variety of notifications sent to Calendar
Tool users to inform them of significant administrative actions. The
administrator can also send a general-purpose notification to all registered
users with the `Notify Users' command. When the administrator
executes this command, the system displays the dialog in Figure 236.
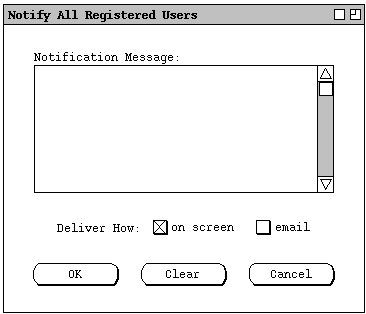
Figure 236: Notify users dialog.
Figure 237 shows the administrator sending a notification that the central host
computer will go down for scheduled maintenance.
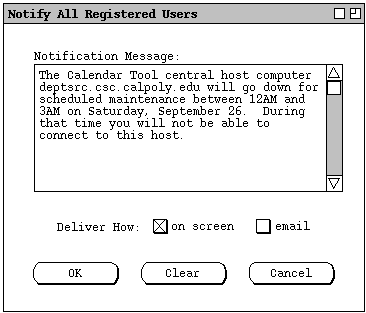
Figure 237: A notification about central host maintenance outage.
Unlike meeting notifications ( Section 2.4.1.5 ), there is no user option to disable on-screen administrative notifications. This includes all administrative notifications, whether sent with the `Notify Users' command, or as the result of executing any of the other administrative commands that generate the notifications. On-screen administrative notifications appear immediately for all affected users who are connected to the originating host at the time the notification is sent. When a user is not connected, the notification is queued for display the next time the user connects to the originating host, as described in Section 2.6.6.1. Aside from the fact that administrative notifications cannot be refused, the queue of pending administrative notifications is managed in the same way as the meeting notification queue described in Section 2.4.1.6.8. All administrative notifications are kept in a separate queue, the complete contents of which are displayed to a connecting user before any meeting notifications are displayed.
The Calendar Tool Administration program provides no command specifically for
communication with individual users. Individual communication occurs when
notifications are sent to users as a result of administrative commands that
generate the notifications. An administrator can reply via external email to
an individual message sent with the `Contact Admin' command (
Section 2.6.6.5
). An administrator can also send an individual email message to any user, by
way of the email address listed in a user's database record. However, the
Calendar Tool Administration program provides no command to launch an email
program for this purpose. The administrator can use the copy and paste
facility of the underlying operating environment to copy the address from the
database record and paste it into the external email program.
2.6.5.5. Setting Calendar Size Limits
As explained in Section 2.8.8, the central host repository contains a copy of each registered user's calendar and the only copy of each group calendar. As explained further in Sections 2.6.6.1, and Section 2.8.4, the system copies the user's local calendar to the central host when the user initially establishes a host connection and whenever the user saves the calendar while connected.
The reason that user and group calendars on the host are stored in individual
files is so the administrator can ascertain the size of each calendar using the
normal file-size commands available in the underlying operating environment.
In this way, if a user or group file exceeds a size that can be supported on a
given host, the administrator can limit the file size by setting the value of
the `Calendar Size Limit' component in the user and group records.
For example, Figure 238 shows the administrator having set the size limit to 10
Mbytes for user James Brandon.
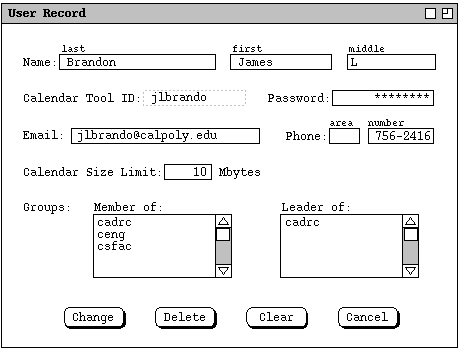
Figure 238: Size limit set in a user record.
For a typical implementation of the Calendar Tool, it is expected that the size of calendar data files will remain manageably small, unless they contain a particularly large number of scheduled items. Nevertheless, it is necessary for an administrator to be able to cap the size of user calendars as needed on a particular host.
When the administrator sets the size limit for a user's calendar, the user is not notified of the setting unless the current size of the user's host calendar is greater than the limit. The user can view the size limit at any time by viewing her user record in the database.
In the case where the current size of the user's host calendar is greater than
a changed size limit, the system notifies the user with an on-screen dialog of
the form shown in Figure 239.
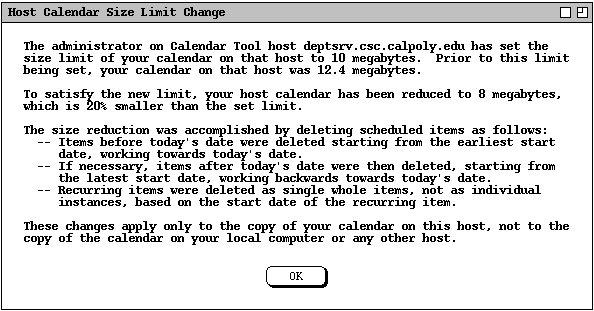
Figure 239: Host calendar truncation notification, after size limit change.
The other circumstance that leads to user notification of a size limit is when the user adds scheduled items to a calendar such that the addition causes the host calendar size limit to be exceeded. This case arises when the user saves the local calendar file when connected to the host, or establishes a host connection after having added items locally while not connected. When one of these actions occurs, the system notifies the user with the same form of dialog as shown in Figure 239, but with the text of the first two paragraphs of the message changed to the following:
The size of the local calendar just transmitted to the hostThe third and fourth paragraphs of the notification are the same as in Figure 239 As explained in the notification message, the system reduces the size of the user calendar by 20%, in order to achieve a workable calendar size.
exceeds the calendar size limit for the host.
To satisfy the required limit, your host calendar has been
reduced to 8 megabytes, which is 20% smaller than the set limit.
The circumstance that leads to an automatic size-limit change in a group
calendar is when a group leader schedules a meeting that cause the size of the
group calendar to be exceeded. In such a case, the system reduces the size of
the group calendar using the same 20%-reduction procedure as for a user
calendar. No notification is sent to anyone if the size limit is changed on a
group calendar, not even the group's leader.
2.6.6. Regular User Access to Admin Commands
As noted in the introduction, only the `Connect' and `Contact
Admin' commands are enabled in the regular-user Admin menu, prior
to establishing a host connection. Once connected, the user can perform all
administrative commands in the regular user interface, as presented in the
scenarios that follow.
2.6.6.1. Central Host Connections
To connect to a central host, the user selects the `Connect' command
in the `Admin' menu. In response, the system displays the dialog in
Figure 240.
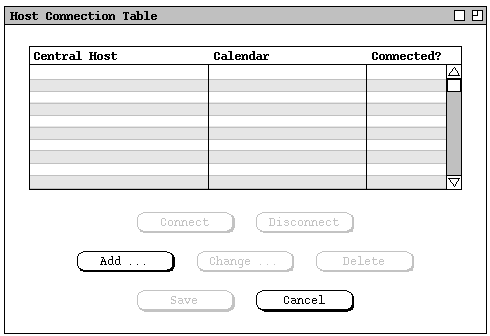
Figure 240: Host connection dialog.
The association of a central host computer with a local calendar file is a fundamental feature of Calendar Tool networking. As explained in the introduction, regular users run the Calendar Tool on local computers, where their calendar files are stored. To support multi-user calendar sharing, there are Calendar Tool central host computers to which users can connect. When a user is connected to a particular host, the associated calendar is the user's "portal" onto that host. When a user connects to the host, a copy of the associated local calendar is sent to the host. When another user schedules meetings on the host, the meeting is penciled in on the associated calendar. Further discussion on these and other aspects of Calendar Tool networking appears in Section .
With an initially empty host table, as in
Figure 240,
the only enabled command buttons are `Add ...' and `Cancel'.
The other buttons become enabled as table entries are added. To add a new
entry, the user presses `Add ...', in response to which the system
displays the dialog in Figure 241.
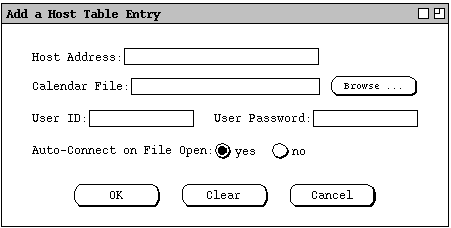
Figure 241: Add host dialog.
The `User ID' and `User Password' fields contain the Calendar Tool ID and password for the user on the specified host. These values must match the ID and password values defined by the host administrator in the user's database record (see Section 2.6.2 ).
The last field in the add-host dialog is `Auto-Connect on File Open'. The setting of this field specifies whether or not the system initiates a connection to the host when the associated calendar file is opened. This is the same option value that appears in the `Admin' tab of the `Administrative' options dialog, described in Section 2.7.5. The setting also appears in the add-host dialog, as a convenience. When the user changes the option setting here, the system changes it to the same value in the options dialog, and vice versa.
Figure 242 shows the user having entered typical values for a host table entry.
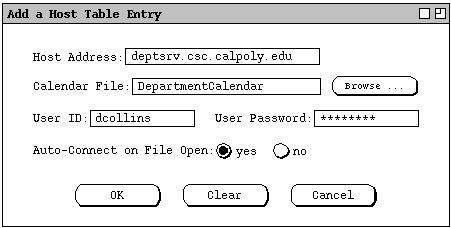
Figure 242: Defining a host table entry.
The user presses 'OK' in
Figure 242
to confirm the addition of the host table entry, after which the system removes
the add dialog from the screen and updates the host connection table as shown
in Figure 243.
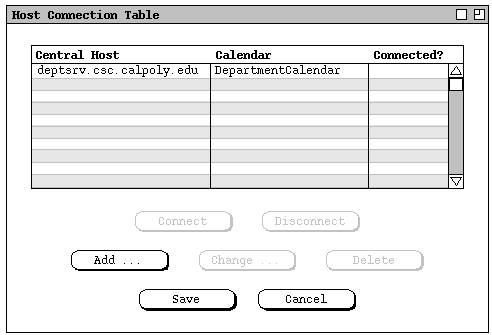
Figure 243: Host connection table with new entry added.
Once at least one host is in the table, the user can initiate a host
connection. To do so, the user selects the host by clicking on the desired row
in the table. In response, the system highlights the row and enables the
`Connect', `Change', and `Delete' buttons, as shown
in Figure 244.
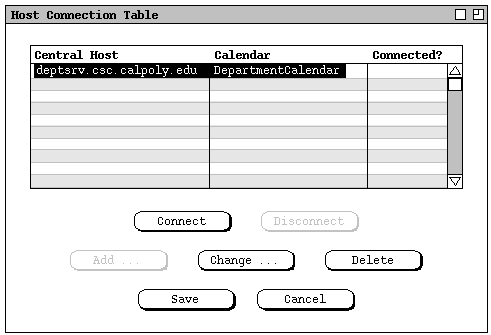
Figure 244: Host selected in table.
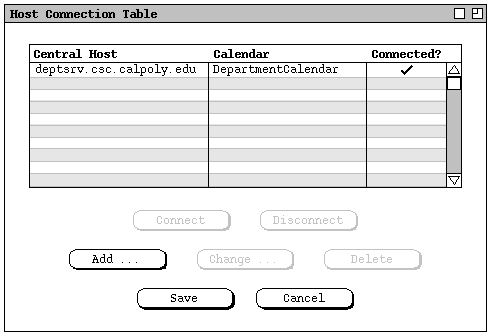
Figure 245: Host connection established.
The set of new penciled-in meetings is comprised of all those penciled in on the central host calendar that have not yet been copied to the local calendar. The contents of this meeting set is determined by the setting of the pencil-in acceptance option on the host copy of the calendar when the meeting is scheduled. Details of the pencil-in acceptance option are described in Section 2.4.1.5 The three possible cases for copying new penciled-ins are the following:
If any part of the connection validation process fails, the system issues an appropriate error message, as described in Section .
The user can add multiple entries in the host table. For example, Figure 246
shows the user having added three more entries, and having established another
connection.
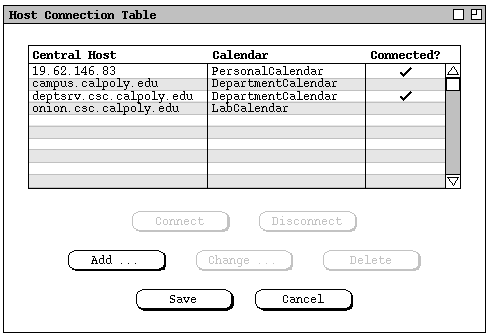
Figure 246: Host connection with additional entries.
To change or delete a host table entry, the user selects the entry of an unconnected host. In response, the system enables the `Change' and `Delete' buttons. A host entry cannot be changed or deleted when the host is connected. When the user selects a connected host, the system enables the `Disconnect' button, leaving the `Change' and `Delete' buttons disabled.
When the user presses `Change', the system displays the same dialog used to add an entry (Figures 241 and 242 ), with the word "Add" in the window banner replaced with "Change". The current values of the selected table entry are displayed in the change dialog. The user can make any changes, except that none of the data fields can be empty. As the user confirms each new table entry change, the system keeps the table rows sorted by host address in ascending lexical order.
When the user presses `Delete', the system displays a confirmation dialog with the message "Are you sure you want to delete the selected host table entry?", with an `OK' button to confirm the delete and `Cancel' button to cancel it.
When the user presses `Disconnect' (after having selected a connected host in the table), the system displays a confirmation dialog with the message "Are you sure you want to disconnect from the selected host?", with an `OK' button to confirm the disconnect and `Cancel' button to cancel it. Disconnection does not close the associated calendar, however the converse is true. That is, closing the calendar associated with a connected host performs a disconnect with that host, as described in Section 2.8.3.
When the user presses the enabled `Save' button, the system saves the contents of the host table into the Calendar Tool Settings file. Only the host table portion of `Settings' is affected by this save, with all other portions of the settings file left unchanged. Details of Settings file contents and related commands are covered in Sections 2.8.1 and Unsaved changes can also be saved using the `Save Settings' command in the `File' menu, as described in Section .
When the user presses `Cancel', the system clears any unsaved changes to table entries that are not connected, and removes the dialog from the screen. Unsaved changes to connected table entries are unaffected by `Cancel', and reappear in their pre-cancel state if the user re- executes the `Admin->Connect' command.
The following is a summary of the button states in the host connection table, based on what if any entry the user has selected:
To enforce the calendar/host association rules fully, the Calendar Tool server program prohibits more than one connection at a time from the same user to the same host. While the intent of the association rules is to prohibit this, they do not cover the following cases:
When a user attempts to establish a second connection to a particular host, the
system displays the error dialog described in
Section .
The Calendar Tool system does not prevent the same user from connnecting to two
different hosts at the same time. That is, two different servers running on
two different hosts do allow a single user to be connected to both hosts at the
same time.
2.6.6.2. Defining the Current Host to Which Admin Commands Apply
Once the user establishes a host connection, the system enables the database and password commands in the regular-user `Admin' menu. Theses commands are host-specific, in that they apply to the particular central host that is current. For example, when the user selects the `Users' command in the `Admin' menu, the system displays the user database entries for the current host.
The definition of "current host" is the connected host that is associated with the current calendar. As defined in Section 2.3.6.4, the "current calendar" is the one at the top of the calendars list on which the user is currently operating. Hence, all commands in the regular-user `Admin' menu are enabled when the current calendar is associated with a host, and that host is connected. In summary, to make a host current, the user follows these steps:
Since the results of regular-user `Admin' commands are host-specific,
they are displayed in separate windows for each host. For example, suppose the
user views the user database for host A, then makes host B current, then
selects the `Admin Users' command again. In response, the system
displays a separate window for the user database of host B. The displays for
all regular-user `Admin' command operate in this manner, with a
separate display window for the results of each command, for each host. In
effect, admin commands always operate in multi-window mode, as described in
Section 2.3.6.2.3.
The `Windowing Mode' setting in the `View' menu (
Section 2.3.6.2
) does not apply to any admin commands.
2.6.6.3. Regular User Access to the Admin Databases
A regular user can view but not modify all three of the Calendar Tool
databases. To do so, the user selects one of the top three commands in the
regular-user `Admin' menu. For example, if the user selects the
`Users' command, the system displays the dialog shown in Figure 247.

Figure 247: Regular user viewing the Users database.
To view a selected user record, the user selects the desired record in the user
database display and presses `View'. In response, the system displays
a dialog of the form shown in Figure 248.
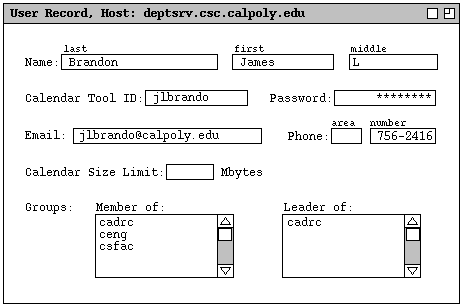
Figure 248: Regular user viewing a user database record.
In general, all regular-user database display windows have the host name in the window banner. Also, all regular-user database displays lack the following buttons when compared to the privileged administrator dialog versions of the displays: `OK', `Clear', `Cancel', `Add', `Change', and `Delete'. Without `Add' buttons, none of the data-entry dialogs for adding database information are available to regular users.
Normally in Calendar Tool display windows, uneditable data fields are shown in light-grey typeface and borders. This is not the case with the regular-user database displays, since none of the fields is ever editable, and they appear more readable in regular type and black borders.
Except for the password change command described in the
next section,
a regular user cannot edit any user, group, or location database record,
including the user's own. The user can request that an administrator make a
change by contacting the administrator with the `Contact Admin'
command, described in
Section 2.6.6.5.
2.6.6.4. Changing the User Password on a Central Host
A registered user's password is the only piece of information stored on the
central host that the user can change directly. To change a host password, the
user first makes current the host on which the change is to occur, as explained
in
Section 2.6.6.2.
Then the user executes the `Change Password' command in the
regular-user `Admin' menu. In response, the system displays the
dialog in Figure 249.
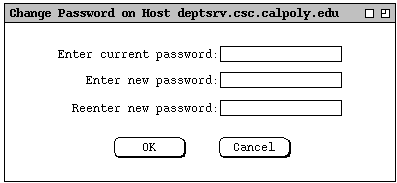
Figure 249: Regular user password change dialog, for a central host password.
To effect the password change, the user enters the current password, a new password, and then reenters the new password to confirm. As all password values are typed, they are echoed as asterisk characters, not as the actual characters typed. When the user presses `OK', the system confirms that the current password is correct and that both versions of the new password are identical. If so confirmed, the system changes the password in the user's database record on the host, as well as in all affected entries in the host connection table (see Section 2.6.6.1 ). An affected entry in the host connection table is one in which the current host is listed as the value of host address in the table entry.
If the current password is incorrect or the versions of the new passwords differ, the system displays an error dialog to that effect, upon dismissal of which the user can try again.
Some clarification on the storage of user password values is in order. For a regular Calendar Tool user, the value of a central host password is stored both on the central host as well as on the user's local computer where the Calendar Tool program runs. The password on the central host is stored in the user's database record. The host database record contains the defining value of the password, in that the host password value must be matched when the user initiates a host connection. A password value is also stored on the user's local computer in the host connection table, as described in Section 2.6.6.1. An entry in the local host connection table contains an accessing value of the password, in that this value is the one matched against the host-stored password value in order to validate a connection.
In terms of physical storage, the host password is stored in the user's
database record, which is in turn stored in the Users component of the
host central repository, as described in
Section
On the user's local computer, the password is stored in the host-connection
table, which is saved permanently in the settings file, as described above.
2.6.6.5. Contacting an Administrator
The regular Calendar Tool user may need to contact an administrator for a number of reasons. The reasons include requesting a change to the user's database record; requests to be added or deleted from a Calendar Tool group; or requests for general information about the operation of the Calendar Tool in a particular installed environment. To make any such request, the user selects the `Contact Admin' command in the regular-user `Admin' menu.
As noted earlier, `Contact Admin' is enabled whether or not there is a
current host connection. `Contact Admin' is still host-specific, like
all other Admin commands. The system requests a host from the user if
no host is current when `Contact Admin' is executed. Specifically, if
the user executes `Contact Admin' when no host is current, the system
displays the dialog in Figure 250.
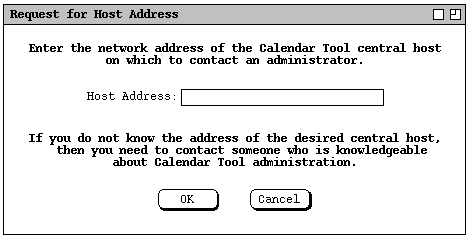
Figure 250: Host request dialog.
When the user enters a valid host address in the request dialog, or when a host
is current in the first place when the user executes `Contact Admin',
the system displays the dialog in Figure 251.
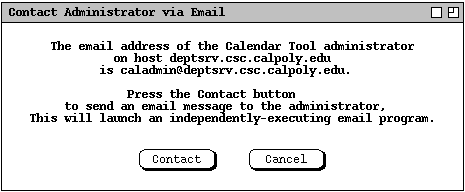
Figure 251: Contact admin dialog.
Figure 252 shows the body of a typical email message that a user sends to an
administrator.
Dear Admin:

I've changed my email address and phone number since the last time I used the
calendar program.  They are jim@onion.csc.calpoly.edu and (805) 756-1897.
Also, I've forgotten my password.  Can you tell me what it is or change it to
something new.

Thanks,
    Jim Brandon
Figure 252: Typical admin request.
The administrator's response to this particular request is described in the change scenario of Section 2.6.2. The user is notified of the change as discussed there, in particular Figure 208. Since users contact an administrator with an external email program, an administrator may reply to the contact directly via external email. Such communication is outside the control of the Calendar Tool. For managerial requests such as the preceding from user Brandon, the administrator need not reply externally to the request, since the Calendar Tool sends a change notification as part of the change process.
The following is a summary of the administrative communication services provided by the Calendar Tool and Calendar Tool Administration programs:
As described in the preceding scenarios, Calendar Tool administrators have full access to the three Calendar Tool databases. They also have complete execution control over the Calendar Tool central host server.
Administrators have limited control over user calendars stored in the central host repository. By setting the `Size Limit' field in a user database record, the administrator can limit the number of items stored in the central host copy of a user's calendar. The administrator can also move or delete the files in which user calendars are stored.
Administrators have no direct control over the internal content of user calendars stored in the host repository. Specifically, administrators cannot add or change individual scheduled items in the calendars. The only deletion control is indirect, through the setting of the calendar size limit and the systematic deletion of items that may lead to, as explained in Section 2.6.5.5. Per the file encryption requirement described in Section 3.2.1, administrators cannot meaningfully view the contents of user calendar files, except by running the Calendar Tool in the normal way on the host computer. This prevents administrators, or any other users of the central host computer, from viewing the private portions of user calendars stored in the host repository.
Administrators have limited and indirect control over Calendar Tool operations on users' local computers. Specifically, when a local user is connected to a central host, notifications from an administrator are sent to and received by the Calendar Tool program running on the local computer. When using the Calendar Tool Administration program, administrators have no control whatsoever over the contents of Calendar Tool files stored on any users' local computers.
A Calendar Tool user who happens to be an administrator may run the regular
Calendar Tool on a host computer to manage her own personal calendars and to
schedule meetings for other users. When running the regular Calendar Tool in
this way, the user is not considered to be a administrator at all. Further,
the physical computer that happens to be a Calendar Tool central host is
considered to be the user's local computer when running the regular
Calendar Tool program. As explained in
Section
the distinction between central host computer versus local client computer is a
logical distinction, in that the same physical computer can serve both
functions. The precise definition of "administrator" is one who is running the
Calendar Tool Administration program on any computer where the administration
program happens to be installed.