This introductory scenario shows an individual user scheduling two simple appointments. Appointment scheduling is one of the most commonly performed operations with the Calendar system. In this scenario, the user is assumed to have just been registered in the Calendar system. Hence the user has a brand new calendar with no entries and the standard default settings for all options. Details of user registration and default calendar creation are covered in Section 2.6.
To schedule an appointment, the user selects the 'Appointment' command
in the
Schedule menu.
In response, the system displays the dialog shown in Figure 6.
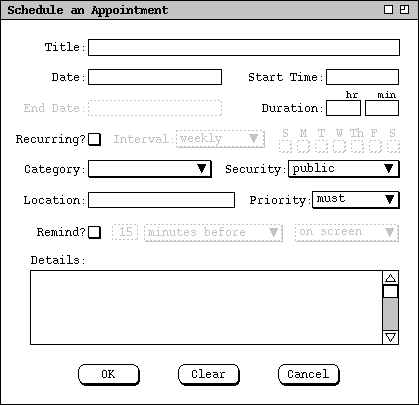
Figure 6: Appointment scheduling dialog.
The information in the fourth row of the appointment dialog is used to specify whether, and if so how often an appointment recurs. Immediately to the right of the 'Recurring?' label is a check box. If it is checked on, then information pertinent to a recurring appointment changes from greyed-out to solid type. The recurring information is the 'End Date', the recurring 'Interval', and the seven daily check boxes to the right of the 'Interval' box.
The appointment 'Location' specifies where it will be held. The location value is a plain text string. The appointment 'Priority' indicates whether an appointment is a 'must' or 'optional'. The priority is used to indicate the general importance of an appointment to the user. The priority is also used in group meeting scheduling, where optional appointments can be automatically rescheduled if necessary. Meeting scheduling is discussed further in Section 2.5.
The data-entry row starting with 'Remind?' is used to enable the sending of a reminder prior to the start of the appointment. When the 'Remind?' check box is on, the other reminder information changes from greyed-out to solid. The two data-entry fields immediately to the right of the check box indicate how soon before the meeting the reminder is sent. The small box is a numeric value and the other box is one of the three alternatives 'minutes before', 'hours before', or 'days before'. To right of the time-before entry is a box for selecting how the reminder should be sent. The three choices are 'on screen', 'beep only', or 'email'. Details of these reminder formats are covered in Section 2.4.5.
The bottommost data-entry area in the appointment dialog is for writing a detailed description of the appointment. The user may enter any amount of free-form textual information in the 'Details' field.
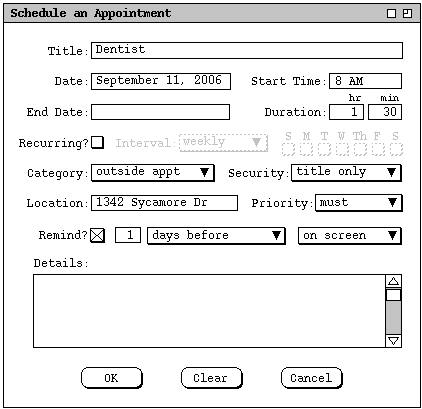
Figure 7: Scheduling a dentist appointment.
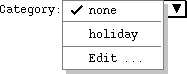
Figure 8: Initial categories menu, before Outside Appt category has been added.
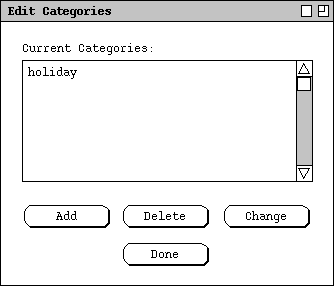
Figure 9: Edit categories dialog.
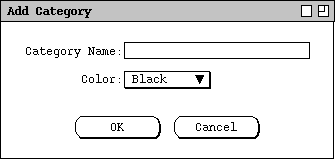
Figure 10: Add category dialog.
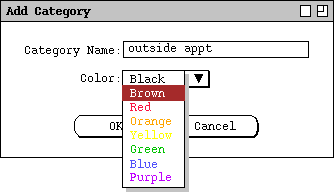
Figure 11: Creating a new category.
To confirm the scheduling of the dentist appointment, the user presses the 'OK' button in the main schedule-appointment dialog. At this point, the dentist appointment is added to the user's personal calendar.
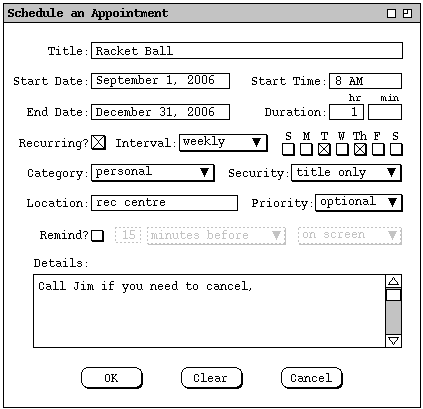
Figure 12: Scheduling a second appointment.
The user has set the priority for this new appointment to 'optional' instead of 'must'. The operative effect of selecting an 'optional' priority relates to scheduling group meetings, which is discussed further in Section 2.5. Aside from group scheduling, the meaning of 'must' versus 'optional' is purely informational, i.e., it indicates the relative importance of the appointment.
The information entered for a recurring appointment initially applies to all occurrences of the appointment. When the user confirms a recurring appointment with the 'OK' button, the appointment is entered into the user calendar on all of the specified dates. Subsequently, the user can change some or all of the information on a recurring appointment for some or all of the recurring dates. Details of how a recurring appointment is changed are covered in Section 2.4.6.
To clear all information entered in an appointment dialog, the user presses the 'Clear' button. In response, the system clears all typing areas and restores all other data-entry fields to their default states. Details of default settings are covered in Section 2.8.2 on preferences. To cancel a scheduling command entirely, the user presses the 'Cancel' button. In response, the system removes the dialog from the screen without performing any scheduling action.
After scheduling and confirming an appointment, the appointment data are entered in an online working copy of the user's calendar. In order for the appointments to be permanently saved in the calendar file, the user must invoke the 'File Save' command. The default name of the calendar file for new users is chosen by the system administrator, as described in Section 2.6. The user may save calendars on as many different files as desired. However, the filename chosen by the system administrator is the only name known to the Calendar system for group scheduling purposes. Further details of file commands are discussed in Section 2.7.
After the user presses the 'OK' button in the scheduling dialog, the
dialog itself is removed from the screen. The scheduling information for a
previously scheduled appointment can be reopened by selecting the
'Item' command in the 'View' menu, or by double clicking on
the title of an appointment in a daily, weekly, or monthly display. Details of
these displays are covered in the
next section
of the requirements.