
When the user selects the `Windows ->' command in the `View'
menu, the system displays a submenu of the form shown in Figure 64.
Figure 64: Windows submenu with chronological list of active windows.
The windows are listed by the title strings that appear in the window banners. When the title is longer than the default menu width, the " ..." suffix is added. The window titled "Calendar Tool" is the command menubar. It is listed explicitly since it is indeed a physically separate window.
To make any window active, the user selects its name in the `Windows' menu. In response, the system performs the following actions:
Immediately below the window list is the `Close' window command. When the user selects this command, the system removes the current window from the screen and removes its name from the windows list. After the current window is closed, the next window in the list becomes current. Any window except the command menubar can be closed.
The action performed by the `Close' command is different from the
action typically referred to as "iconify" or "minimize" in window-based
operating environments. The iconify action does not completely remove a
window, but rather reduces it to an iconic form that can be re-opened. In
contrast, the close operation fully removes a window from the screen, leaving
no icon of any form. An underlying operating environment may provide both
iconify and close operations. If it provides close, the Calendar Tool detects
closure of one of its windows, removes the name of the closed window from the
windows list and makes the next window on the list current.
2.3.6.1. Windowing Mode
As introduced in earlier scenarios, the user may choose from three different
windowing modes. To do so, the user selects the `Windowing Mode'
command, in response to which the system displays the submenu shown in Figure
65.
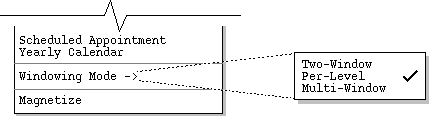
Figure 65: Windowing mode submenu.
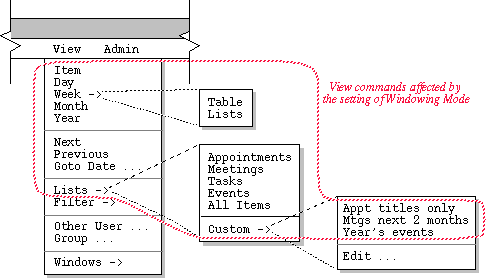
Figure 66: Commands affected by the setting of Windowing Mode.
The default windowing mode is `Per-Level'. The windows list in Figure 64 reflects the state of windows based on per-level mode having been active during the scenarios presented to this point.
In per-level mode, there are up to eleven separate viewing windows active on
the screen. Table 7 describes each of these windows.
| Window Title | Command Results Displayed |
| "Scheduled item-type" | View Item |
| "Daily Agenda" | View Day |
| "Weekly Agenda" | View Week |
| "Monthly Agenda" | View Month |
| "Yearly Calendar" | View Year |
| "Appointments, sorted by ..." | View Lists Appointments |
| "Meetings, sorted by ..." | View Lists Meetings |
| "Tasks, sorted by ..." | View Lists Tasks |
| "Events, sorted by ..." | View Lists Events |
| "All Items, sorted by ..." | View Lists All Items |
| custom list name | View Lists Custom custom list name |
Table 7: Windows used in per-level windowing mode.
At the item level, the item-type in the title is one of "Appointment", "Meeting", "Task", or "Event". At the week level, the results of the two styles of `View Week', i.e., `Table' or `Lists', go in the same window. For custom lists, the custom list name is the name of one of the custom lists defined by the user.
When one of the eleven mode-affected view commands is executed in per-level mode, the system performs the following display actions:
The `View Next' and `View Previous' commands never create a new window in per-level mode. This is because these two commands must be executed in the context of an existing display. Therefore, `View Next' and `View Previous' always change the current display when executed in per-level mode.
The `View Goto Date' command updates an existing applicable window if one exists. Otherwise it creates a new window at the default viewing level. Further operational details of `View Goto Date' are given in Section 2.3.2.3.
In some cases, the size of an existing window may change when a command is
executed in per-level mode. For example, at the item-level of viewing, the
size of an appointment display is larger than an event display. In such cases,
the window is positioned so that its upper left corner stays in the same screen
location.
2.3.6.1.2. Two-Window Mode
In two-window mode, a single window is used to display all calendar viewing commands; another single window is used to display all list commands. Hence there up to two active display windows in two-window mode. The calendar viewing commands are the first five in the `View' menu, and the first five listed in Table 7. The list viewing commands are those in the `View Lists' submenu, and the last six listed in Table 7
When the user selects two-window mode, the mode transition does not itself change the state of the screen. Rather, the transition establishes how windows will be displayed subsequently. Hence, the transition to two-window mode from per-level or multi-window modes does not remove any windows from the screen.
When one of the five calendar view commands is executed in two-window mode, the system performs the following actions:
Three or more windows can be displayed while in two-window mode, but only two of them are actively used for command display. If the user changes the active calendar window while in two-window mode, the newly current window becomes that in which all subsequent single-window calendar display occurs. The same applies to a change in the current list view window.
The size of an existing window may frequently change when a command is executed
in two-window mode. In such cases, the window is positioned so that its upper
left corner stays in the same screen location.
2.3.6.1.3. Multi-Window Mode
In multi-window mode, a separate window is used for each and every execution of a mode-affected view command, even for commands at the same calendar level and for list commands of the same type. The purpose of multi-window mode is to allow the user to create side-by-side displays of consecutive calendar periods, or other useful combinations of multi-window information. For example, Figure 67 shows a side-by-side three-month display, which the user creates by performing the following actions:
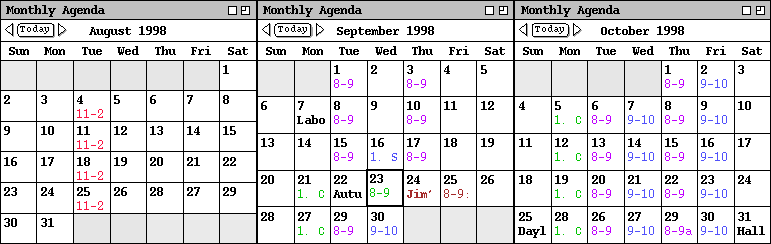
Figure 67: Side-by-side three-month display.
Here's where we put in the cool idea for having the windows stick to each
other when they're moved in close proximity to each other.