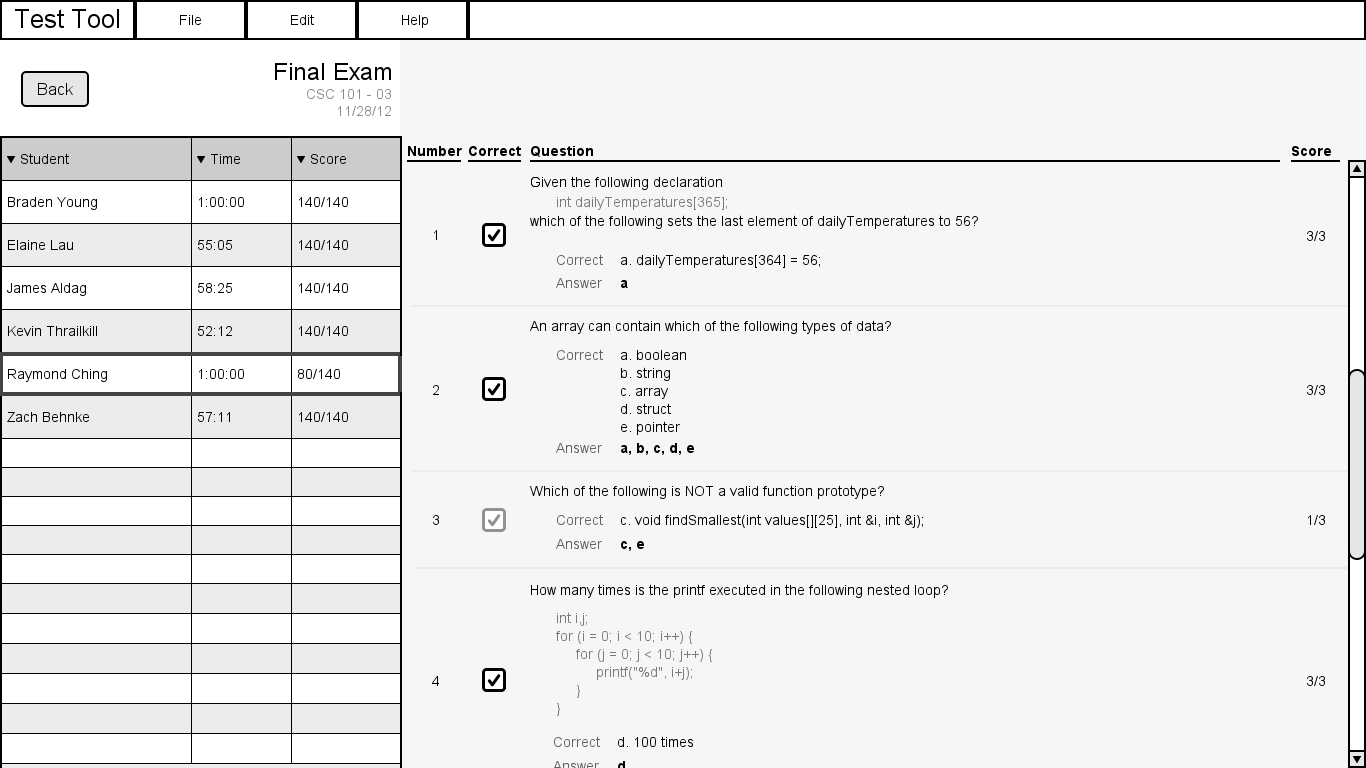
This is the interface for the teacher to grade any tests that were assigned. The teacher will open this screen after a test has been taken by his/her students. But this screen can also be accessed when not all students have completed the test - in order to view current progress by the students. This screen is accessed by clicking on the Grade button on the main page. Clicking on the Back button will return to main page.
Test questions that can be automatically graded, will be. All other questions can be manually graded by the teacher on this screen. Additionally, he/she will have the ability to change question point values, answers, or even remove them from the test.
Figure 41: Grading Interface
The left panel is an overview of the students who have taken the test (or who were supposed to if someone didn't do it). Clicking on a student in this pane will pull up their test in the right pane. In the right pane, the teacher can grade the test and make any changes they desire.
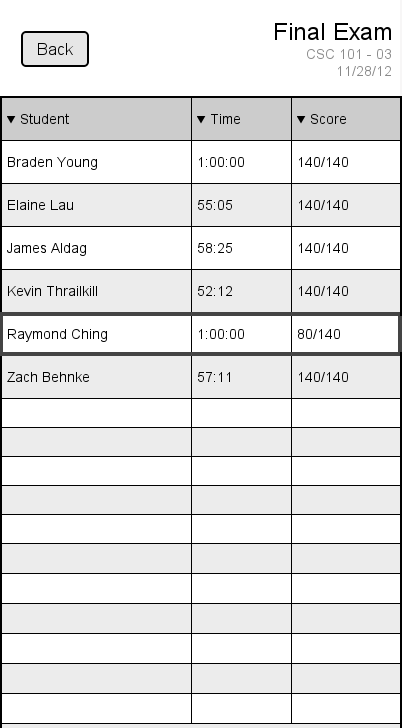
Figure 42: Focus of the Grading Interface's Left Panel
The left panel of the grading screen provides an overview of all the students who took the test, what they scored on the test, and the amount of time taken on the test. Above the list of students is the title of the test (Final Exam). Below that is the name of the class, which in this case also includes the class's section. The date the test was given is beneath the class name.
The Name heading has an arrow pointing downward to the right of the text. This signifies that the tests are sorted by the students' names in ascending order. Clicking on another heading will change the sorting to be based on that heading's attribute. For example, clicking time will order the tests by how long it took each student to take the test, with the fastest time being on top. Clicking on a heading again will flip the sort order to descending (signified by a downward arrow).
Raymond Ching's name is currently highlighted in blue. This means that his test is opened. Clicking on another student will open their test in the right panel and their name will then become selected with the blue highlight.

Figure 43: Focus of the Grading Interface's Right Panel
The right panel is where the teacher will grade the selected test. If possible, questions will be graded automatically. Question types such as multiple-choice, fill-in, true or false, and programming will be instantly graded using teacher-submitted answers. However, the teacher will also be able to change an answer or override the auto-graded questions on this page. This can be done by simply clicking on an answer and editing it like any other text box.
Notice that Question 4 in Figure 43 is not graded. The teacher is notified of an ungraded question by the number (under the
Number heading) being orange instead of black. Additionally, the checkbox under the Correct heading is empty. This is because
this particular question was a short answer problem and could not be graded automatically. However, the teacher did submit an answer for
this problem (shown in the grey to the right of Correct). This could be possibly be benefical to perhaps a TA or someone else helping
the teacher grade this test. Also include in the correct answer are a few bolded words. These are the keywords the teacher chose to emphasize
in an answer. Any keywords that appear in the student's answer will also be bolded. This feature is included to help the teacher grade even
faster.
Question Types
Each question type is handled differently by the grading system. Some questions are automatically graded while others include keywords to help the teacher manually grade questions faster. The grader allows the teacher to override any automatically graded questions.
1. True or FalseTrue or false questions are graded automatically with an all or nothing point value.

Figure 44: True/False Question
Multiple choice questions are supported by the automatic grading system. It compares the correct answer supplied by the teacher to the student's answer.

Figure 45: Multiple Choice Question

Figure 46: Multiple Choice Question with Multiple Answers
Fill-in can be automatically graded or not automatically graded - depending if the user selected the Auto-grade checkbox when the question was created. A simple text comparison is used to determine if the student submitted the correct answer. If the question is not set to be graded automatically, then the teacher has to manually edit the score by adjusting it in the score section.

Figure 47: Fill-In Question
Short answer questions are not graded automatically. However, the teacher can provide an optional Sample Answer when creating the question. The student's answer will be shown along with the teacher's sample answer - given that one was supplied. The teacher can then adjust the point value in the score section or by clicking the check mark.
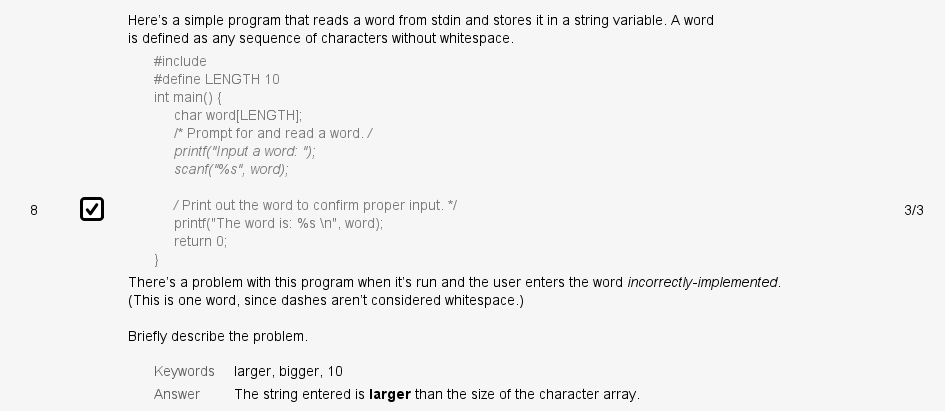
Figure 48: Short Answer Question
Programming questions are graded automatically by a teacher provided test script. The student's code is not compiled by the Test Tool program. The grading scripts's output can be shown in the Answer section so the teacher can see where the student may have gone wrong. Clicking the View code link will open the student's submitted file in a pop up window.
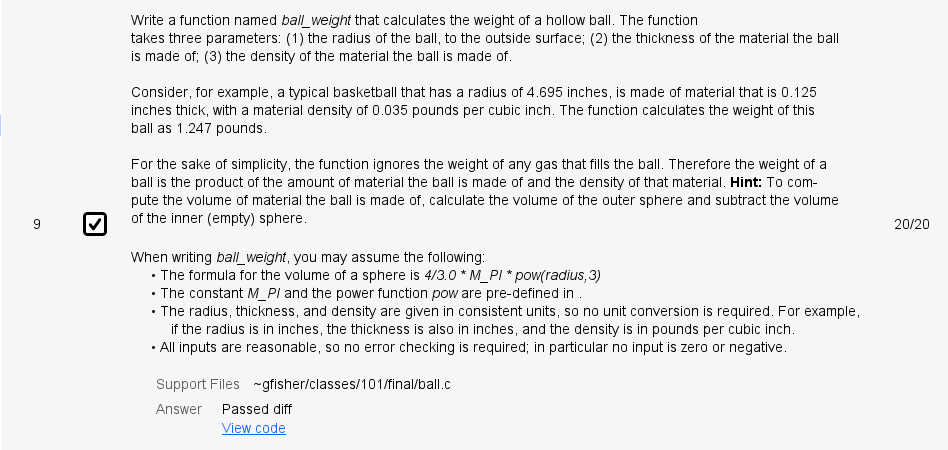
Figure 49: Programming Question