This section shows scenarios of creating Lessons in the CSTutor Editor application. A Lesson contains nodes of information and quizes. This section will show a basic lesson being created and then discuss in depth the abilities and features of CSTutor to make lessons more content rich and enjoyable to individuals taking a lesson.
Scenarios covered in this section detail the following:
This scenario shows an indidivual user creating a basic lesson on the topic of For Loops. In this scenario we assume that the user has executed the Editor program and the system is waiting at the Default editor screen (figure 1 below). Furthermore a basic lesson is comprised of the following components: one informatin node with introductory title and author name, a lecture node and a node containing example code.
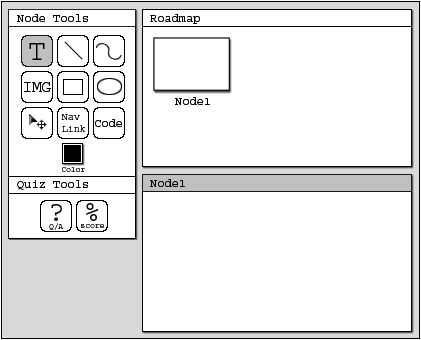
The user begins by clicking on "File -> New" to create a new lesson. The system responds by displaying to the user a new blank lesson workspace. Figure 1 below is a view of a blank workspace and all of its related components.
Figure 1: Default Editor Screen. (note the roadmap, Node1 window and Lesson Explorer window)
The user then selects the Node1 window and using the Text and Line tools in the Node Tool toolbar adds text to Node1 giving it the title "For Loops" and making a line between the title and their name. These completed actions are seen below in the Node1 window in figure 2.
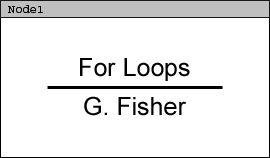
Figure 2: A simple introduction node with a Text title and Line drawn.
The user then executes the command "Authoring -> Add InfoNode". The system responds by placing a smaller tile image of Node1 into the roadmap area. This can be seen in figure 3 below.

Figure 3: Roadmap view with the 1st added node (Node1).
After Node1 is visible in the roadmap a blank Node2 workspace becomes available to the user. The user then repeats the process of adding text to a node with the Text tool. The user details the concept of a For Loop in a lecture notes format. Then, the user repeats the process above of creating another new InfoNode (Node3), once they have finished Node2. The system responds by placing a visible link (an arrow) between the first node created by the user (Node1) and the second node created by the user (Node2). These two nodes linked together can be seen below in figure 4.
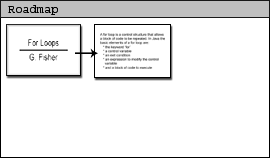
Figure 4: Roadmap with 2 nodes, linked together by the system for the user.
The user then edits Node3 to contain sourcecode examples they again type with the Text tool. The user then adds this node to the RoadMap and the system responds again by linking the two most currently created nodes. Figure 5 shows the completed roadmap with three nodes in place.
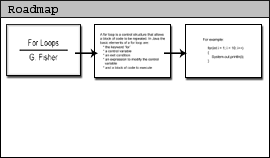
Figure 5: The completed roadmap of a basic lesson containing 3 InfoNodes.
At this point the user clicks on "File -> Save As..." and saves the appropriately. This concludes the task of creating a basic lesson.