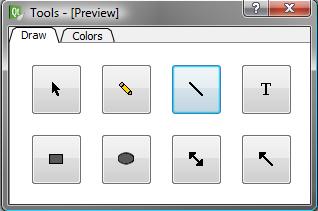

Figure 1: Drawing Tab
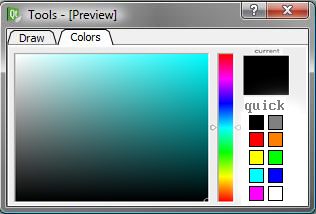
Figure 2: Color Tab
Near the bottom right of the color tab on the drawing tool is a "quick" color selection with ten boxes. Each box contains a basic color, and when clicked by the user will set the current color to that of the clicked box.
Advanced color selection involves picking a base color, and a shade. Clicking along the rainbow Color Slider, pointed out in Figure 3, will select a base color. This modifies the shade window to be based on the selected color. Top right most in the shade window is the base color, bottom left is pure black, and everywhere else in the shade window is a linear interpolation based on those colors. Clicking anywhere in the shade window will set your current color to be that of where you clicked.
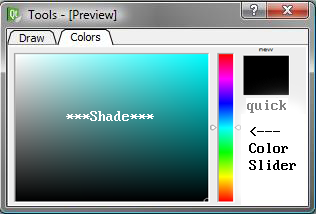
Figure 3: Advanced Color Selection
The quick color boxes have been hidden in Figure 3 to make it easier to discern the advanced color options. The basic colors were overwritten to make understanding the advanced options simpler. The window will still look and behave as it does in Figure 2, and the advanced color options in no way interfere with quick color selection.
There are eight different options in the drawing tab to choose from. Figure 4 labels each of the eight styles with a number. The buttons are: select (1), pencil (2), straight line (3), text (4), rectangle (5), oval (6), double-headed arrow (7), and single-headed arrow (8). Pressing the select button causes clicked objects to be draggable. The pencil button draws a pixel wherever clicked. Pressing the line button causes a line to be drawn from initial cursor click, to where the user releases the cursor -- the rectangle, oval, single/double-headed line, all behave in the same fashion.
The other drawing style to select from is 'text' option. When the user clicks the text option, they are able to draw an invisible box by clicking on the screen. All text will appear inside of the box.
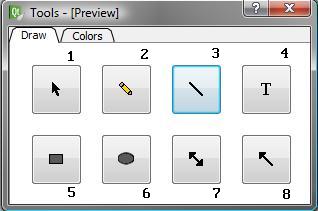
Figure 4: Drawing Tab (with labels)
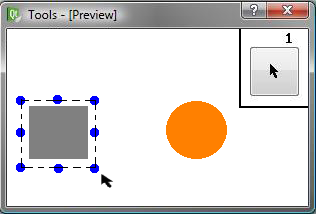
Figure Ex-1: Select Tool (1)
This tool is used to select and modify previously drawn objects. Clicking on an object will surround it with a dotted perimeter with draggable circles along the corners and mid points. Dragging any of the nine perimeter blue circles will resize the shape based on the direction dragged in. Clicking and dragging from within the dotted perimeter will move the entire object and maintain it's size. Figure Ex-1 illustrates the state of clicking a previously drawn gray rectangle.
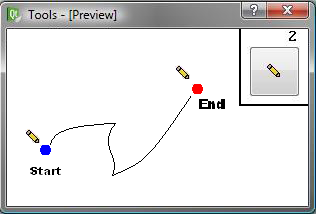
Figure Ex-2: Pencil Tool (2)
The pencil tool allows the user to freely draw. Clicking and dragging will leave a trail starting from the clicked spot and following the exact path of the mouse until released. A sample of this functionality is displayed directly above, in Figure Ex-2.
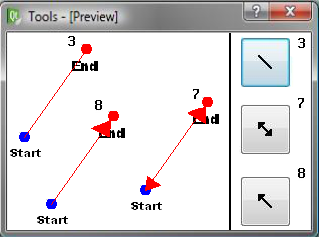
Figure Ex-3: Lines and Arrows (3,7,8)
All three of these tools are variations of the same concept, drawing a line. Clicking and dragging will draw a straight line starting from the spot clicked from, and ending at the spot released from. If using the single-headed arrow, then it will be the same only a triangle arrow head will be included with the line where you released. Double-headed arrows will have an additional arrow head from where you first drew. All three drawing styles are shown above in Figure Ex-3. In the figure, from left to right, is a line (3), single-headed arrow (8), and then a double-headed arrow (7).
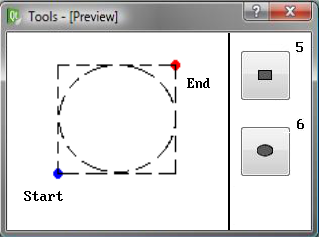
Figure Ex-4: Ovals and Rectangles (5,6)
These tools give the user the ability to quickly and simply draw ovals and rectangles. Clicking and dragging will fill the selected shape between the point of click and the point of release. The height of the shape is based on the vertical distance between points, and the width is based on the horizontal distance between points. Figure Ex-4 illustrates the size of a rectangle or oval assuming the start and end points shown.
Rectangles and ovals by default are fully filled in when drawn. Selecting the same tool a second time will toggle between drawing fully filled, or just drawing the perimeter.
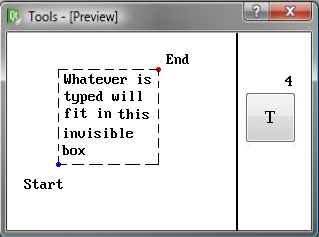
Figure Ex-5: Text Tool (4)
The text tool is a two step process. After selecting the tool itself, first draw an invisible rectangle in the same way as in figure Ex-4. Then a text cursor will blink at the top left of the rectangle, and any text typed will automatically fit within the borders of the rectangle.