2.3.1 Adding items
In this walkthrough, a user is adding a column item with subsections. Adding new columns to the grade sheet is one of the most common operations in the Grader tool. The user is assumed to have just created a new grade sheet, with all default entries and settings.
To add a column, selects "Item" >> “Add”. In response the system displays the dialog shown in Figure 2.3.1.1. This dialog has many data-entry fields for the components of the item.
Figure 2.3.1.1
The "Title” field is a one-line string that describes the item briefly. This is the only field that must be filled with a unique value before the item can be created. If this condition is not satisfied, the message in Figure 2.3.1.2 appears. After pressing “Ok” in that message, the user returns to the main “Add item” dialog.
Figure 2.3.1.2
The "Data Item" and "Graded Item" radio buttons are mutually exclusive and describe the type of the entries found in this item.
"Data Item" is the default value. When the user selects it the "MaxScore" and "Weight" fields are greyed out and disabled.
When "Graded Item" is selected, the "MaxScore" field is activated. "MaxScore" corresponds to the maximum score a student could earn on this item.
The checkbox next to "Weight" determines whether this column is weighted with respect to other columns on the same level.
If the box is unchecked, which is the default, the text field next to weight is greyed out.
If the box is checked, the text field is activated and the dialog appears as shown in Figure 2.3.1.3
Figure 2.3.1.3
The information in the fifth row of the dialog is used to identify a supercategory for this item. To the right of the text field is a button to select a supercategory from the current categories. When this button is pressed, the dialog in Figure 2.3.1.4 appears.
Figure 2.3.1.4
The user then selects a supercategory from existing items and presses Ok to confirm, or pushes cancel to make no changes. There can be either zero or one supercategory for any item.
In this scenario there are no columns to choose as supercategories, as the Grade tool starts out with no columns valid as supercategories.
Below the supercategory row is the dialog used for adding subcategories to this item. The text field holds the name of the subcategory the user wants to add to the list. The user fills in the name of the subcategory to be created, then presses the “Add” button located to the right of this text field. The system responds by moving the subcategory to the “Current Subcategories” box, located directly below the “Subcategory” row.
This box displays all current subcategories of the item to be created. There is no arbitrary limit on how many subcategories an item may have. The subcategories are selectable for the purpose of removing them from this box, but they can not be edited directly from this box. The user removes a subcategories one at a time by selecting them inside this box, then pressing the “remove” button located to the left of this box.
When an item has subcategories, the MaxScore field is blank and greyed out. This is because all supercategory MaxScore entries
are calculated using their subcategory MaxScore and Weight values.
The lowest point for data entry is the comments box, where any additional notes about the item are placed.
Pressing the “OK” button at the bottom of the screen adds an Item with all of the entered information to the grade sheet. The default location for new Items on the grade sheet is directly to the left of the score column. The cancel button will close the dialog and return the user to the main grade sheet without making any changes.
After the dialog first appears on the screen, the user enters information by a combination of entering values and pushing buttons. Figure 2.3.1.5 shows the result of the user entering values for an item called “Project 1”. This item has three subcategories, Part 1, Part 2, and Part 3.
Figure 2.3.1.5
The column type is set to an unweighted GradedItem. The subcategories created with this column have the same type, and if they are Graded Items, they are set as unweighted with an initial MaxScore of 0.
The user has entered a comment to this item, which appears on the GradeSheet as shown in Figure 2.3.1.6.
Figure 2.3.1.6
When the user confirms the item by pressing the “Ok” button, the item is entered into the current grade sheet, as shown in Figure 2.3.1.7. In order for the item to be permanently saved to the grade sheet, the user must invoke the “File” >> “Save” command.
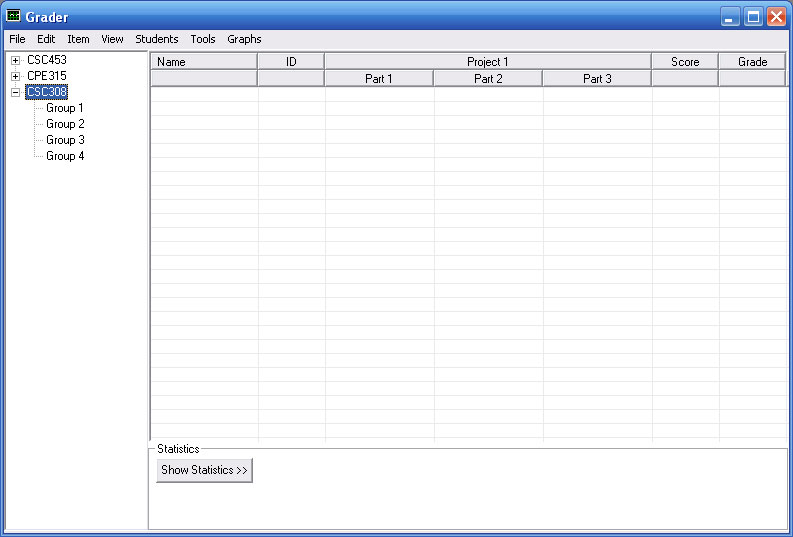
Figure 2.3.1.7
Figure 2.3.1.8 shows an example of the supercategory browser after item "Project" is added to the gradesheet.
Figure 2.3.1.8
Prev: None
| Next: Editing Items
| Up: Managing Graded Items
| Top: index