Aside from the Time, Class, and Pattern Preferences, an instructor may also chose several Proximal Preferences that will help influence their Scheduling outcomes. In the discussion that follows, the interfaces to these preferences will be explored.
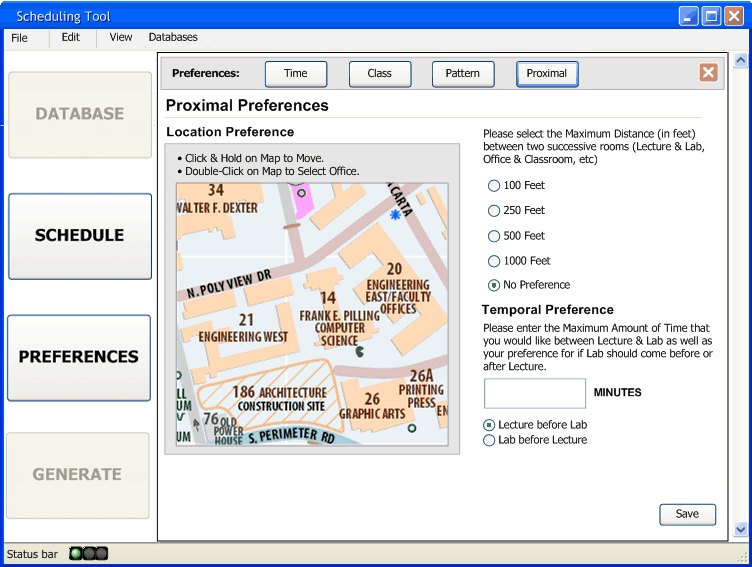
After the instructor clicks on the Proximal button, either from the second-level toolbar or the button on the Preference landing screen (as documented in Section 2.2), they will be presented with the following interface:

Figure 2.2.4.1: The Proximal Preference Interface
The instructor is presented with the above window which shows a small viewport that is propagated with a map of the campus, an option to select their Distance Preferences, an input box to enter their Temporal Preference, and a selection for if they want their lecture to precede or succeed their lab. All of the values and selections seen above are the default values for each instructor.
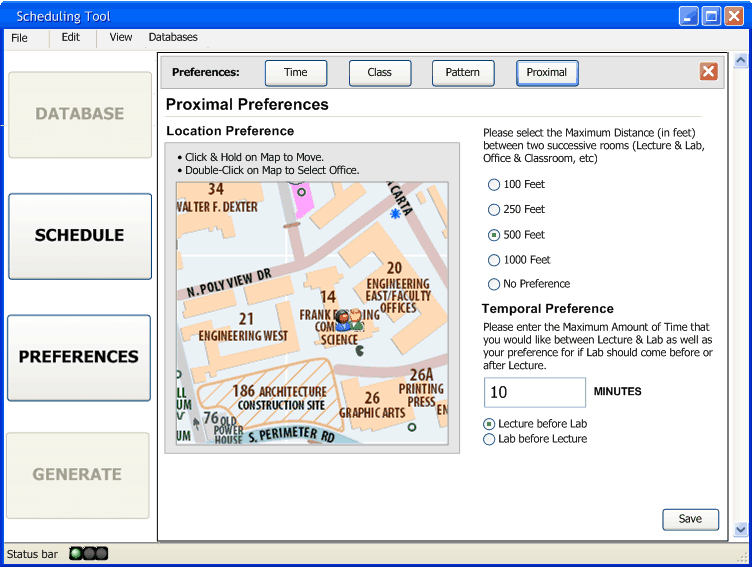
In order to accommodate an instructor's Distance Preference in relation to their office and future class rooms, an instructor must first select the location of their office on the scrollable map. To select their office, they will simply double-click on the location of the room and an image of two users will appear indicating to them that their action was received. If they double-clicked on the wrong office by accident, they can simply double-click on another section of the map and the new location will be updated.
The instructor can next select the Maximum Distance that they wish two successive rooms to be. For example, if they have a lab following a lecture, they would select their preferred distances between these two rooms under this option. They perform this selection by selecting one of the radio buttons indicating their preferred distance.
Finally, the instructor can set their Temporal Preference. They are presented with an input box that lets them enter the maximum number of minutes that they wish to pass between subsequent classes. They can then select whether or not they wish their Lecture to come before or after the Lab, with the default being the former.
Below is an example of the Proximal Preference Interface with the values filled out:

Figure 2.2.4.2: The Proximal Preference Interface with the Preferences Filled out
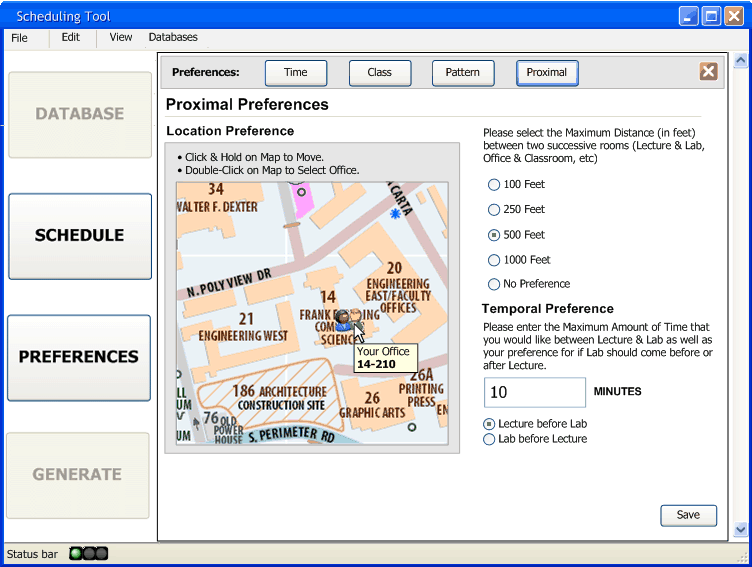
One extra feature is the ability for the instructor to confirm that their office selection was correct. They can do this by mousing over the icon that is placed on the map when they double-click on it. This will produce a text-tool that reads back the selected office. If they selected the wrong office, they can simply change it. This screen is seen below:

Figure 2.2.4.3: The Proximal Preference Interface when an Instructor Mousesover their Office Selection
After the instructor has finished configuring his/her proximal preferences, they can click the Save button to commit these changes to the server. If they have made changes to their Proximal Preferences that they have not saved and have attempted to navigate away from this screen (perhaps by going to File Exit, or clicking the Red X at the top of the UI), then they will be presented with a dialogue box asking them to either Save or Discard Changes. This dialogue is shown below:

Figure 2.2.4.4: Instructor being Prompted to Confirm their Actions
Clicking Yes on this screen will commit the changes to the server and return them to the Preference Landing Page seen in Section 2.2. Clicking No will discard their changes and return them to the Preference Landing Page seen in Section 2.2. Clicking Cancel will return them to the Proximal Preferences screen and allow them to make further changes and edits.