2.1 User Interface Overview
When the user initially invokes the Scheduler Tool, a screen appears with the menu bar on top of the window, as shown in Figure 2.1-1, and the category toolbar.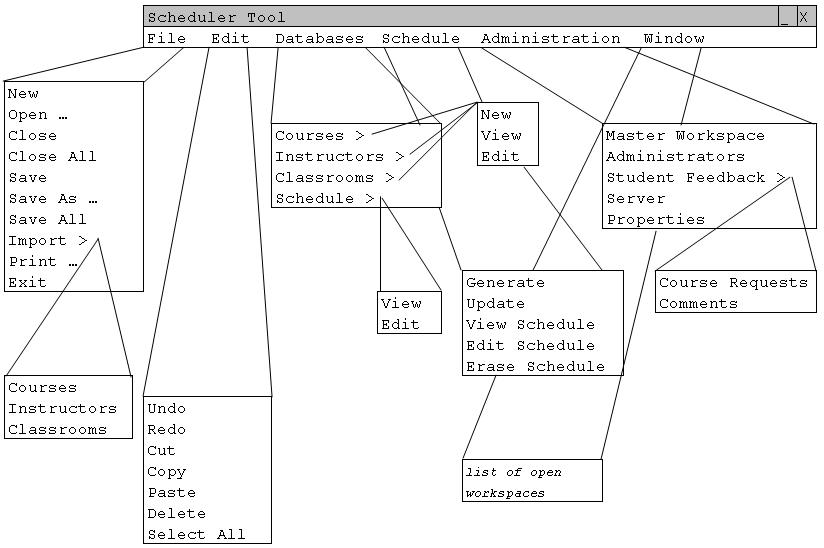
Figure 2.1-1: The expanded view of the Scheduler Tool menu bar.
The 'File' menu contains typical commands for manipulating data files and performing other system-level functions. 'File > New' creates a new empty schedule. 'File > Open ...' opens an existing schedule from a previously saved file. 'File > Close' closes the currently active schedule, offering to save if it has been modified since opening. 'File > Close All' closes all open schedules, offering to save any that have been modified. 'File > Save' saves the currently active schedule on the file from which it was opened, or on a new file if it was created from a new display. 'File > Save As ...' allows the current schedule to be saved on a different file from which it was opened or most recently saved upon. 'File > Save All' saves all currently open schedules. 'File > Import >' allows the user to import a course, instructor, or classroom database from the server. 'File > Print ...' prints the contents of the currently active display window in a form suitable for output to a printing device capable of displaying text and graphics. 'File > Exit' exits the Scheduler Tool, offering to save any modified schedules if necessary.
The 'Edit' menu contains commands for manipulating schedule data during editing. 'Edit > Undo' undoes the most recently completed editing commands. Repeated successive invocations of 'Undo' undoes successively earlier commands. 'Edit > Redo' redoes the most recently undone command. Repeated successive invocations of 'Redo' redoes the series of undone commands in reverse order. 'Edit > Cut' removes and copies the currently selected datum in the current display. 'Edit > Copy' copies the currently selected datum without removing it. 'Edit > Paste' inserts the most recently cut or copied datum at the currently selected edit point in the current display. 'Edit > Delete' removes the currently selected datum without copying it. 'Edit > Select All' selects all editable data in the current display.
The 'Databases' menu contains commands to create new, view, or edit the four databases. The four databases include courses, instructors, classrooms, and the schedule.
The 'Schedule' menu contains commands to work with the current schedule. 'Schedule > Generate' generates the best possible schedule, as defined by how the schedule is generated. 'Schedule > Update' refreshes the schedule and displays the schedule with recent changes that have been made. 'Schedule > View Schedule' brings up the window where the schedule is displayed. 'Schedule > Edit Schedule' allows the user to make changes to the current schedule. 'Schedule > Erase Schedule' erases the schedule that was generated, but does not remove any information within the databases.
The 'Administration' menu contains all the administrative features of the Scheduler Tool. 'Administration > Master Workspace' brings up the master workspace or creates one if there is no master workspace. 'Administration > Administrators' brings up a window which defines the Administrators of the current workspace. 'Administration > Student Feedback >' lets the administrator view 'Comments' and 'Course Requests' posted by students. 'Administration > Server' lets the user set the server path for the master workspace. 'Administration > Properties' lets the user set properties of the current workspace, such as the schedule name and phase deadlines.
The 'Window' menu contains information about the current workspaces that are open within the Scheduler Tool. For example, if the Spring 04 and Winter 04 workspaces are open, then 'Window > Winter 04' would take the user to the most recently used window in the Winter 04 workspace.