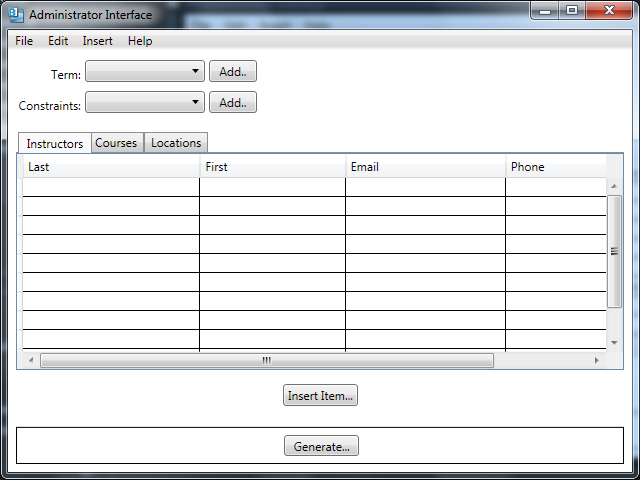
When the administrator initially invokes the M Scheduler, the screen appears as shown
in Figure 1.
Figure 2.1.1.1: Initial screen of the administrator, with no predefined data.
The administrator will be handed a blank template to work from when they open up the scheduler. There will be no predefined data inside any of the databases. The administrator must choose a term that the schedule will be generated for by specifying it under 'Term'. If the term is not available, the administrator has the option to add a new term. The adding a new term future is currently being worked on and will be addressed later in the future. A collection of terms created will be kept recorded for schedules created in the future.
The administrator's responsiblity is to fill in the databases with the scheduling information. This can be done either by importing databases from an existing project or inserting manually.
Importing Data From Existing Project
In order to import all data from an existing project, go to 'File' and select 'Import Existing Database..'. This will bring up a navigator where you will navigate to an already existing project. After selecting the project, all data from that existing project will be imported into your current project's databases, this means all instructors, courses, and locations. Screen for the navigator will be included later.
Importing Data Manually
In order to import data manually into one of the existing databases, go to 'Insert' and select either 'New Lecturer..', 'New Course..', or 'New Location..'. A window will be brought up requesting information on the item being inputted and the item will then be in the database. Screens for these particular windows can be found in the later sections.
After the databases have been filled with the information needed, the administrator will choose 'Generate..' found at the bottom of the window to produce the schedule.
Figure 2 shows an expansion of the command menus.
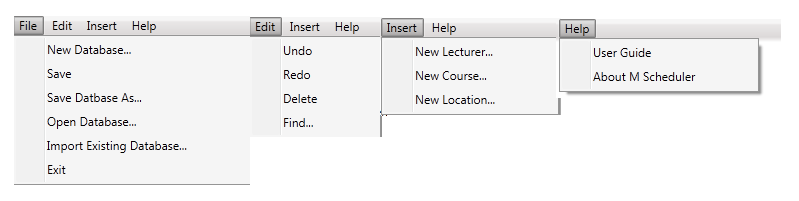
Figure 2.1.1.2: Expanded command menus.
The File menu contains typical commands for manipulating data files and performing other system-level functions. 'File New Database...' creates a new database. 'Save' saves the current database open. 'Save Database As...' allows the current database to be saved on a different file from which it was opened or more recently saved upon. 'Open Database...' allows the user to open an existing database from a previously saved file. 'Import Existing Database...' will import information from an existing database into the current database. 'Exit' will exit the M Scheduler.
The Edit menu contains commands for manipulating information in the database. 'Edit Undo' allows the user to undo the most recent move. 'Edit Redo' allows the user to redo the most recent undo. 'Edit Delete' is used to delete the item that is currently selected in a list. 'Edit Find' allows the user to search for an item within a specified database.
The Insert menu contains commands for inserting information into the database. 'Insert New Instructor...' inserts a new instructor into the database. 'Insert New Course...' inserts a new course into the database. 'Insert New Location...' inserts a new location into the database.
The Help menu contains commands for users that have questions. 'Help User Guide' contains information on how to use the M Scheduler or any of its features. 'Help About M Scheduler' contains information about this product.