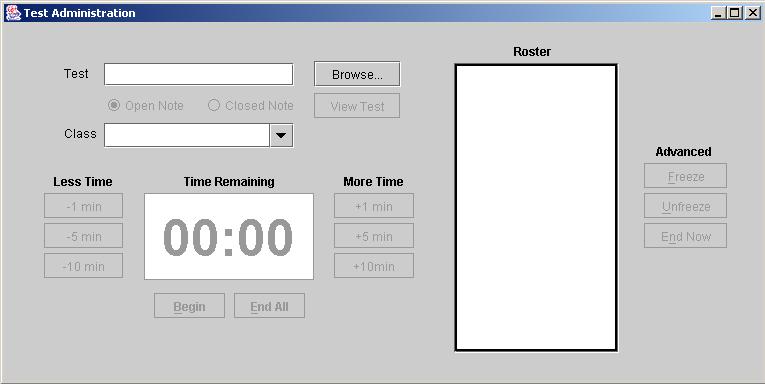
Figure 2.4.1.i1: Test Administration Window
This scenario shows the instructor electronically administering a test to an entire class. In this scenario, we assume the instructor has already created a test (see 2.2 Test Generation). The instructor can print each test to administer on paper (see 2.1.1 Teacher Interface), but the primary function of the test tool is to administer the test using computers.
Administering a
test in the computer lab requires 5 steps:
- Opening The
Test Administration Window
- Selecting A Test
- Selecting A Class
- Beginning A Test
- Collecting A Test
There are further
functions for adjusting remaining time and freezing one or more students
tests.
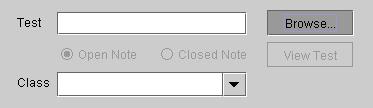
To get to the Test Administration window as shown below in Figure 2.4.1.i1, the instructor selects the Administer Test item in the Tests menu (see 2.1.1 Teacher Interface).
To select a test
the instructor clicks on the Browse
button which opens up a window to let him find the
filepath of
the test as shown below in Figure
2.4.1.i2. When a test is selected the total time for the
test is displayed in the Time
Remaining window.
The instructor
must select the test to be Open Note
or Closed Note
from the two options beneath the test name as shown below in Figure 2.4.1.i3. An Open Note
test allows the student full access to other computer programs while
taking the test. A Closed Note
test prevents the student from accessing other programs until the test
is submitted. The default setting is Open Note.
To view the
selected test the instructor clicks the View Test
button located beneath the Browse
button.
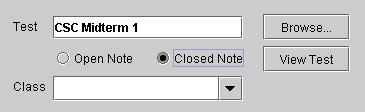 Figure 2.4.1.i3: Open or Closed Note |
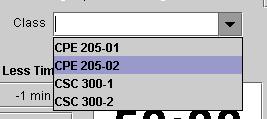
To select a class the instructor clicks on the desired class from pull down tab in the Class combo box as shown below in Figure 2.4.1.i4. The pull down tab lists classes and sections which the instructor teaches. When a class is selected, the names of the students in that class are displayed in the roster window on the right edge of the display.
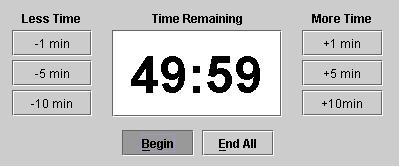
To
begin the test the instructor clicks on the Begin
button under the timer. A login window appears on each student's
screen. After successful login the window displays the
test. When the instructor begins the test, the timer begins to
count down as shown below in Figure
2.4.1.i5. A late student will simply login at an open
computer and begin the test. A late student is not given extra
time for their test, their time remaining will match all other student
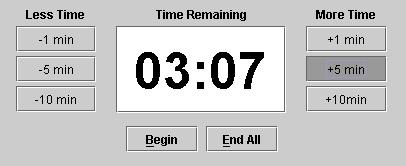
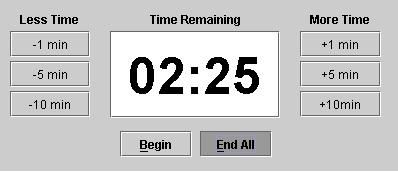
To adjust the remaining time the instructor clicks on the Less Time icons to the left of the clock or the More Time icons to the right of the clock as shown below in Figure 2.4.1.i6. The buttons adjust the time in increments of one, five, and ten minutes.
Should the instructor need to freeze one or more of the tests in progress, such as if cheating is suspected, the teacher highlights the desired student's names in the roster window and clicks the Freeze button to the right of this window as shown below in Figure 2.4.1.i7. Freezing a test locks the test from the student but does not stop the Time Remaining clock. To unfreeze a frozen test the teacher highlights the desired student's names and clicks the Unfreeze button.
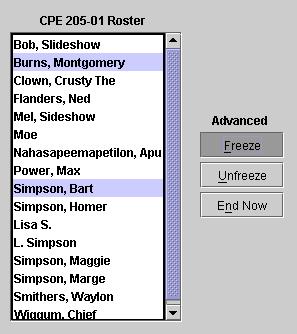 Figure 2.4.1.i7: Freezing A Student's Test |
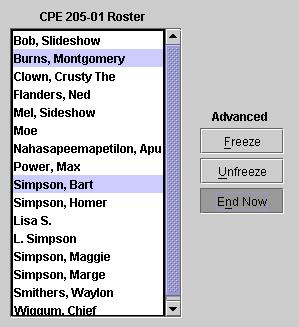 Figure 2.4.1.i8: Manual Collection Of Tests |
To collect a test
the instructor has three options: automatic
collection, manual collection of one or more tests, or manual
collection
of all tests. For automatic collection the instructor simply lets
the remaining time reach zero and the program collects all unfinished
tests. To manually collect one or more tests before the test time
is finished the instructor highlights the desired names in the roster
window and clicks the End Now
button as shown above in Figure
2.4.1.i8. To
manually collect all tests before the test time is finished the
instructor clicks the End All
button as shown below in Figure
2.4.1.i9.
When the test is collected the program autogrades the answered tests. The graded tests are placed in a folder for the teacher to further review (See 2.5.1 Manual Grading).
| Up: 2.4. Test Taking |
Next: 2.4.2. Taking An In-Class Test |