This introductory scenario shows an individual user creating a new question and adding it to an empty question bank, setting it's properties, writing the question, trying different answer types, and adding a picture to the question body. Adding questions is one of the most commonly preformed user actions when first using the Test Tool. In this specific scenario, we assume that the user adds a question to an empty question database. Note that the process of adding a question to an empty question database is the same as adding a question to a non-empty question database.
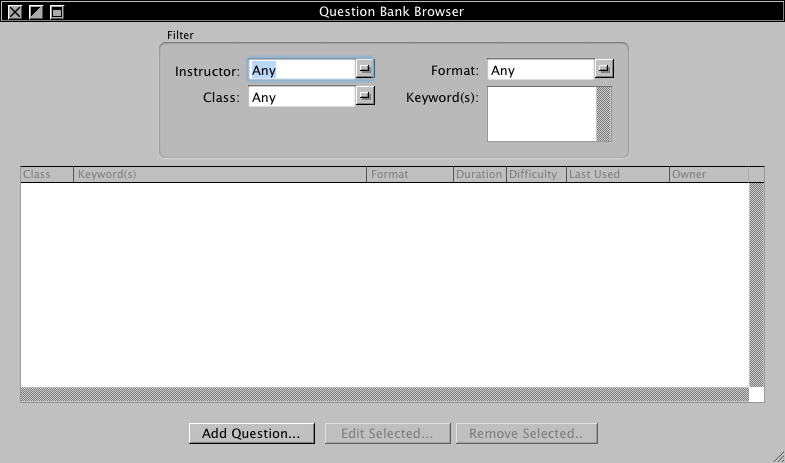
In the following scenario, we assume that the user, an administrator / test creator / teacher is at the Question Bank Browser window for the first time, arriving there from the starting window as described in 2.1. The Question Bank Browser is shown in Figure 1:
Figure 1: The Manage Question Bank window.
This window and it's functions are covered in detail in section 2.9. Figure 1 represents the way the bank appears when first opened.
To add a question to the bank, the user selects the Add Question... button from the question database window or selects the Add Question... menu item from the Questions menu. The Test Tool will then show the window shown in Figure 2:
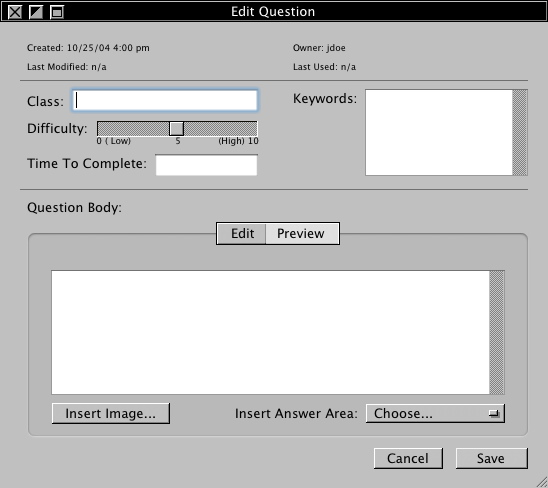
Figure 2 : The Edit Question dialog box.
The top row of text contains information about this question. They are as follows:
The next section of controls allows the user to input descriptive items about the test question. The Class input field is for the title of the class that this question will primarily be used for. The Keywords input field accepts several space-delimited words that describe the content of this test question so that this question can easily be found later as well as included in searches for questions with similar properties. Keywords that contain two or more words but still need to be counted as one "phrase" can be surrounded by quotes. The Test Tool then treats the phrase surrounded by the quotes as a single "key phrase". The Difficulty slider allows the user to describe how difficult the question is to answer for the average person answering the question, from 0, the lowest difficulty, to 10, the highest difficulty. Finally, the user can input the estimated length of time that this question will take for the average person answering this question to complete it.
The user adds the following keywords into the Keywords input box:
And then sets the Difficulty slider to low and the Time To Complete text input field to "30 seconds".
The next section of the window is where the user writes the question body as it is shown on the tests. The user can use any HTML tags to change the appearance of the question such as a bold tag (<b>), an italics tag (<em>), among much more. In this scenario, the user types the HTML shown in the figure below in to the Question Body text input area. The Edit Question window now appears as shown in Figure 3:
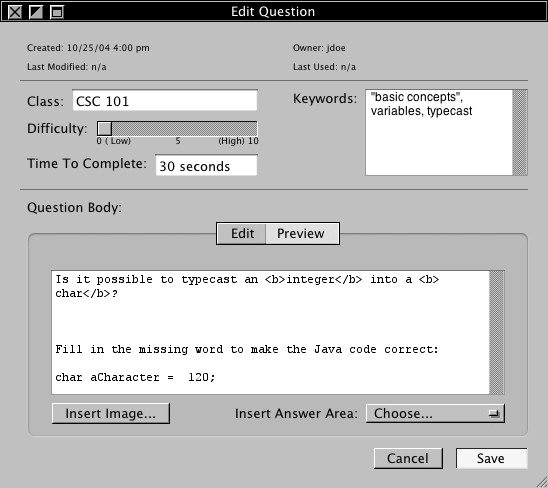
Figure 3 : The Edit Question dialog with partial input.
The user then clicks on the Preview... tab, which shows a tab with a preview of how the question, so far, looks on a generated test. The system displays the window shown in Figure 4:
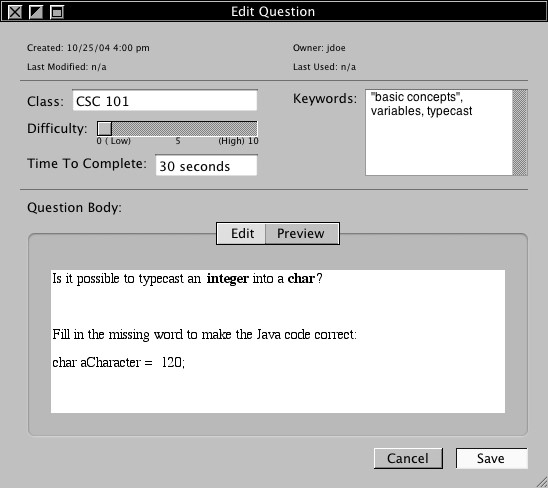
Figure 4 : The Preview tab.
Back in the Edit tab, there are two more buttons remaining to discuss. The first is the Insert Image... button which is covered in 2.2.10. The second is the Insert Answer Area pull-down menu. This pull-down menu allows the user to select an answer type to add, modify it's settings, and finally to add it to the question body.
The Answer Area Type drop-down menu containing the above choices is seen in Figure 5.

Figure 5 : The "Answer Types" drop-down menu.
Each possible selection in the question type drop-down menu is covered in section 2.2.1 through 2.2.7.
This scenario shows the user adding a "True / False" answer. The user selects the item "True/False" in the Insert Answer Area drop-down menu in the Edit Question window to set this question's answer type. The user is then presented with a window as shown in Figure 6:
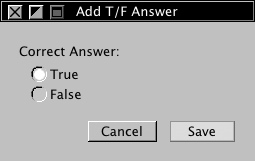
Figure 6 : Choosing options for a True/False question.
The user decides that "True" is the correct answer so the user clicks on Save. The Save button saves this answer to the question and is used as the answer type for this question unless the user changes the answer type later on. The Cancel button doesn't save or add this answer type to the question and does not change anything about the question.
This scenario shows the user adding a "Multiple Choice" answer. The user selects the item "Multiple Choice" in the Insert Answer Area drop-down menu in the Edit Question window to set this question's answer type. The user is then presented with a window as shown in Figure 7:
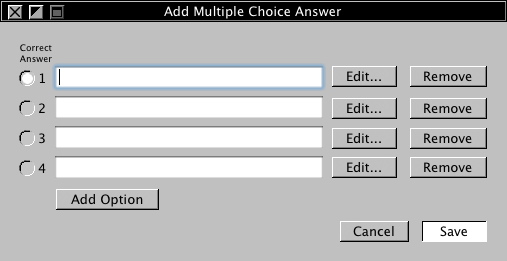
Figure 7 : The Add Multiple Choice Answer window.
This window contains rows, which represent individual options. The user can add options by clicking on the Add Option button. This adds a new row below the previously-last row in the window, resizing the row as necessary. Each row has a Remove button, which, when clicked, removes it's respective row. The text field in each row allows the user to input the answer text (HTML is allowed). The Edit... button opens a larger window in which the user has more space to type in the answer if the text field in the Multiple Choice window isn't large enough. This is covered below. Finally, the column of radio-buttons on the left of the rows allows the user to select which corresponding row is the correct answer.
The user inputs the following choices into the text input box rows:
The window now appears as shown in Figure 8:
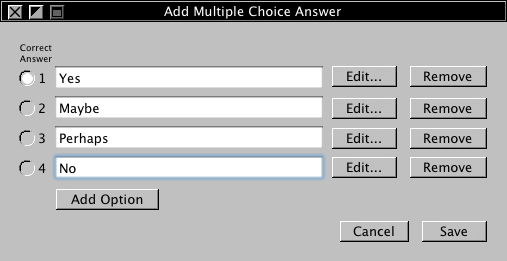
Figure 8 : The filled-in Add Multiple Choice Answer window.
The user decides that the "Perhaps" option is redundant so the user clicks on the Remove button in the corresponding row. That then removes that row and resizes the window accordingly. The window then appears as shown in Figure 9:

Figure 9 : The filled-in Add Multiple Choice Answer window with a removed option.
The user clicks on the "Edit..." button next to the second option which reads "Maybe". A window shows up with the "Maybe" option in the edit text. To italicize the word "Maybe", he user surrounds it with the "<em>" HTML tag to italicize the text. The window is shown in Figure 10:
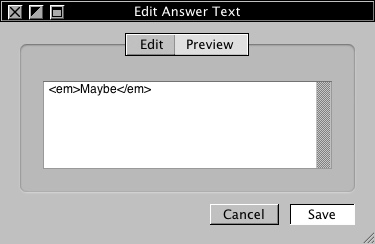
Figure 10 : The Edit Answer Text window
To preview how the answer option will appear on the finalized test, the user clicks on the "Preview" tab which shows the rendered text, which is shown below in Figure 11:
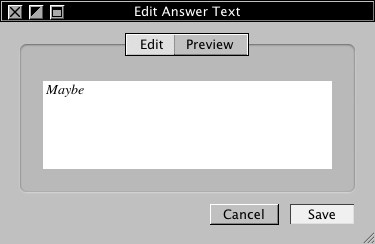
Figure 11 : The Edit Answer Text window preview
The "Save" button saves the answer text settings to the Add Multiple Choice Answer window and closes the Edit Answer Text window, and the "Cancel" button closes the window without saving the changes to the answer text. After clicking either button, the user is returned to the Add Multiple Choice Answer window.
Now that the user has set his/her options to his/her liking, the user clicks the "Save" button, which saves the changes and returns the user to the Edit Question window, with the Multiple Choice answer now the default answer type.
In this scenario, the user adds a "Matching" answer. Supposing that the question to be answered is, "Match the class to it's Package:", the user then selects the "Matching" answer type in the Edit Question window's Insert Answer Area drop-down menu. The user is then presented with the window as shown in Figure 12:
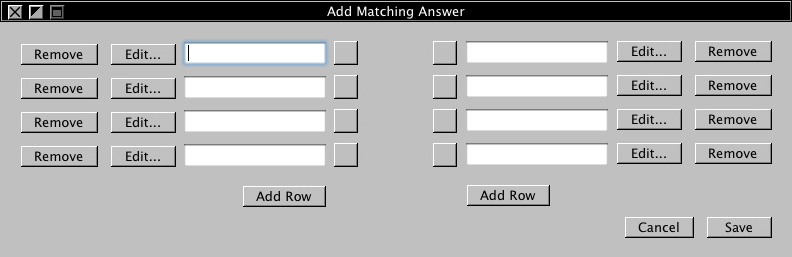
Figure 12 : The Add Matching Answer window
There are two columns of options. They represent individual options. The corresponding "Remove" buttons remove their respective option, and the "Edit..." button allows the test creator to edit the text using the same window as shown in Figures 10 and 11 which acts in the same way described in 2.2.2. The "Add Row" button adds a new row to the bottom of it's corresponding column. The row of gray boxes allow the user to set the correct matches. To do so, the test creator clicks and holds on a box then drags over to the corresponding correct match, which draws a line as the user does so. Any combination of matches are acceptable, as long as every option is used at least once and that they are only connected to options on the opposite side and not on the same side.
In this scenario, the user fills out the text boxes and matches as shown in Figure 13:
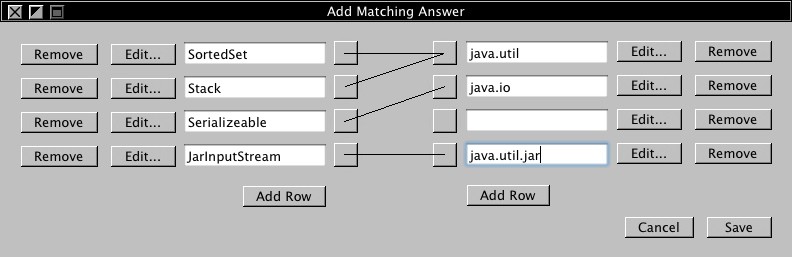
Figure 13: The Add Matching Answer window, filled in
Both "SortedSet" and "Stack" are connected to "java.util". This means that the test taker will have to connect both of them to the java.util option to earn full points for this question. If only one of the two is connected, they will receive a prorated amount of points.
Because the 3rd option in the right-hand column is not connected and not filled out, the user clicks on the "Remove" button, which removes the corresponding option. The window now appears as shown in Figure 14:
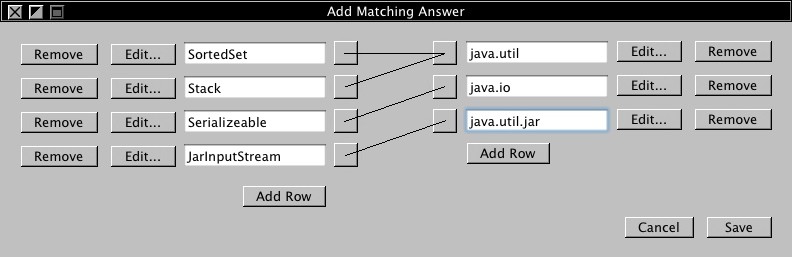
Figure 14: The Add Matching Answer window, filled out and with the empty option removed
Although the user manually removed the option, the Test Tool automatically ignores options that are not filled out or have no connection. An option with no text but that is still connected will produce an error message when the user tries to save the answer.
Now that the user has set his/her options to his/her liking, the user clicks the "Save" button, which saves the changes and returns the user to the Edit Question window, with the Matching answer now the default. The "Cancel" button would have closed the window without saving any changes.
In this scenario, the user chooses the "Fill In The Blank" answer type. Supposing that the question to be answered is, "______ is one example of a subclass of java.lang.Number.", the user then selects the "Fill In The Blank" option in the Edit Question window's Insert Answer Area drop-down menu. The user is then presented with the window as shown in Figure 15:
![]()
Figure 15: The Add Fill-In-The-Blank Answer window
This window contains only one text input field for the allowed responses as well as a checkbox. The various possible correct answers are simply typed in, separated by commas. Any single one of the set answers, if entered in during a test, will result in full points for the corresponding question. If the checkbox is checked, the answer is case-sensitive, meaning that if the user types in "america" when the answer is "America", they will not receive credit for this question. In this instance, the user fills in the options as shown in Figure 16:
![]()
Figure 16: The Add Fill-In-The-Blank Answer window, filled out
Satisfied with the options, the user clicks the "Save" button, which saves the changes and returns the user to the Edit Question window, with the Matching answer now the default. The "Cancel" button would have closed the window without saving any changes.
In this scenario shows the user adding a "Short Answer" answer type. Assuming that the question to be answered is, "Describe at length what polymorphism is.", the user then selects the "Short Answer " option in the Edit Question window's Insert Answer Area drop-down menu. The user is then presented with the window as shown in Figure 17:
-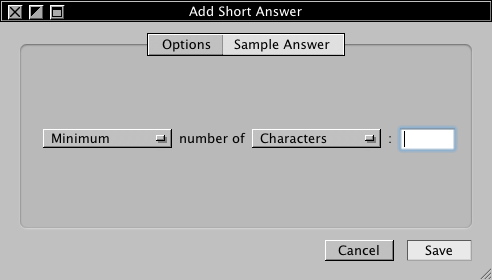
Figure 17: The Add Short Answer window
The two tabs at the top of the window are "Options" and "Sample Answer". On the "Options" tab, the user specifies their preferences for this particular answer type. On the "Sample Answer", the test creator can add a sample correct response to the question which is then used as the "correct answer" on the printed key. It does not, however, get used in any aspect of the automatic grading process.
The two drop down menus allow the user to change the limits on the allowed size of the answer. The first drop-down has the following options:
The second drop-down has the following options:
Any combination of the two sets of options are acceptable. The edit field at the end specifies the number of characters, words, or lines that are either required at a minimum or at a maximum. The user wants a minimum of 500 characters so the user sets the options as sown in Figure 18:
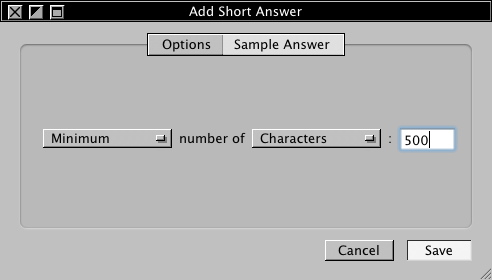
Figure 18: The Add Short Answer window, filled out
Short Answer questions are manually-graded only. The "Essay Answer" answer type allows for automatic grading, as shown in 2.2.6, below.
After clicking on the "Sample Answer" tab, the user is presented with the following:
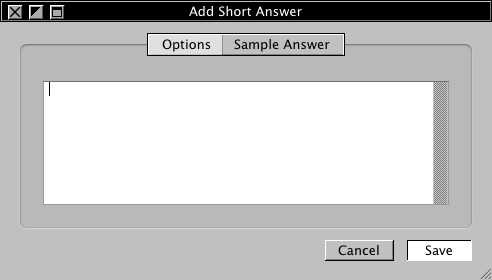
Figure 19: The Add Short Answer window's "Sample Answer" tab
Here, there is a text box in which the representative sample answer can by typed or pasted in. The sample answer is only used when a test key is made, in which this sample answer is used as a suggested correct answer. After typing in the sample answer, the test creator now sees the following:
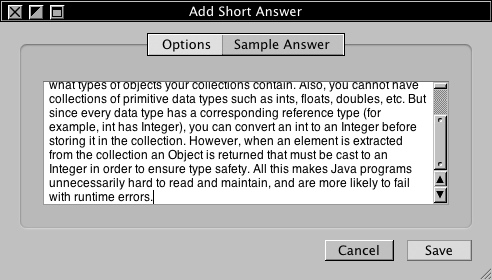
Figure 20 : The Add Short Answer window's "Sample Answer" tab, filled out
The user then clicks on the "Save" button which saves the changes in answer type for the question currently being edited and then closes the Add Short Answer window, returning the user to the Edit Question window. The "Cancel" button closes the Add Sort Answer window and returns the user to the Edit Question window without saving any changes.
In the following scenario, the user adds an "Essay Answer" answer type. Assuming that the question to be answered is, "Write an essay on the limitations of Java.", the user then selects the "Essay Answer" answer type. After selecting the "Essay Answer" option in the Edit Question window's Insert Answer Area drop-down menu, the user is presented with the window as shown in Figure 21:
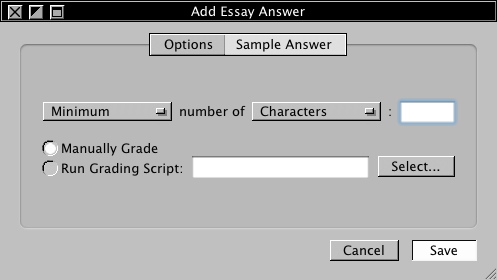
Figure 21: The Add Essay Answer window
The two tabs at the top of the window are "Options" and "Sample Answer". On the "Options" tab, the user specifies their preferences for this particular answer type. On the "Sample Answer" tab, the test creator can add a sample correct response to the question which is then used as the "correct answer" on the printed key. It does not, however, get used in any aspect of the automatic grading process.
The first row of options behaves exactly as previously described in 2.2.5. The second section of options allows the user to either manually grade the answer or run an outside program to grade it. The program must run through the command line and take exactly one argument, a path to a temporary text file containing the answer. The program should then respond with the score as a percentage. For example, if the student earns 98%, the program should respond with ".98". The "Select..." button allows the user to select the grading script/program using their operating system's standard file selection dialog box. The user can also manually type in the path to the script/program in the text field.
The user wants the test taker to input a maximum of 10,000 characters and then grade that response using a script called "essayGrader.pl". The window then appears as shown in Figure 22:
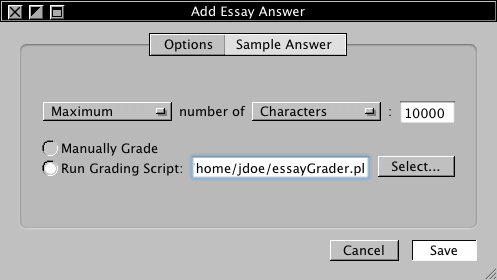
Figure 22: The Add Essay Answer window, filled out
The "Sample Answer" tab behaves exactly as shown in 2.2.5.
The user then clicks on the "Save" button which saves the changes in answer type for the question currently being edited and then closes the Add Essay Answer window, returning the user to the Edit Question window. The "Cancel" button closes the Add Essay Answer window and returns the user to the Edit Question window without saving any changes.
In this scenario, the user chooses a "Program Code" answer type. The user selects the "Program Code" option in the Edit Question window's Insert Answer Area drop-down menu and then the Add Program Code window appears. The Add Program Code window looks and behaves exactly like the Essay Question window as seen in 2.2.6. The only difference between the two is that during the test taking, the text input field that the test taker types in to uses a monospace font which makes it easier to format and read code. After selecting the "Program Code" answer type, the user is presented with the window as shown in Figure 23:
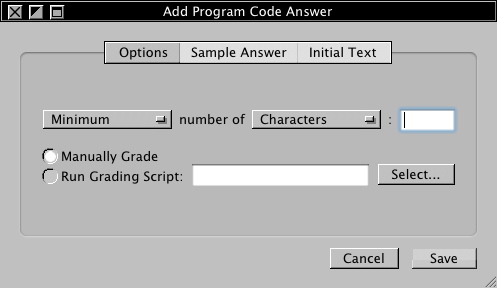
Figure 23 : The Add Program Code Answer window
The two tabs at the top of the window are "Options" and "Sample Answer". On the "Options" tab, the user specifies their preferences for this particular answer type. On the "Sample Answer" tab, the test creator can add a sample correct response to the question which is used as the "correct answer" on the printed key. It does not, however, get used in any aspect of the automatic grading process.
There are no functional differences between the Essay Answer window discussed in 2.2.6 and the Program Code Answer window. They behave in the same way. The difference between the two is that during test taking, Program Code answers will provide the user with a fixed-width font (such as Courier or Monaco) text field whereas the Essay Answers will use a variable width font, such as Times or Georgia. And filled out, the window looks like Figure 24:
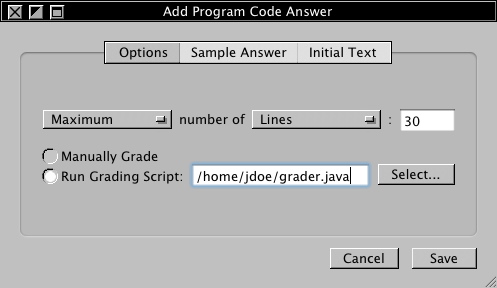
Figure 24: The Add Program Code Answer window, filled out
The "Sample Answer" tab behaves exactly as shown in 2.2.5.
The "Initial Text" tab contains a text-input field as shown below:
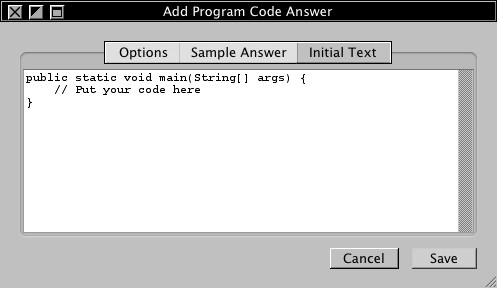
Figure 25: The Add Program Code Answer window's "Initial Text" tab
This text field is the area where the user inputs text that is in the answer area when taking the test. The user inputs the shown code. Then, when students are taking the test, they will see the above code at first. They then edit it to fulfill the requirements of the question.
The user then clicks on the "Save" button which saves the changes in answer type for the question currently being edited and then closes the Add Program Code Answer window, retuning the user to the Edit Question window. The "Cancel" button closes the Add Program Code Answer window and returns the user to the Edit Question window without saving any changes.
After clicking on the Save button in the add answer types (sections 2.2.1 through 2.2.7), an element is inserted into the Question Body text-input field wherever the carat is at. For this scenario, the user has just added a True / False answer type to the question.
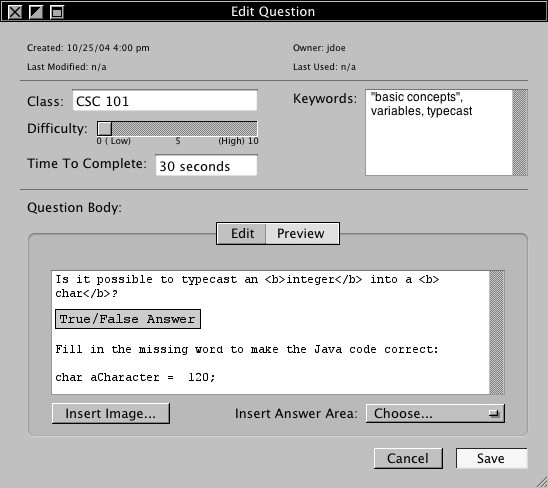
Figure 26: The Edit Question window, with an answer area inserted
The element that is inserted is the gray box shown in Figure 26 that reads, "True/False Answer". This is where the answer area goes on the test. The element's text reflects the answer type it is (i.e. "True/False Answer", "Matching Answer", "Program Code Answer" etc.). The element is treated much like text it. You can drag it around, copy and paste it in another location, and surround it with HTML tags. Multiple answer types are allowed in a single question. Double clicking on an answer area box will bring up the editor for that question. For instance, if the user double clicked on the True/False answer area box, the user would see the window shown in 2.2.1.
In this scenario, the user, in addition to the True/False answer that already exists, wants to add a Fill-In-The-Blank answer area. The user wants the answer area on the last line, so the user positions the carat in between "=" and "120" on the last line. Then, the user selects the "Fill-In-The-Blank" option of the "Insert Answer Area" drop-down menu. After saving the options in the "Add Fill-In-The-Blank Answer" window, the user clicks save and sees the updated Question Body:

Figure 27: An added answer area
The "Insert Image..." button in the Edit Question window allows the user to insert an image into the Question Body. The user positions the carat at the very end of the Question Body and clicks the "Insert Image..." button. The user then sees the standard file selection dialog box, whichever is standard for the user's operating system. After the user selects the image he/she wants, the user sees the following updated Question Body:
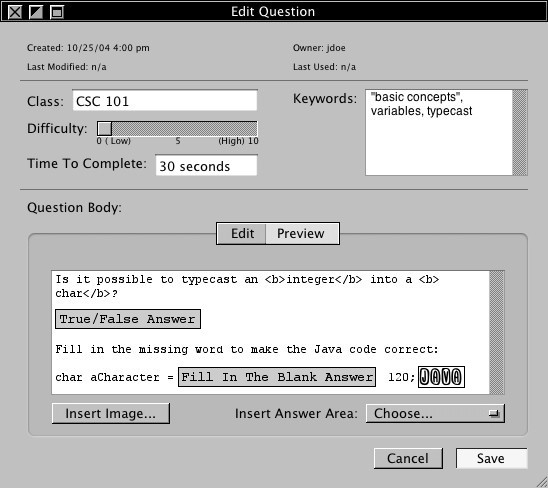
Figure 28 : An inserted image
The Preview tab shows the following:
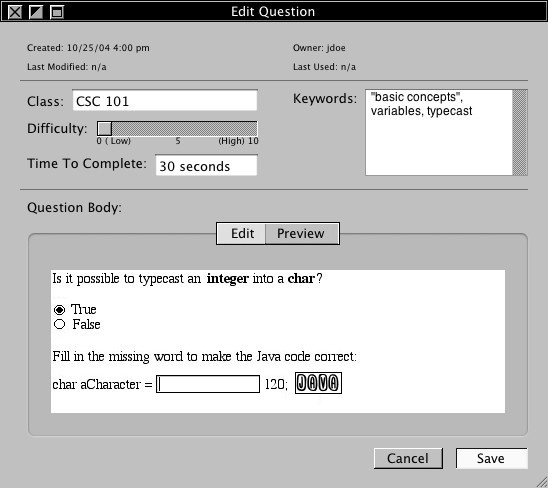
Figure 29: Previewing question after adding image
The image element behaves the same way that an answer area does. The user can move, copy, paste, and delete it. Double-clicking on an image allows the user to select a new image using the OS-standard file selection dialog.
When the user has finishing making changes to the question, the user can then click either Cancel or Save. If the user clicks on Cancel, none of the changes are saved and the question is not saved to the database. The user is returned to the question database window, which is the same as before. Instead, the user decides to save the question to the database so the user clicks on Save. The question and all related information will get added to the question bank and will appear as a row in the question database row and the Edit Question window will close. If the user clicks the close window button in the toolbar, the user will see a window that asks if they would like to save the question, offering two buttons, Save and Don't Save. The Save and Don't Save buttons have the same functionality as the Save and Cancel buttons in the Edit Question window, respectively
After adding the question in the above scenario, assuming the user decided on a True / False answer type, the Question Bank Browser will now appear as shown in Figure 30:
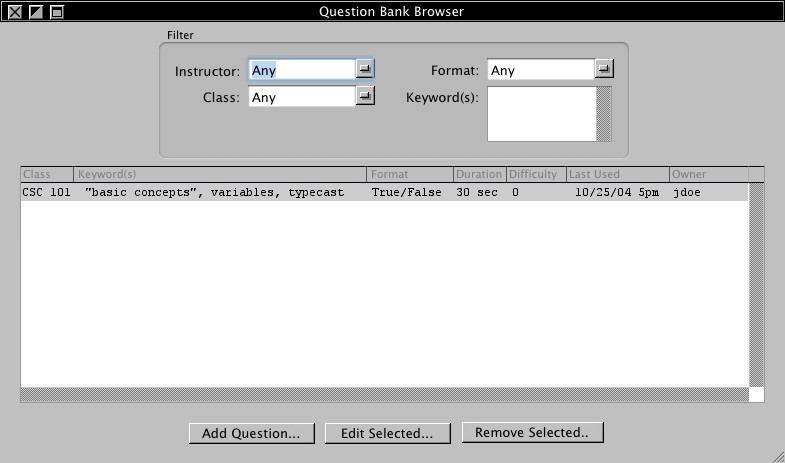
Figure 30 : The Manage Question Bank window with one row.
Because a row is now selected in the list of questions, the Edit Selected... and Delete Selected... buttons are now enabled. The Delete Selected... button will remove the selected question from the question bank. The row will disappear from the list of questions. The Edit Selected... button allows the user to edit the selected question. In this scenario, the user selects the first and only question and clicks on the Edit Question... button. The following window appears:
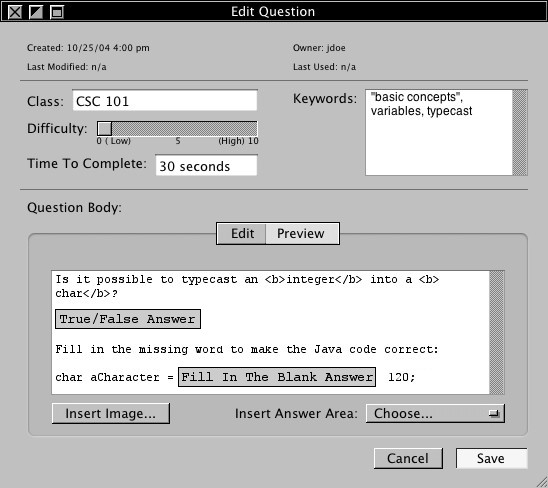
Figure 31: Editing a question
This is the familiar Edit Question window, with the question being edited loaded. Everything works the same as shown in the 2.2 scenario. If the user makes changes and then saves them, the Date Modified field will get updated with the date and time that this question was edited. Saving and Canceling work otherwise the same as described earlier in 2.2.
In this scenario, the user views a question that the user does not own. In the Question Browser window, there are two rows, as shown:
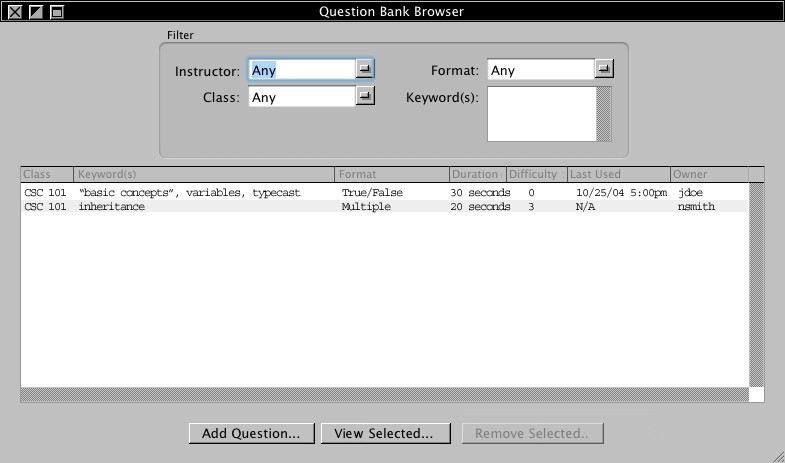
Figure 32: Question Bank window non-owned question selected
The second row is highlighted. Because the user doesn't own the question, only the View Selected... and Add Question... buttons are enabled. The user can not delete the question because he/she does not own it. The user however, can click on the View Selected... button, which will bring up the following window:
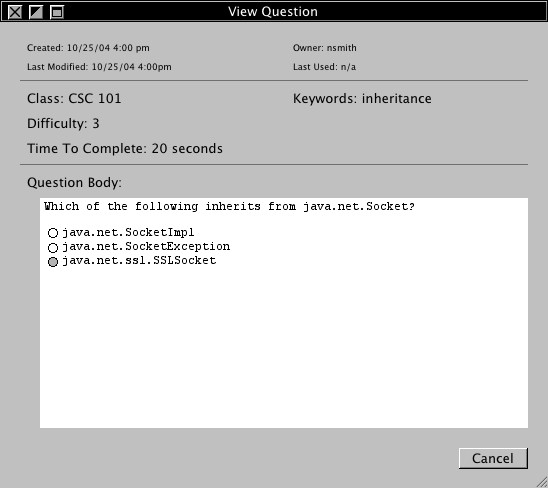
Figure 33: Viewing a question
The information fields are the same as in the regular Edit Question window with the exception that they can't be edited. Clicking on the Cancel button will close the window.
Assume the user has entered many questions and has synchronized the database with the server (covered in 2.2.15). The Questions Bank window will then look something like the following:
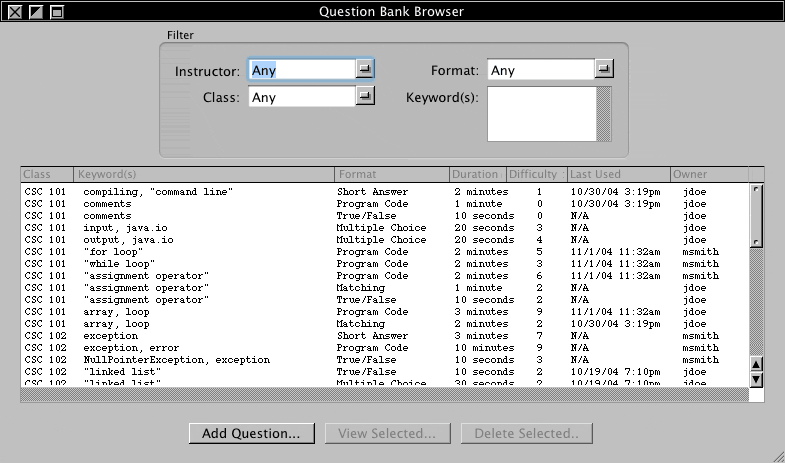
Figure 34: Question Bank window with many questions
The fields at the top of the window allow users to filter the questions to find questions or groups of questions that satisfy the entered information. The Instructor field filters for the user-id of the owner of the question, the Class field filters the class that each question is assigned to, Format filters the format of the answer type(s) of each question, and the Keyword(s) filters the keywords for the questions. The Keyword(s) field accepts comma separated words, including phrases surrounded by quotes. The Instructor, Class, and Format fields are editable fields that also have a drop down menu. Clicking on the control to the right of the white editable area brings up a drop-down menu that contains the possible values, gathered from the rows currently in the local question bank:
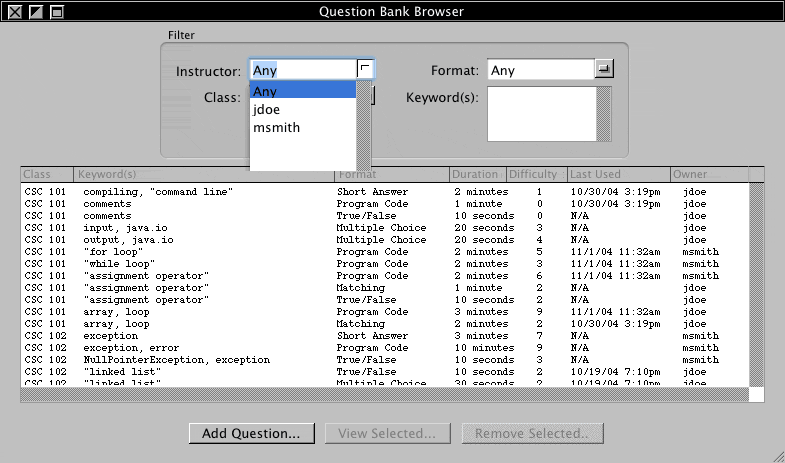
Figure 35: Question Bank window with many questions
In this scenario, the user wants to see the questions owned by jdoe and for the CSC 102 class, so the user selects "jdoe" in the drop-down menu for Instructor, and types "CSC 102" in the Class field. The filtered results look like so:
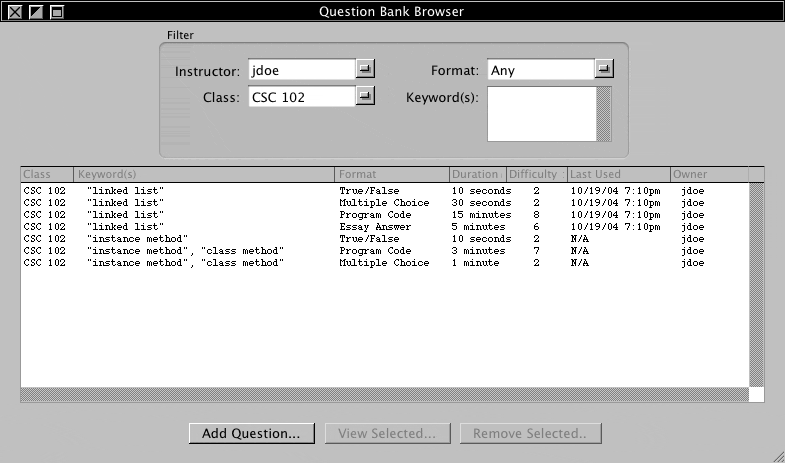
Figure 36: Question Bank window with filtered list of questions
Users can remove any questions in the local question bank, but when synchronizing to the server, they can not delete the server's version if they don't own it. Synchronizing is covered in detail in 2.2.15. To remove a question, a row must be selected:
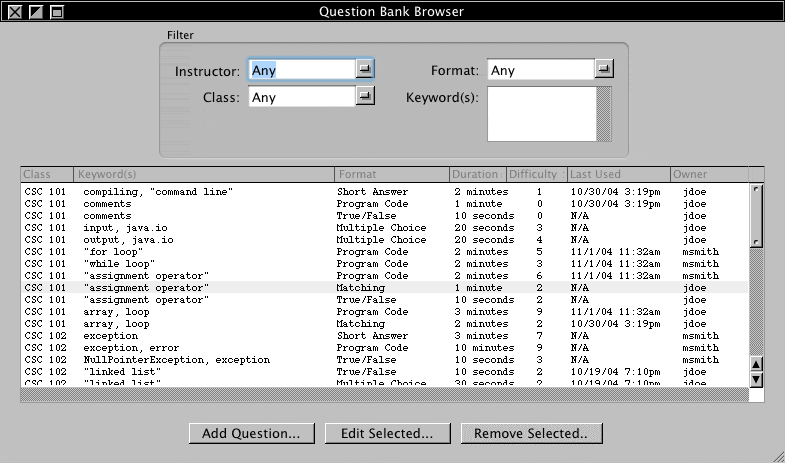
Figure 37: Question Bank window with a row selected
Clicking on the Remove Selected... button will bring up the following confirmation dialog:
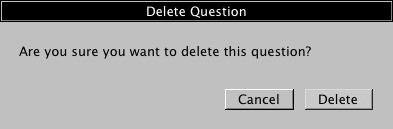
Figure 38: Confirm delete dialog box
Clicking on the Delete button will confirm the deletion, remove the question from the local copy of the question band, and remove it's row from the Question Bank window.
Note: This section isn't complete. It needs more complete descriptions and scenarios and screenshots.
If an user wants to edit a question that they do not own, they can duplicate the question, which will create a new copy of the question with the owner attribute set to their user name. Duplicating a question will also reset the "Last Modified" and "Last Used" fields.
In this scenario, the user, jdoe, duplicates a question that the user does not own so that the user can edit it. They select the following row in the Question Bank window:
CSC 102 | NullPointerException, exception | True/False | 10 seconds | 3 | N/A | msmith
Because the user does not own this question, the edit button now reads, "View Question...", which allows the user to view the questions as shown in 2.2.11. To duplicate the question, the user goes to the "Edit" menu and selects the item reading "Duplicate". This will then add the following row to the question bank:
CSC 102 | NullPointerException, exception | True/False | 10 seconds | 3 | N/A | jdoe
The window will automatically update the sorting of the questions if they are sorted. If the questions were filtered and the new question doesn't meet the filter criteria, the user doesn't see the new row until their filter criteria matches the new question. In addition to the owner being changed in the new copy, the "Created" is updated to the current date, and the "Last Modified" and "Last Used" fields are reset. The question isn't added to the server until the local question bank is synchronized.
Note: This section isn't complete. It needs more complete descriptions and scenarios and screenshots.
Local modifications are local-only until the question bank is synchronized. Synchronizing allows the user to put their questions on the server for others to use, to get questions that others have created, and to update questions that they have already downloaded from the server. To synchronize, the user selects the "Synchronize..." menu item from the "Question Bank" menu. The Test Tool contacts the server, gathers information about the questions already on the server, and then shows a window with the following:
Each of the above rows are expandable / collapseable folders that contain the questions that fulfil their containing folder's title. For example, a question under the "Deleted Locally" question is a question that has been deleted locally. To the right of every question, there is a Synchronize column containing a checkbox, which behave as described below:
After the user is finished making their choices, they click on the "Synchronize Now" button at the bottom of the window which then perfroms the actions selected. Clicking the "Cancel" button will cancel the synchronize and leave both the local and remote question banks untouched.