2.1. User Interface Overview
Test Tool users fall under three possible headings: Instructors, Proctors and Students. Different user interfaces are available for each of these groups. Users in the Instructor category have access to the widest and most extensive range of features and capabilities. Instructors have the ability to manipulate a question database, generate tests, manage student users, and administer (or proctor) student tests. Proctors are a subset of Instructors and only have access to the test proctor section. The third user interface is for students. The Student Test Tool application allows students to take a variety of tests such as proctored tests, practice tests, or take-home. Students can also use Test Tool to view graded tests.
2.1.1. Instructor
When an Instructor initially invokes the Test Tool, the screen appears as shown in Figure 1.
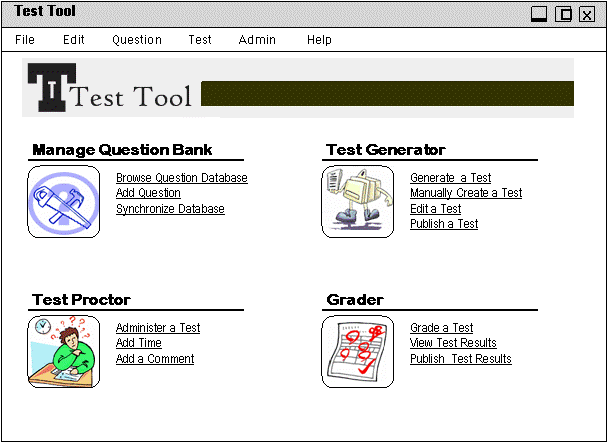 |
Figure 1. Initial screen for Instructors.
The initial display consists of pull-down command menus (File, Edit, Question, Test, Admin, and Help) and a set of links for quick access to the more commonly used functions. These links are grouped under header bars such as “Manage Question Bank”. The underlined links below each header bar provide shortcuts to more specialized functions. These links are provided for two reasons: (1) Quick access to frequently used features and (2) To help new users get an idea of the general structure and functions available through Test Tool. The command menu provides access to a fuller range of features.
Each quick link corresponds to a menu command. The following table provides a brief description of each of the quick links along with the link’s corresponding menu command. The menu commands are displayed as “Menu -> Command” where menu is the name of the pull-down menu where the command can be found.
|
Quick Link |
Corresponding Menu Command |
Description |
|
Manage Question Bank
|
|
|
|
Browse Question Database |
Question -> Manage Database |
Opens the dialog box for viewing the questions in the Questions Database. (Details covered in section 2.2.12 Viewing Question Bank.) |
|
Add Question |
Question -> Add |
Opens a blank Edit Question Dialog Box which can be used to add a new question to the Question Databank. (See section 2.2 Managing Questions.) |
|
Synchronize Database |
Question -> Synchronize |
Allows an Instructor to share the questions in their database and receive questions from a shared Question Bank. Details of this function are covered in section 2.2.15 Synchronizing Local and Server Question Banks. |
|
Test Generator
|
|
|
|
Generate a Test |
Test -> Create New -> Basic |
Opens the Test Generation Window described in section 2.3.1 Basic Test Generation Window. |
|
Manually Create a Test |
Test -> Create New -> Manual |
Opens a blank Test Editor window as describe in section 2.4 Editing a Test. |
|
Edit a Test |
Test -> Edit a Test |
Allows the instructor to open an existing test and edit its contents. (Details in section 2.4 Editing a Test.)
|
|
Publish a Test |
Test -> Publish |
Allows a user to set the Administrative Options for a test and post the test on a server for use by Proctors and Students. (See section 2.4.6 Publishing a Test.)
|
|
Test Proctor
|
|
|
|
Administer a Test |
Test -> Proctor -> Begin Test |
This begins the test proctoring functions (see section 2.5. Test Taker Proctor by opening the Proctor login screen described in section 2.1.
|
|
Add Time |
Test -> Proctor ->Add Time |
This opens the Add Time window (2.5.6. Special Options) while a timed, proctored test is underway. |
|
Add a Comment |
Test -> Proctor -> Add Comment |
Opens the Comment editor which allows Instructors and Proctors to add comments to a proctored test which can be viewed by students. Details in section 2.5.5 Add Comment. |
|
Grader
|
|
|
|
Grade a Test
|
Test -> Grade |
Begins the grading process with the Open Grader dialog box to select a test to be graded. Details in section 2.7 Grading. |
|
Publish Test Results
|
Test -> Post Grade |
Begins the process to post graded test by first selecting the test to be posted. Details in section 2.7.3 Posting Grades. |
|
Create Key
|
Test -> Create Key |
Opens the dialog box which selects a test to generate a key. |
The “Corresponding Menu Commands” from the preceding table can be seen in the expanded version of the command menu shown in Figure 2.
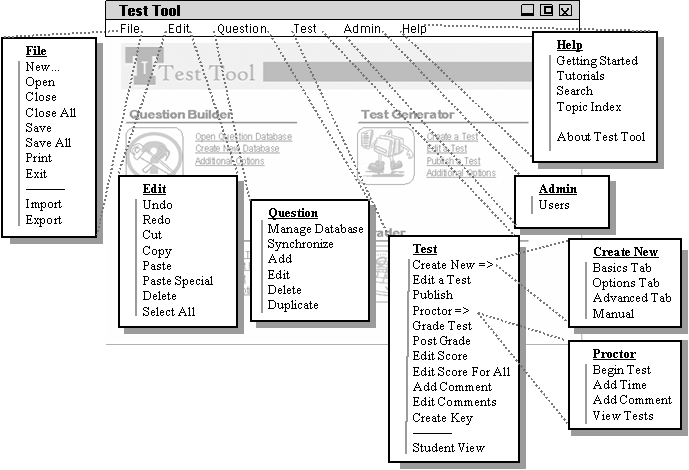 |
Figure 2: Expanded menus from Instructors screen.
Below is a general overview of each command. Further description and information for these commands can be found in later sections.
The File menu contains the typical commands for manipulating data files and performing other system-level functions. ‘File New’ opens either a new question or test file in a new window. ‘File Open’ opens an existing question or test file in a new window. ‘File Close’ closes the currently active window and ‘File Close All’ will close all open windows which contain files. Before any files are closed, the system will offer to save any that have been modified since opening. The ‘File Save’ and ‘File Save All’ will save one or all open file windows. If the file is new and does not have an existing name, Test Tool will prompt for a name and location to save. A copy of a file or an edited version can be saved under a new name with the ‘File Save As’. ‘File Print’ prints the contents of the currently active window in a suitable form. ‘File Exit’ exits the Test Tool; offers to save modified files before exiting.
The Edit menu contains commands for manipulating test data during editing. 'Edit Undo' undoes the most recently completed editing commands. Repeated successive invocations of 'Undo' will undo successively earlier commands. 'Edit Redo' redoes the most recently undone commands. Repeated successive invocations of 'Redo' will redo the series of undone commands in reverse order. 'Edit Cut' removes and copies the currently selected datum in the current display. 'Edit Copy' copies the currently selected datum without removing it. 'Edit Paste' inserts the most recently cut or copied datum at the currently selected edit point in the current display. 'Edit Delete' removes the currently selected datum without copying it. 'Edit Select All' selects all editable data in the current display.
The Question menu contains functions for manipulating individual Questions and the Question data bank. The first available option, ‘Question Manage Database’ invokes a dialog box to browse the question database. The ‘Synchronize’ begins the process to synchronize the database on a local machine with a shared database. The shared database is located on a server. The ‘Question Add’ command opens a blank question file and displays the dialog box for entering the appropriate data. ‘Question Edit’ opens an existing Question and displays an editor for the question. ‘Question Delete’ will remove the currently active Question from the data bank. Before the question is deleted, the system will prompt the user for confirmation. ‘Duplicate Question ’creates a new Question file with data from an existing Question. The data is extracted from the currently active or selected Question.
Functions for creating and manipulating tests are in the Test menu. Each of the commands invokes a dialog box that leads the user through the function options. ‘Create New’ opens another drop-down menu with additional options. Each of these commands; ‘Basics Tab,’ ‘Options Tab’ and ‘Advanced Tab’; allow the user to create a new test. ‘Options Tab’ provides a wizard with basic test criteria, while the ‘Advanced Tab’ provides the most criteria or detail for test generation. ‘Test Edit a Test’ allows users to open a previously created test and make changes. ‘Test Publish’ begins the process to make a test available to students and ‘Test Proctor’ provides an additional menu with options for proctoring an exam. ‘Proctor Begin Test’ allows a Instructor to begin the proctoring process. While proctored test is underway, Instructors can use ‘Proctor Add Time’ to change the time remaining on the countdown clock. The Instructor can also add comments, which can be viewed by Student’s, with ‘Proctor Add Comment,’ or they can view the progress of a Student with ‘Proctor View Tests.’ Additional commands and details about Proctoring can be found in section 2.5 Proctoring.
Options for grading a test are also located in the Test menu. ‘Test Grade Test’ begins the automatic or manual grading. ‘Test Post Grade’ allows an Instructor to post graded tests to a server where Students can retrieve and review them. ‘Test Edit Score’ and ‘Test Edit Score’? are used during manual grading to edit existing scores. Instructors have the option of grading one test at a time or numerous tests at once. ‘Test View By Question’ allows the Instructor to grade the same question from multiple exams while ‘Test View by Student’ grades only one complete test at a time. An Instructor can also provide a Student with additional feedback by including comments with the graded exams. The commands, ‘Test Add Comment’ and ‘Test Edit Comments’, are used to add or edit these comments. In addition to grading, Instructors can also create a “key” which contains both the test questions and answers. The final option in the Test menu is ‘Student View.’ This command allows an instructor to open and view a test using the Student user interface.
The Admin menu allows access to the user management functions.
The Help menu provides users with various tools to search for help with problems and/or reference “How to” help. New users can take a tutorial of basic functioning with the ‘Help Getting Started’ command. Additional tutorial are available through ‘Help Tutorials.’ The ‘Help Search’ command allows users to search for specific help topics and the ‘Help Topic Index’ command displays a complete index of topics. ‘Help About Test Tool’ is a command to display a dialog box with product information.
2.1.2. Test Proctor
Users in the Proctor category view a screen similar to Instructors; however, they are only given access to the functions involved in administering a test to students. Instructors also have access to the various menu commands for proctoring a test which were briefly described above. A quick overview of the Proctors interface is provided in this section. Figure 3 shows the Test Proctor screen view. (Additional descriptions and the expanded menu commands can be found in section 2.5.)
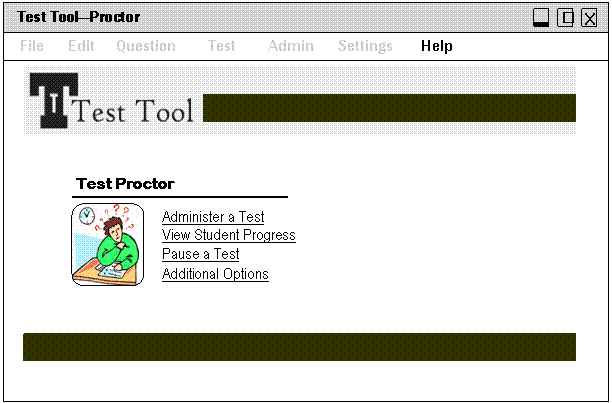 |
Figure 3. Initial Proctor screen view.
The only available menu is the Help menu. These commands function identically to the Instructor commands. (See description of help commands in section 2.1.1).
2.1.3 Student
The Student user interface begins with the log in screen, shown in Figure 4.
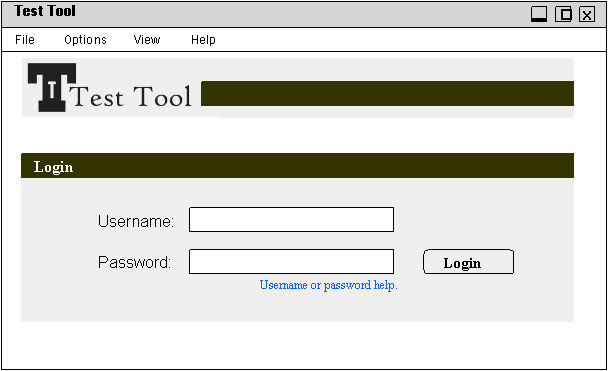 |
Figure 4. Initial Student screen view.
The initial display consists of several pull-down help menus (details below). Also included on the initial screen is a login form. Students must enter a username and password and click the “Login” button before they can continue. The username and password are verified before the user can continue.
After logging in Students are presented with a screen view like the one in Figure 5.
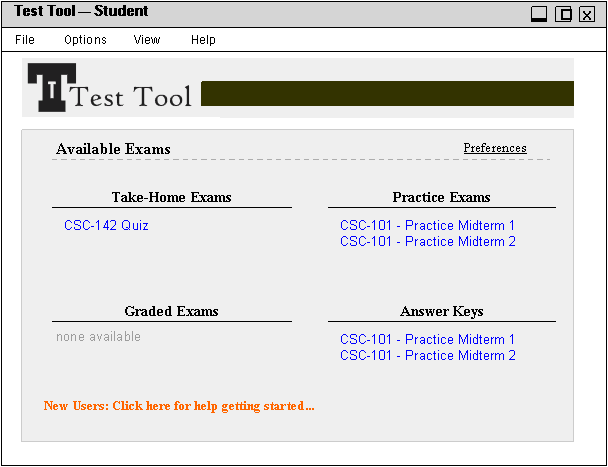 |
Figure 5. Student screen view.
This screen contains additional command menu options as well as quick links to available tests. Each test can be opened by selecting the test name shown in blue. By selecting the link called “Preferences,” students may customize their testing screen before opening an exam. The link in orange will open a basic tutorial to acquaint new users with Test Tool features.
All of the quick link options and some additional features are available in the command menu. An expansion of the Student command menu is displayed in Figure 6.
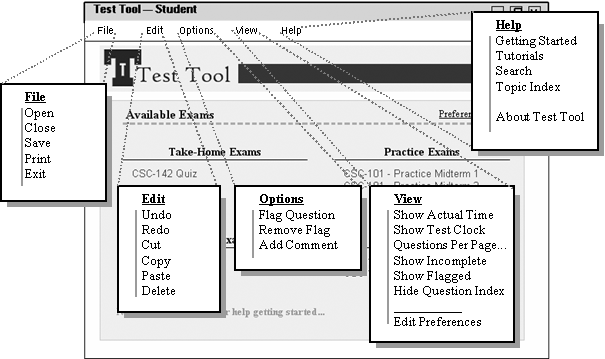 |
Figure 6. Expanded command menu for Student users.
The File menu is a pared down version of the Instructor’s menu. ‘File Open’ opens a test file. ‘File Close’ closes the current open test. Before closing a test, the system will offer to save the progress of the test. The ‘File Save’ will save a test in progress. This option is typically used for take-home or practice exams. ‘File Print’ prints the contents of the currently active window in a suitable form. ‘File Exit’ will offer to save the progress or submit any open tests before closing the Test Tool program.
The Edit menu contains commands for manipulating calendar data during editing. 'Edit Undo' undoes the most recently completed editing commands. Repeated successive invocations of 'Undo' will undo successively earlier commands. 'Edit Redo' redoes the most recently undone commands. Repeated successive invocations of 'Redo' will redo the series of undone commands in reverse order. 'Edit Cut' removes and copies the currently selected datum in the current display. 'Edit Copy' copies the currently selected datum without removing it. 'Edit Paste' inserts the most recently cut or copied datum at the currently selected edit point in the current display. 'Edit Delete' removes the currently selected data without copying it.
The commands in the Options menu provide Students with a few extra tools for use during a test. These commands (and most of the commands in the View menu) are only active when the student is taking a test. The ‘Options Flag Question’ allows Students to ‘flag’ a question for later review. After reviewing a question, Students can remove a previously placed flag with ‘Options Remove Flag.’ Submitted tests do not keep track of flagged questions. Students who wish to mark a question or convey a comment to the Instructor can use the ‘Options Add Comment’ command. Students can add comments about specific questions or about the test in general. Submitted tests will retain the added comments and will be displayed to the Instructor when the test is graded (See Grading for further details).
The View menu provides Students with options about which windows to view while taking a test. ‘Section 2.7 Student Users’ contains details about the content and use of these various windows. The first two commands, ‘Show Actual Time’ and ‘Show Test Clock’ appear when the ‘Clock’ window is being displayed. If these options have been selected, the Options menu will display the commands ‘Hide Actual Time’ and ‘Hide Test Clock instead. The next three options of the View menu are for altering the number or type of questions display in the actual test window. ‘Questions Per Page’ allow a user to select whether to display a certain number of questions per page or to show all. ‘Show Incomplete’ will only display questions that have not been answered. ‘Show Flagged’ will only display questions flagged by the Student. Students may also show or hide a window containing the index of test questions. The question index can be hidden by using the ‘Hide Question Index’ command. The final command in the View menu is ‘Options Edit Preferences.’ Students can use this command to set and save preferences about which windows (such as the clock and index windows) appear during tests.
Details of the help menu are provided in the Instructor command overview (see section 2.1.1).