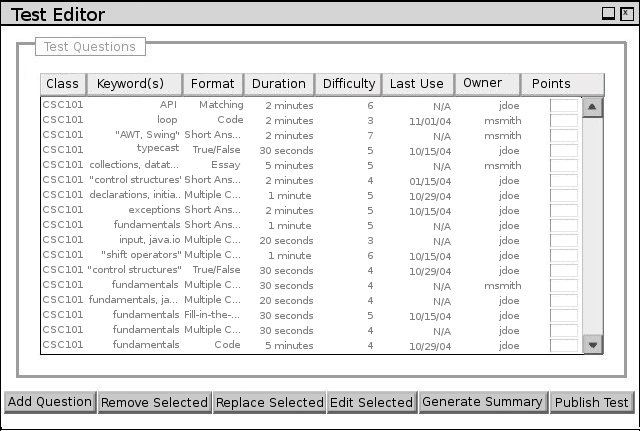
This scenario illustrates the software's test editor. Instructors invoke the test editor to customize a test generated by the automated wizard (see Section 2.3) or to create a test by manually browsing their question bank. Before creating a test, the instructor must first populate the question bank, as detailed in Section 2.2.
To create a new test, the instructor selects the New item
in the Test menu. To edit a saved test, the instructor selects the
Open item of the same menu. Alternatively, the instructor may use the
New and Open items of the File menu, respectively,
to perform these same operations. In the following scenario, the test
generation wizard automatically invokes the test editor and opens the final
test generated in Section 2.3, resulting in the
editor configuration shown in Figure 1. See
Appendix B for a complete listing of the
questions comprising this generated test.
Figure 1: Test editing interface.
2.4.1. Adding a Question to a Test
Instructors add questions to a test using either a manual or automatic interface. In the former, the instructor selects questions for addition by manually browsing the question bank; in the later, he specifies criteria describing desired questions, and the software automatically adds questions with these properties. To begin this process, the instructor clicks the 'Add Question' button located below the question table. The editor displays the selection dialog shown in Figure 2 in response.
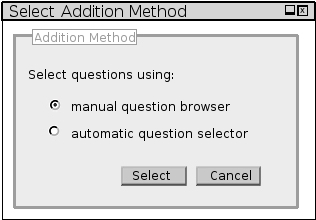
Figure 2: Addition Method Selection Dialog
Selecting the manual option in the dialog displays the question browser pictured in Figure 3; selecting the automatic method displays the question criteria dialog described later and shown in Figure 4. In both cases, the assumed contents of the question bank accessed in this scenario are detailed in Appendix A.
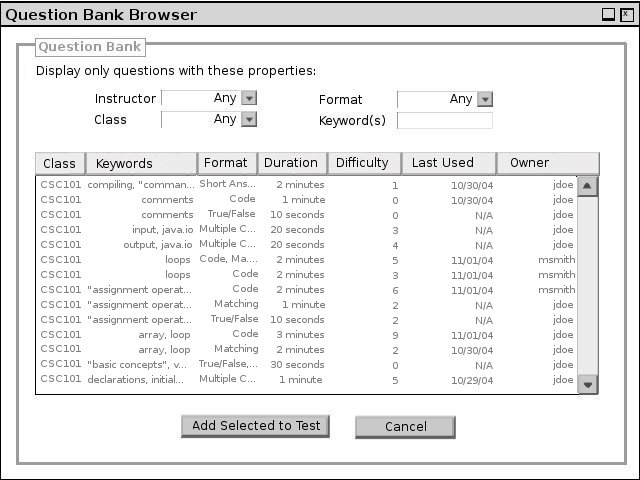
Figure 3: Browsing the question bank manually
The question browser displays a summary of the question bank's contents in a tabular format similar to that of the test editing interface described in Section 2.4 but does not include a scoring weight column. Clicking the column headers performs the same reordering described in that same section.
Instructors limit the set of questions displayed in the table using the "Instructor," "Format," "Keyword," and "Class" fields located above the question table. Only questions with each of the following properties are displayed in the table:
The test author selects the user "jdoe" from the "Instructor" menu. Given the question bank in Appendix A, filtering by this instructor displays the questions in Figure 4.

Figure 4: Question bank filtered by instructor
If the instructor instead filters by class "CSC102" and format "Multiple Choice," the editor displays the question bank as in Figure 5.
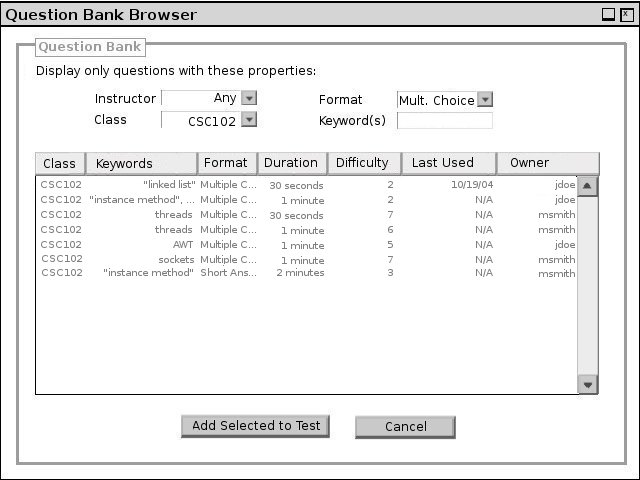
Figure 5: Question bank filtered by keyword
To add questions to the test, the instructor selects their rows from the table and clicks the "Add Selected" button located at the bottom of the browser. The "Cancel" button ends this addition operation without modifying the current test.
In this scenario, the instructor selects the final three questions displayed in Figure 5 and clicks the "Add Selected" button. In response, the editor updates the test view to reflect the addition of these questions. Before the editor allows a test to be published, the instructor must specify the scoring value for each question. For questions containing only one student response area, the instructor satisfies this requirement by entering a positive integer into the text-entry field located in the "Points" column of the relevant row. For the AWT and sockets questions added above, the instructor enters the values "5" and "10" respectively. At this time, the instructor also specifies scoring weights for the original questions included by the generation wizard in Section 2.3. Figure 6 shows the current state of the test following the foregoing interactions.
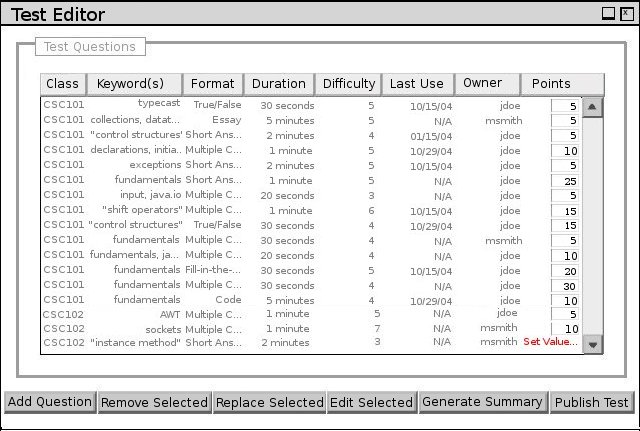
Figure 6: The test resulting from the manual addition of a question
For questions comprised of multiple student response areas, instructors must specify an individual scoring weight for each such area. To initiate this process for the final question in Figure 6, the instructor clicks the red "Set Value..." link in its "Points" column. In response, the editor displays the dialog in Figure 7.
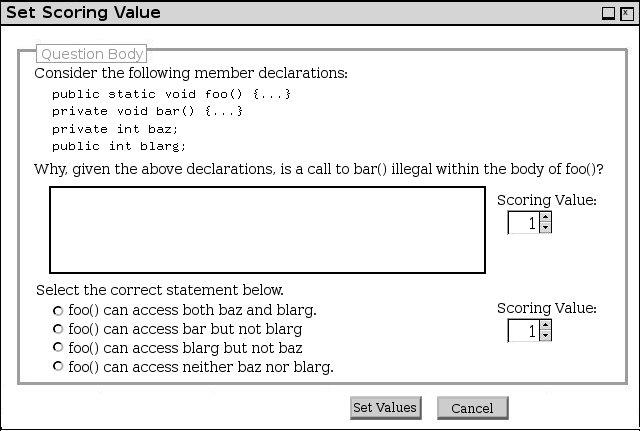
Figure 7: Setting scoring values for question comprised of multiple response areas.
The interface in Figure 7 displays the body of the selected question to allow the instructor to specify individual scoring values for each student response area. A "spinbox" widget, expecting a positive integer value, is located to the right of each response region. The total scoring worth of this question is the sum of the values appearing in each spinbox after the instructor clicks the "Set Values" button. The "Cancel" button dismisses the dialog without modifying the question's scoring weight.
For this scenario, the instructor assigns five points to each response area and clicks the "Set Values" button. In response, the editor updates the involved question's "Points" column, as in Figure 8.
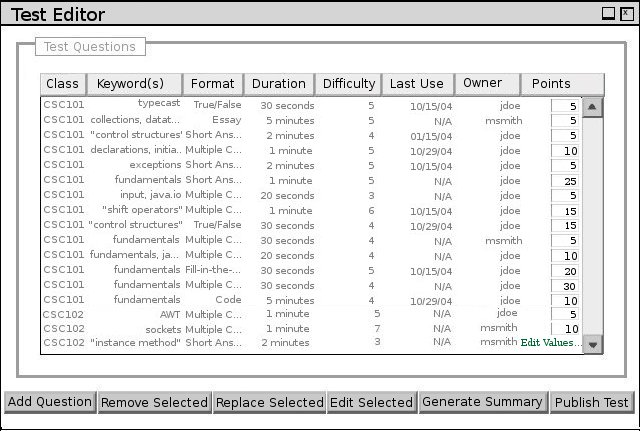
Figure 8: The view of the test after modification made from Figure 7
In Figure 8, the final question's "Points" column now contains the green "Edit Values..." link. This new contents provide the same functionality as the red "Set Values..." link displayed before the scoring value was set but is updated to illustrate that the question's weight has been defined.
If the instructor instead selects the automatic method from the dialog in Figure 2, the editor displays the interface shown in Figure 9.
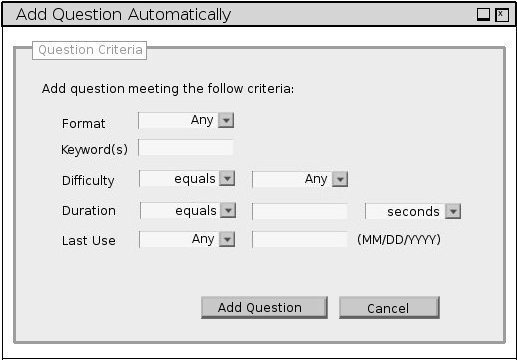
Figure 9: Specifying criteria for questions to be added automatically
This interface allows instructors to automatically add a question with particular properties to the current test. The instructor specifies constraints defining suitable questions using the fields in this dialog (detailed below), and the software adds to the test a question meeting these criteria. If the current question bank does not contain such a question, the editor does not modify the test and notifies the user of the failure via a small dialog window.
The set from which the software selects a question for addition is defined by the instructor using all of the following constraint fields:
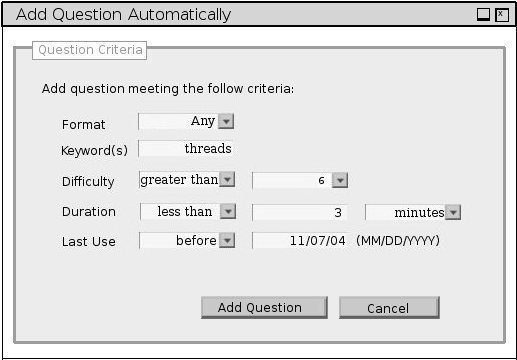
Figure 10: Completed Auto-Add Dialog
The user input shown in Figure 10 requests the addition of a question about threads, with estimated difficulty greater than "6" and duration less than three minutes. Furthermore, potential questions may not have appeared on any test published on or after November 7, 2004. One question from the instructor's question bank (see Appendix A) meets these requirements, and the editor consequently adds it to the test. The test-view resulting from this addition is displayed in Figure 11. Before continuing, the instructor sets this question's scoring weight to "5."
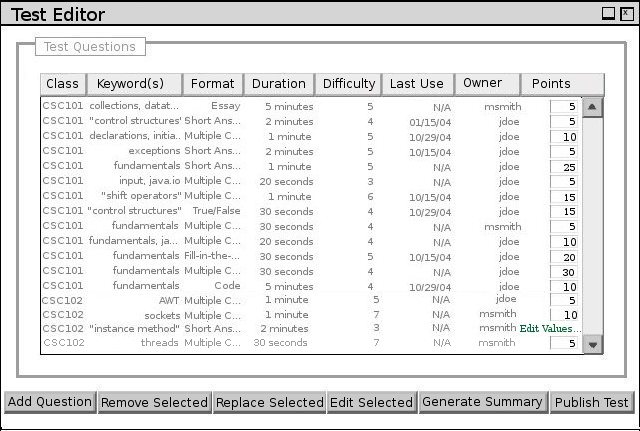
Figure 11: Test resulting from auto-addition operation
If, for example, the instructor had instead requested questions of difficulty greater than "7," the test editor would been unable to fulfill the addition request. In this case, the editor leaves the current test unmodified and displays an error message explaining that no such questions meeting the instructor's criteria exist in her question bank.
To remove a question from a test, the instructor highlights the question's row in the question table and clicks the remove button. The software responds with a dialog confirming the removal. Confirming removes the question's row from the question table but does not delete the question from the question bank. The user may remove multiple question in a single removal operation.
In this scenario, the instructor selects three questions by sequentially clicking their respective rows while simultaneously pressing the "Control" key. Figure 12 shows the result of this selection.
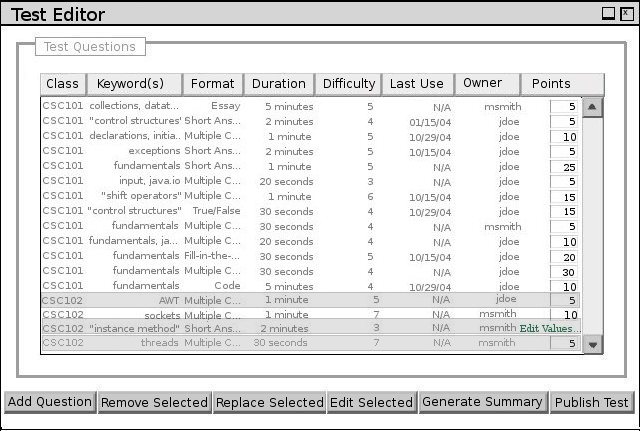
Figure 12: Highlighted test questions
The instructor then clicks the "Removed Selected" button, and the editor confirms the removal operation with the dialog pictured in Figure 13.
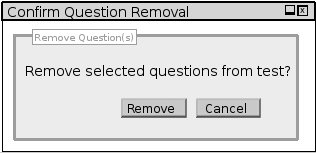
Figure 13: Confirmation of question removal operation
The user confirms the operation by clicking the dialog's "Remove" button, and the test editor diassociates the selected questions from the open test. The questions comprising the test after this removal are visible in Figure 14.
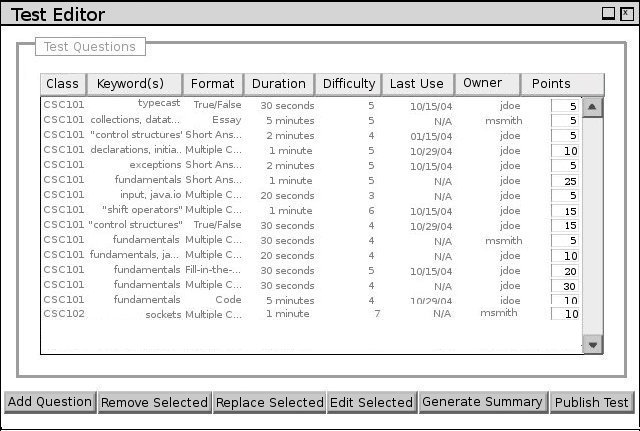
Figure 14: Test resulting from removal operation
2.4.3. Replacing a Question on a Test
Instructors may replace test questions with other questions having similar properties by selecting the formers' row in the question table and clicking the 'Replace Selected' button. The replaced questions are removed from the test, and new questions are added according to the following substitution rules:
To illustrate the editor's replacement operation, the instructor selects the test question with keywords "input" and "java.io" and clicks the "Replace Selected" button. In response, the editor removes this question and inserts, into the position vacated by the removed question, a question meeting the criteria described above. The resulting test is shown in Figure 15. The scoring value of questions added via the replacement operation is initially undefined, and so the instructor sets the new question's weight to "5" before proceeding.

Figure 15: Test resulting from replacement operation
2.4.4. Editing a Test Question
Instructors may edit questions included on a test by highlighting the question name in the title column of the question table and clicking the 'Edit Question' button. This launches the question editor (described in Section 2.2.8). This interface allows, but does require, instructors to limit the scope of their modifications to the edited test, leaving the question unchanged in the question bank.
2.4.5. Generating a Test Summary
When the user clicks the 'Generate Summary' button below the question table, the software presents a window similar to Figure 16, displaying a summary of the current test.
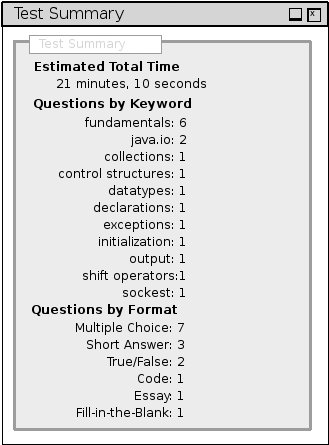
Figure 16: Test Summary Dialog
This summary contains the following information:
Once the instructor is satisfied with the questions included on the test, he or she clicks the 'Publish Test' button to make the completed test available to students. Before publishing his test, the instructor in this scenario uses the above addition, removal, and replacement operations to make his test's contents that of Appendix C. To this user action, the software responds with the the dialog pictured in Figure 17.
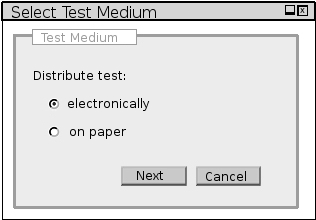
Figure 17: Specifying Test Medium
This dialog prompts the user to select the distribution medium for this test. Selecting the electronic option prepares the test to be delivered to and collected from students over the network; selecting the paper option generates traditional hard copies of the test.
For this scenario, the instructor selects electronic distribution. In response, the software presents the input dialog displayed in Figure 18 to collect information regarding the administrative environment in which students are to take this test. If the instructor instead chooses paper distribution, the software displays the standard print dialog of the operating environment in which the test tool is executing.
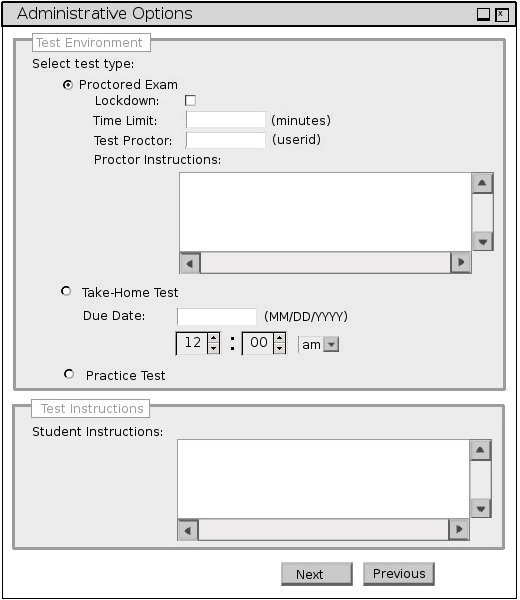
Figure 18: Specifying Administrative Environment
The test formats available have the following names and meanings:
For open book exams, the instructor must specify a due date for this exam using the input fields to the right of the "Due Date" label. In the first of these, the instructor inputs, in MM/DD/YYYY format, the date by which students must submit their completed exams. The values of the input widgets below the date text-entry field determine the precise time of that day to be considered the exam's deadline. The first is a select menu with hours numbered "1" through "12" as options; the second is a select menu with minutes numbered "0" through "59" as options; the final is a two-element select menu, distinguishing AM/PM. All fields in the "Take-Home Test" section have no relevance for closed book or practice tests and are disabled in the UI.
For all test environments, the instructor may include instructions to the student regarding the taking of this test. These instructions are entered in the text-area labeled "Student Interactions." This field is optional, and its contents may be of any length and textual format.
After this input dialog appears, the instructor inputs the test's administrative options by a combination of typing and selecting from pre-defined items. Figure 19 illustrates a representative set of possible options.
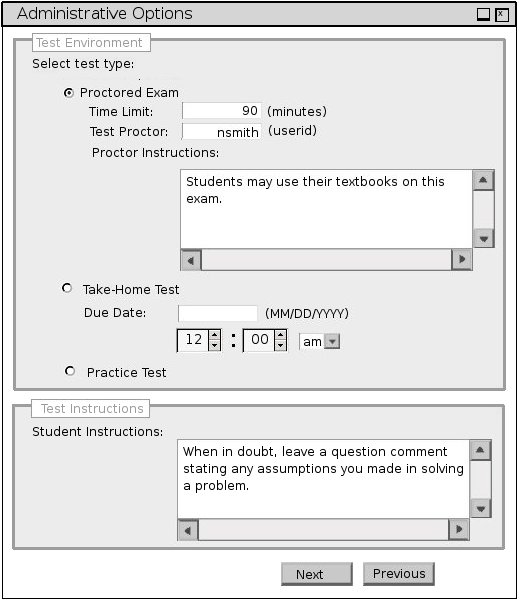
Figure 19: Sample Administrative Environment Options
These options configure a ninety minute exam to be proctored by user "nsmith." This proctor will receive the note regarding textbook usage before electronically distributing this exam. Test-takers will receive the student instructions before beginning the exam.
After completing the required fields in this dialog, the instructor clicks the "Next" button. Alternatively, the instructor may click the "Previous" button to return to the test medium selection dialog described earlier. For take-home and practice tests, the next step of the publishing process is assigning the test to individual students; this is accomplished via the dialog shown in Figure 20. For proctored exams, the dialog in Figure 19 is the process' final step.
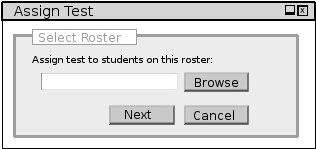
Figure 20: Assigning students a test
The "Browse" button in Figure 20 launches the standard file-chooser of the environment in which the test editor is executing. Using the browse button, or alternatively by typing a valid path into the dialog's text-entry field, the instructor specifies a "roster" file containing the user IDs of students permitted to download this published test.
Figure 21 illustrates the result of selecting a roster file via the environment's file-chooser.
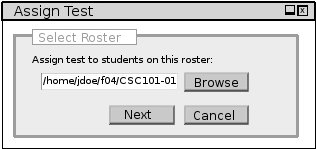
Figure 21: Completed roster selection dialog
Clicking the dialog's "Next" button authenticates the instructor's identity with a login prompt; on successful authentication, the test is published to the server and available to the assigned students or designated proctor. The "Cancel" button returns the instructor the administrative options dialog in Figure 18.
At any point in the test creation process, the instructor may save an open test for future editing by selecting the Save item of the File menu. This action launches the standard file chooser of the operating environment in which the test editor is executing. After the instructor specifies a valid path, the editor saves the test to the selected location.