
One of the main and most important features of the Test Tool program is the Test Grading software. The grading part of this program consists of taking all of the student’s tests into a database, grading them automatically, manually, or individually, compiling the grade and then returning the test to the student with their grade.
To access the test grading tool the user must first click on the Grade Tests button on the Test Tool Launch Pad or from any of the other Test Tool modes go to the Mode menu and click on Grade Tests. Doing this brings up the main grading window, where the user can choose which test to grade or grade all tests. This main test grading screen is displayed below in Figure 1.
Figure 1: Initial test grading window
To grade all tests automatically, the user clicks the grade all tests button. This automatically grades all of the multiple choice, true/false, and fill-in the blank questions, stdout code questions, and allows a user to grade each essay question and coding question for every student, one question at a time.
For multiple choice questions, the student's answer is checked against the questions correct answer and marked correct only if the two answers match. Fill-in the blank question answers are put through a spell checker, and the spell check results are compared with the questions correct answer for exact string match. True/False questions are marked correct only when the student's answer matches the question's correct answer. Coding questions are graded in two different ways. Coding questions can either be graded by the codes standard out (stdout) or by the user compiling and running the code. The stdout is automatically checked against the correct answer to the question. When the question is not intended to be graded by only the standard output, a coding question is graded by the user with options to compile and run the program.
When the automatic grading operation is enacted, it automatically grades those types of questions and jumps straight to any essay questions or coding questions that the test may have.
When an instructor selects the Grade All Tests button in the main test grading window, Figure 1 above, the program displays the following window, Figure 2. This allows for each question of the test to be graded on a student by student basis. The top text box displays the question, and the answer follows in the bottom text box. The Correct, Incorrect, and Partial Credit buttons all give a grade to a question. The Comment button allows the user to leave a comment on a question. Additionally, there is an option for whether the professor wants to see who the current student being graded is. If the professor does not want to know which student they are grading, the check box next to the name unchecked and the students name is disabled.
Marking a question correct with the Correct button awards the full point value of the question to the student. Marking a question incorrect with the Incorrect button awards the student 0 points for the selected question. The partial credit button allows the user to assign more than zero points, and less than full credit. A small panel comes up (shown below in Figure 2) and the user inserts the point value awarded for the question . Another important feature is the commenting ability of the grader. If a grader wants to comment on a certain question, they use the Comment button. This brings up a new window with the indicated question, and a box for comments by the grader, shown in Figure 3. As you can see below in Figure 2 and Figure 3 the user awards the student 1 point out of 5 and enters a comment .
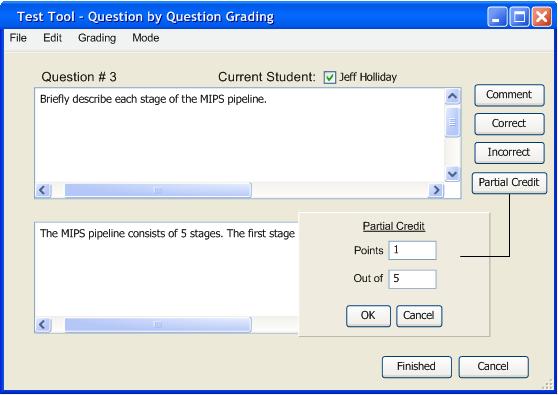
Figure 2: Question by question grading screen
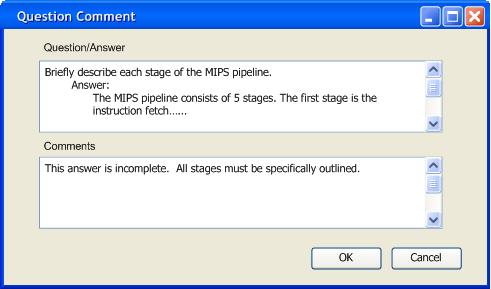
Figure 3: Question comment
Coding questions that cannot be graded automatically come up during the questions by question grading process in a similar window to essay questions as shown in Figure 2. The code grading screen has additional features also. It has two extra buttons, Compile and Run as shown below in Figure 4.
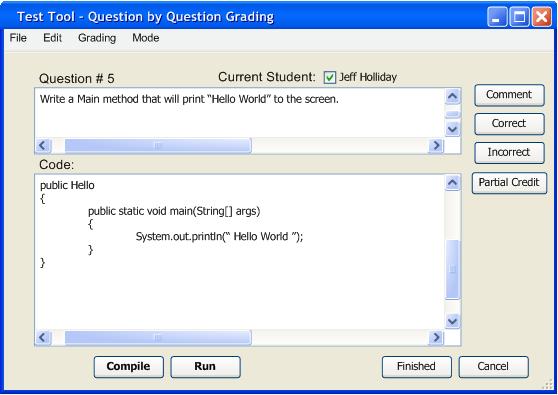
Figure 4: Code grading window
The Compile button compiles the code preparing it for runtime. The Run button runs the code and brings up the output window shown in Figure 5. The instructor grades these questions however he/she feels fit. Partial credit can be given for each coding question according to code style, correctness of output, and on whether or not it can be compiled without errors.
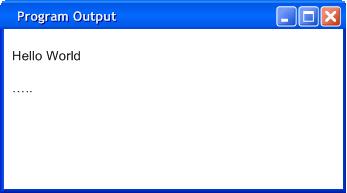
Figure 5: Program Output Window
In order to grade a test individually the user must highlight a certain test, as shown below in Figure 6, which enables the Grade Test button, click on the Grade Test button and the test grader pops up. This button automatically grades all multiple choice, true/false, fill-in the blank and coding questions that are set to be graded automatically. If the user wants to grade all questions manually, the Open Test button allows the instructor to grade multiple choice, fill-in the blanks and true/false manually.
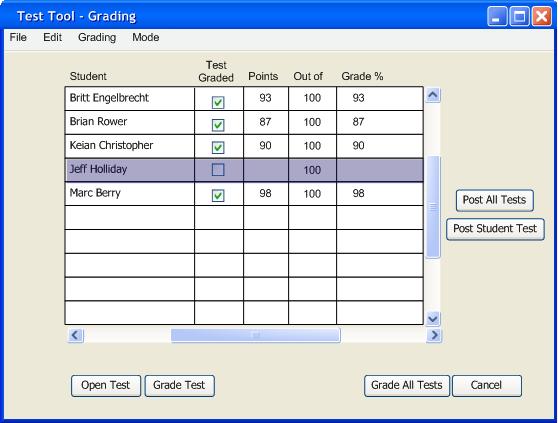
Figure 6: Filled grading screen
As shown in Figure 7 below, the selected test comes up in a new window. The student’s individual test comes up in the text box shown below with each question and answer. Each question is marked Correct, Incorrect, or is marked for partial credit. The questions that are graded already, including the ones from automatic grading, show up with a red check next to the number. In order to grade an individual question, the user highlights the question and marks it correct/incorrect or marks it with partial credit. Comments may also be used in the same way as the question by question grading. The commenting window comes up in a separate window as shown below.
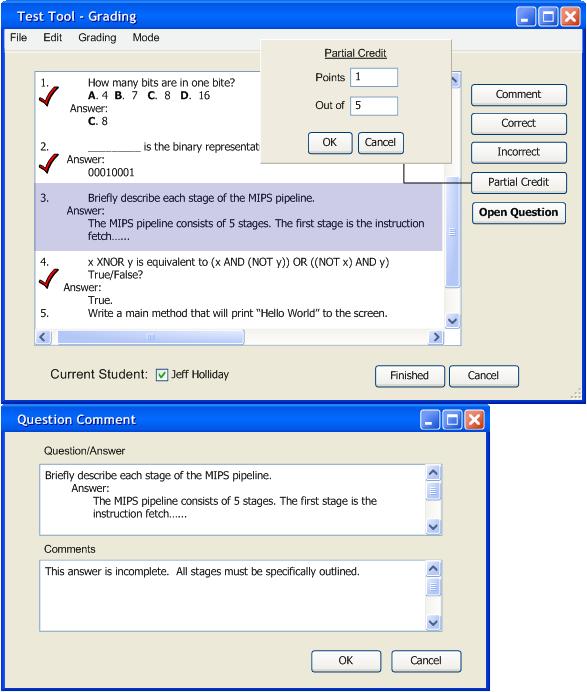
Figure 7: Individual Test grading window with comment window
When grading one test at a time, the user selects the question and double clicks it or clicks the Open Question button to pull up the question into a new screen. This must be done to grade code questions. Figure 8 displays a selected code questions. To grade this question, it must be selected and double-clicked or the Open Question button must be selected.
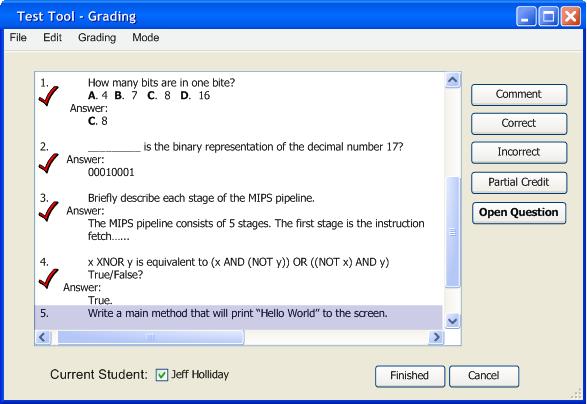
Figure 8: Grading screen with code question selected
The Open Question button opens a window very similar to the question by question window format as shown below in Figure 9. The only difference in this window and the question by question format, is that the student's name is not displayed.
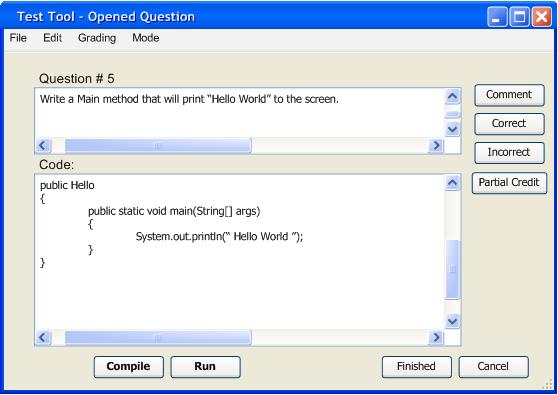
Figure 9: Opened code question
Once the individual test is graded, the user clicks the Finished button and the original test grading screen appears with the grade transferred over to it as shown below in Figure 10. The checkbox next to the students name is enabled, letting the user know that this test has been graded.

Figure 10: Finished test grading window
Once all tests are graded the test scores and tests can be posted for student viewing. This is outlined in more detail in section 2.8.