Figure 1: "Proctoring" initial screen
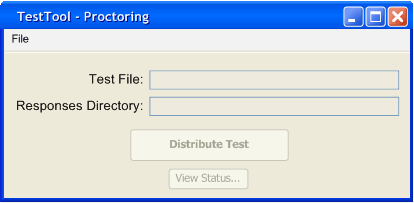
"Test Tool - Proctoring" is a separate application an instructor/proctor installs on the computer he/she intends to proctor a test from.
For a proctored test, students are seated at computer terminals in a lab for taking a test. One computer in the lab acts as the proctor's computer where the proctor runs the "Test Tool - Proctoring" application. The proctor may need to transfer the test file he/she plans to administer to the local machine before selecting it to distribute. The proctor will most likely download his/her test file from a secure location (probably via SSH) and make it available locally. "Distributing" the test consists of the test being sent out to all the students' computers in the lab's LAN. The proctor also has some control over students' test taking progress such as adding time to, pausing, and stopping students' tests.
Figure 1: "Proctoring" initial screen
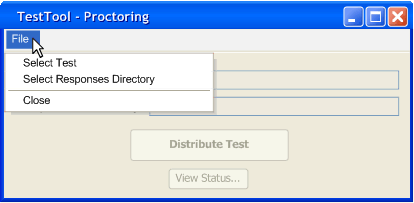
Figure 2: Expanded menu
Clicking on the menu File > Select Test displays a dialog window that lets the proctor select the file that is associated with the test he/she plans to proctor. A standard file selection dialog is display and the proctor selects the file (test) he/she is interested in and clicks the "Select" button to confirm. After selecting the test, the textbox labeled Test File displays the proctor's selected test.
Clicking on the menu File > Select Responses Directory displays a dialog that lets the proctor select the directory in which the students' test responses ("taken tests") will be saved to. After selecting the directory, the textbox labeled Responses Directory displays the responses directory path. When a testing session is finished, each student (automatically) turns in a separate responses (his/her answered questions) file that can later be graded.
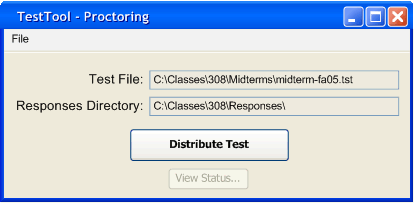
Figure 3: Test and responses directory selected
Once a test file and responses directory have been selected, the proctor is ready to "distribute" the test and the Distribute Test button is enabled. Clicking the Distribute Test button distributes the selected test to the students' computers on the LAN. The responses directory information is also sent to the student's computer which tells the "Test Tool - Student Version" application where to save the student's responses ("taken tests"). Upon distributing the test, the "Test Tool - Student Version" automatically starts. All the student needs to do is fill in his/her student identification number and click Begin Test. (See also the "Taking a Test" section)
Once a test has been distributed, the View Status... button is enabled. Clicking the View Status... button displays a new window showing the list of students taking the test, along with options for adding time to the test and controlling test progress. The status window may be opened and closed at any point during the test taking process. The initial window in figure 3 remains open when the status window is open.
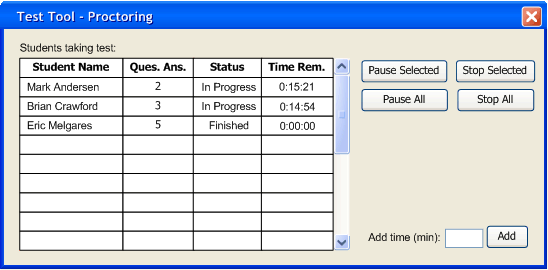
Figure 4: Status window during a testing session
A list of students taking the test are displayed in the list labeled Students taking test. This displays the students' names, the number of questions answered, testing status, and time remaining. If a student is taking the test, the Status column reads In Progress next to the student's name. If a student has submitted his/her test early, then the status column reads Finished next to his/her name. The Ques. Ans. column displays the number of questions a student has answered. The Time Rem. column decrements in real-time as time passes.
The proctor may want to pause (suspend) the test taking process. The proctor may either click to highlight a particular student name in the list and click Pause Selected or may click Pause All to suspend all the students' tests. The buttons labeled Stop Selected and Stop All behave similarly except that "stop" indicates terminating a test and automatically causing the students' results to be submitted. If the proctor pauses a selected students' test, the status column reads "Paused" next to the student's name and the student's time remaining is halted. If all tests are paused by clicking Pause All then all students in the list will have the Pause status. If a student test is stopped, then "Finished" is displayed in the status column and the Time Rem. column reads "0:00:00". If a paused student is selected, the Pause Selected button reads Resume Selected. If students are paused, the Pause All button reads Resume All. Resuming a test unsuspends the students test and the remaining time begins to decrement again.
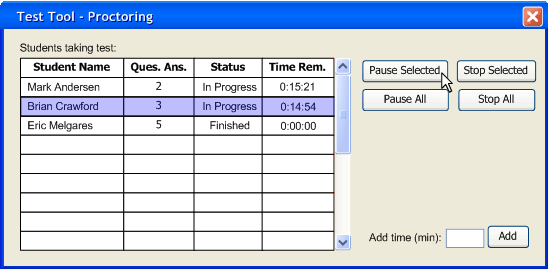
Figure 5: Selecting a student test to pause
To add more time to the test, the proctor enters the additional time (in minutes) in the text box labeled Add time (min). Clicking the Add button adds this time to all students taking the test (the extra time is reflected in the student's test-taking application). The Time Rem. column updates for all students to reflect the addition of extra time.
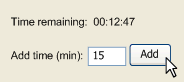
Figure 6: Adding extra time to test
Prev: Advanced Test Creation | Next: Taking a Test | Up: Functional Requirements | Top: index