Figure 1
- New Test Dialog
This section references material covered in the User Interface Overview which provides the "building blocks" the user needs to create a test in the Test Generation Interface. It also uses terminology described in the Glossary.
For this use case there exists a question database of more than sufficient size to satisfy the user's constraints for their test. These questions were entered into the database using the methods illustrated in Question Management use cases.
From the main interface, the user gestures to generate a test by clicking on the New Test button on the Tests palette.
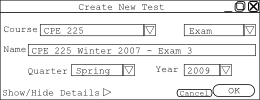
The system displays the new test dialog listed below in Figure 1. The course defaults to the last used course, which in this user's case is CPE 225, and the type defaults to Exam by user preference. The test also has defaults of Spring 2009 as the term and Exam 3 as part of the title. The user is happy with these selections.
|
|
|
Figure 1
- New Test Dialog
|
The user would like this to be a two section exam with a total length of 50 minutes and an unspecified number of questions. Furthermore, the user wants to divide the sections up with a 20 minute introduction section first followed by a more in depth 30 minute section. To begin, the user fills in the questions and length boxes in the Test Summary with Auto and 50 minutes respectively. The user proceeds to click the lock value button next to the number of minutes in the test so the auto-generator will not change that value. Now he/she moves on to creating and configuring the sections of the test. Since by default a test has one section, the user clicks and drags the new section bar up a little less than half way up the test summary. With the two sections now in place, the user fills in their lengths as 20 minutes and 30 minutes and both with an automatic number of questions. He/she then engages the lock value locks next to both sections' lengths to prevent them from getting changed during auto-generation.
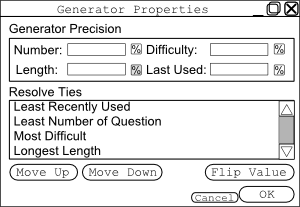
Now the user would like to give the generator some parameters regarding precision and define the rules on how to select random questions. The user clicks the Generator Options button at the bottom of his/her screen to bring up the initially empty dialog as shown below in Figure 2.
 |
|
Figure 2 - Generator Options - Empty
|
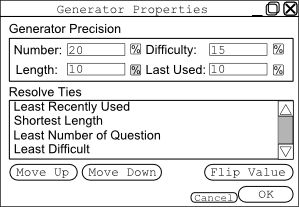
The user decides his/her preferences and enters 20 into the number box, 10 into the length box, 15 into the difficulty box, and 10 into the last used box to signify that he/she would like the generated test to be within 20% of his/her desired number of questions, within 10% of the desired length, within 15% of the desired difficulty, and within 10% of the last used value respectively. The user also decides on the order of tie breakers that he/she would like to use. The user decides he/she would like to reverse the comparison type for length from longest to shortest as well as reverse the difficulty from most difficult to least difficult. To do this, the user clicks on Longest Length and then clicks Flip Value. Then the user clicks Most Difficult and then clicks Flip Value. Now the user would like to slightly alter the ordering of the tie breakers. He/she clicks Shortest Length and then clicks Move Up twice. Now the ordering and the rest of the dialog box appears as in Figure 3.
 |
| Figure 3 - Generator
Options - Filled In |
For the first section of the test, the user would like to have a few introductory multiple choice and fill in the blank questions. The user makes a filter for these constraints as discussed in the Filtering section. The application automatically clears the database view and fills it with questions that meet these constraints. Satisfied with the results of the filter, the user clicks auto generate. The bottom list fills with randomly generated multiple choice and fill in the blank questions from the list in the database view.
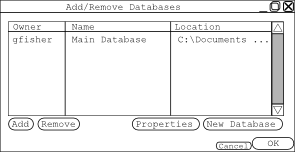
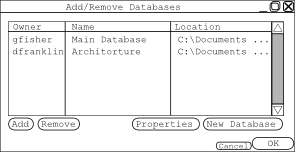
At this point, the user remembers that there are some good section 2 type questions in the remote database called "Architorture" maintained by Professor Franklin. The user clicks the Add/Remove Databases button to open the Add/Remove Databases Dialog as seen below win Figure 2.
 |
|
Figure 4 - Add/Remove Databases Dialog
|
The user clicks add and then clicks on the "Architorture" database. Now happy with the selected databases, the user clicks OK.
 |
|
Figure 5 - Add/Remove Databases Dialog
|
For the second section of the test, the user wishes to have questions that require a little more thought. Specifically, they would like questions with a difficulty of 6 or higher and of type short answer or essay. He/she sets up a filter to satisfy these requirements by following the procedure discussed in the Filtering section. The application automatically clears the database view and fills it with questions meeting these constraints. Satisfied with the results of the filter, the user clicks auto generate. The bottom list fills with randomly generated questions that meet the above constraints.
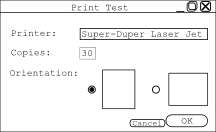
The user decides that they want to print a copy of their test so they click on the Print Test Button. A print dialog box as shown in Figure 4 appears . The user chooses the appropriate print settings and then clicks OK to start the print job and close the dialog.
 |
|
Figure 6 - Print Test Dialog
|
The test meets the expectations of the user so he/she saves the test by clicking the Save to File button. This click brings up the user's standard save dialog as provided by the operating system. They navigate to their desired save folder and enter a filename for the test "test4". They then click save which performs the save to the file and closes the Save to File dialog. The user now closes the test generation interface by selecting the X in the upper right hand corner.