2.1. User Interface Overview
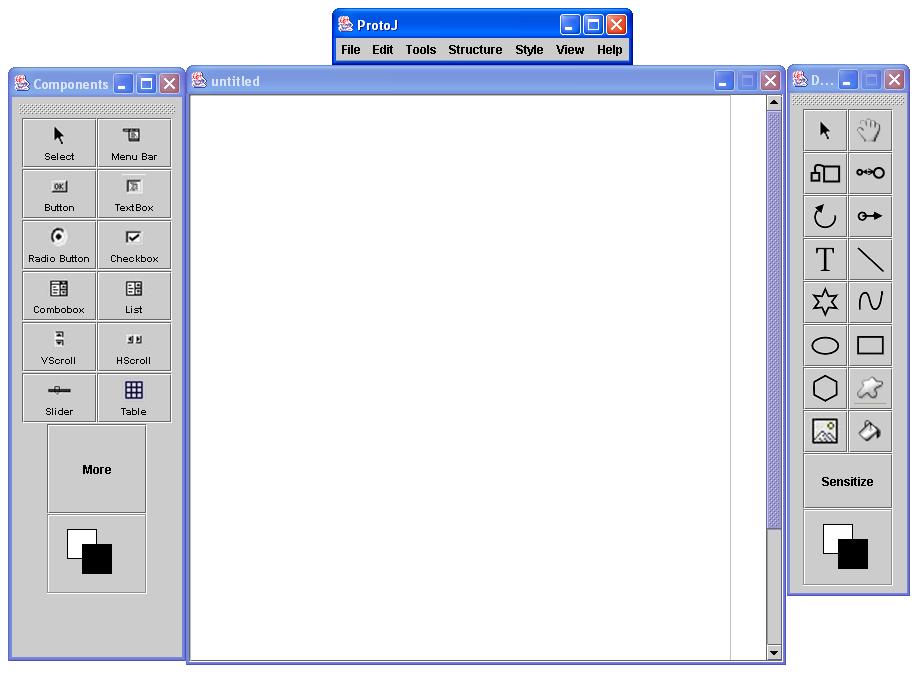
When a regular user initially invokes the Prototyping Tool, the screen appears as shown in Figure 1.

Figure 1: Initial Screen
2.1.1 Menu Layout
The initial display consists of 3 windows: the main work area, the component toolbar and the drawing toolbar. The user can move and/or hide either of the toolbars, but the main work area and the associated menubar will always be visible.
2.1.2 Command Summary
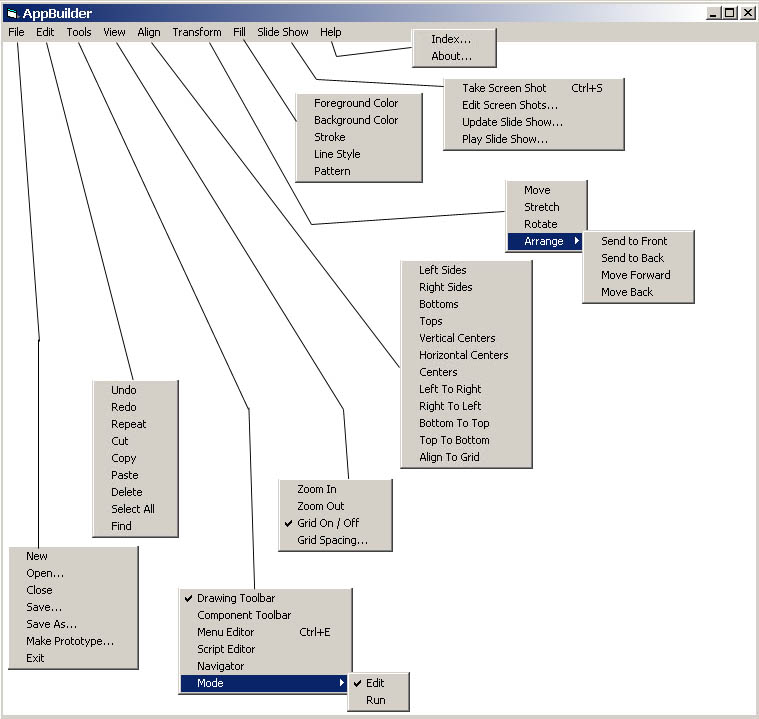
Figure 2 shows an expansion of the command menus for the primary user interface.

Figure 2: Expanded command menus for the user interface
The 'File' menu contains typical commands for manipulating data files and performing other system-level functions. 'File New' creates a new empty project. 'File Open' opens an existing project from a previously saved file. 'File Close' closes the currently open project, and offers to save if the file has been modified since opening.
'File Save' saves the currently active project file on the file from which it was opened, or on a new file if it was just created. 'File Save As" allows the current project to be saved on a different file from which it was opened or most recently saved upon.
'File Make Prototype...' causes a stand alone application to be created from the current project. The application will look and behave exacltly as the preview does that can be seen by choosing run mode from the 'Tools - Mode - Run' menu. The application is created by instanciating each of the classes that have been defined by the user. The classes are defined by editing forms in the workarea of the prototyping program.
'File Exit" exits the prototyping tool, offering to save any modifications if necessary.
The 'Edit' menu contains commands for manipulating form data during editing. 'Edit Undo' undoes the most recently completed editing commands. Repeated successive invocations of 'Undo' undoes successively earlier commands. 'Edit Redo' redoes the most recently undone command. Repeated successive invocations of 'Redo' redo the series of undone commands in reverse order. 'Edit Repeat' displays a dialog that allows the most recently invoked command to be repeated one or more times.
`Edit Cut' removes and copies the currently selected datum in the current display. `Edit Copy' copies the currently selected datum without removing it. `Edit Paste' inserts the most recently cut or copied datum at the currently selected edit point in the current display. `Edit Delete' removes the currently selected datum without copying it. `Edit Select All' selects all editable data in the current display.
`Edit Find' performs a search for a text string. The search is performed in all open forms. Successive invocations of search with an unchanged search string search for further occurrences of the string until all occurrences are found.
The 'Tools' menu contains commands to access basic functions of the prototyping tool. 'Tools Drawing Toolbar' makes the Drawing Toolbar visible if it is currently hidden, and makes the Drawing Toolbar hidden if it is currently visible. The check mark to the left of the word "Drawing Toolbar" indicated if the Drawing Toolbar is currently visible or hidden. If the check mark is visible then the Drawing Toolbar is also visible. 'Tools Component Toolbar' works in exactly the same way as 'Tools Drawing Toolbar' except that it make the Component Toolbar visible or hidden.
'Tools Menu Editor' opens the Menu Editor windows which is used to edit and create menu bars in forms. The 'Tools Menu Editor' is not a checked box. Every time it is invoked it brings the Menu Editor to the front, even if it is already open and hidden behind something else. The words "Ctrl+E" to the right of 'Menu Editor' mean that instead of using the menu to choose 'Tools Menu Editor' you can use the keyboard shortcut by pressing and holding the CTRL key and then pressing the 'E' key. This does the exact same thing as choosing it from the menu. 'Tools Script Editor' works in exactly the same way as the Menu Editor, except that there is no shortcut key for getting to the Script Editor.
'Tools Navigator' makes the Navigator window visible. The Navigator window is used to keep track of all the component and drawing object in the current form. The 'Tools Navigator' menu item works like the 'Tools Drawing Toolbar' described above.
'Tools Mode' brings up a sub menu which allows the user to choose between 'Run' and 'Edit' modes. The default mode is Edit mode. This in the mode in which the user makes changes to the prototype and go through the design process. This is the way that the user defines the classes for the prototype. The 'Run' mode is used to view what a prototype will look like and feel like when the final stand alone prototype is built. 'Run' causes the program to run inside of the prototype builder program. This will not be a stand alone program, but will allow the user to get a feel for the program and do testing before actually taking the time to build the prototype. For more information on building a stand alone prototype see 'File Build Prototype...' above.
The 'View' menu contains the commands that are used for 'Zoom In', 'Zoom Out', 'Grid On/Off' and 'Grid Spacing'. 'Grid Spacing' works by bring up a window that allows the user to set the distance desired between the grid dots.
The 'Align' menu enables the user to organise objects in the work area based upon an algorithm such as 'Align Left Sides' or 'Align Right Sides' or 'Align Bottoms'.
The 'Transform' menu contains commands such as 'Move', 'Stretch', 'Rotate' and a submenu 'Arrange' which lets you set the debth of the object in the picture by using commands such as 'Send to Back' or 'Bring to Front'.
The 'Fill' menu is used in order to set the visual properties of a drawing object. The menu allows the user to change the color and background color of an objects as well as to specify the stroke, linestyle and pattern of the fill.
The 'Slide Show' menu is used to take pictures of the prototype being developed in order to show users some of the basic features of the prototype before putting them to work with it. 'Slide Show Take Screen Shot' which can also be accessed by the keyboard shortcut "CTRL+S" is used to take a picture of the current stated of the form. The snapshots are automatically placed in the Screen Shot Editor. 'Slide Show Edit Screen Shots' brings up the Screen Shot Editor which allows the user to type notes on the bottom of the picture and to re-arrange the order of the shots if so desired. Screen shots can also be deleted here. 'Slide Show Update Slide Show' saves an old slide show and makes a new one out of the current forms. 'Slide Show Play Slide Show' brings up the controls for the Slide Show and displays the first screen shot on the screen.
The 'Help' menu is used to provide the user with information about the prototyping tool and to answer basic questions that they might have about using the prototyping tool. 'Help Index' brings up a windows that allows a user to either type in their question and search for help, or to look through an index that describes in detail how to perform the most commonly used operations. 'Help About' brings up a window that shows the version and build number of the prototyping tool. The user needs to know this in order to maintain consistency when seeking support or reporting errors.
2.1.3 Toolbars
For more information on the toolbars please refer to Section 2.3 and Section 2.4.


Figure 3: Toolbars
These words and images are property of James C. Irwin, jcirwin@calpoly.edu
05/07/2002


