
Figure 12.01: An empty 3D scene
You can reach the gl plugin example here.
Subsections
01 A Word on gl.enchant.js
02 The Sprite3D Class and its Attributes
03 Setting up a 3D Scene
gl.enchant.js is a plugin that lets us incorporate WebGL elements in our enchant.js environment. This means that we’re able to create and use 3D objects right in our browser. This plugin gives us access to shaders, quaternions, light sources, cameras, and many other features.
These plugins depend on gl.enchant.js in order to work:
For our purposes, a Sprite3D is an entity that we can use to represent any kind of 3D element that we want. Let’s talk about some useful attributes of the Sprite3D class.
The globalX, globalY, and globalZ attributes are global 3D coordinates of a 3D sprite.
The parentNode attribute is the parent node of a 3D sprite. Transformations such as translations that occur to the parent node should also apply to the 3D sprite.
The scaleX, scaleY, and scaleZ attributes are direction expansion rates for a 3D sprite, relative to each one’s axis.
The touchable attribute determines whether or not a 3D sprite is touch compatible.
The Sprite3D class also has many useful methods.
The sidestep, altitude, and forward methods all take in a parameter speed in order to move a 3D sprite around in the x, y, and z directions relative to its initial orientation.
The rotatePitch, rotateYaw, and rotateRoll all take in a parameter radian in order to rotate a 3D sprite about the x, y, and z axes, respectively.
The scale method takes in the parameters x, y, and z in order to scale a 3D sprite in those respective directions.
The translate method takes in the parameters x, y, and z in order to translate a 3D in those respective directions.
The clone method returns another instance of the 3D sprite that called it.
You can read more about the Sprite3D class here.
In my example I’ve set up a 3D scene and loaded a collada file to be used as a 3D sprite.
First, I’ve set up the environment to use a Scene3D scene instead of a normal scene by adding this line:
var scene = new Scene3D();
Scene3D at a time is supported. The current scene is pictured below in Figure 12.01.
var light = new DirectionalLight();
light.color = [1.0, 1.0, 1.0];
light.directionX = 1;
light.directionY = 1;
light.directionZ = -1;
scene.setDirectionalLight(light);
Directional Light which lights along the positive x-axis, positive y-axis, and negative z-axis. I then set the scene’s directional light to be this particular light by making a call to scene.setDirectionalLight().
var camera = new Camera3D();
camera.x = 0; camera.y = 0; camera.z = -20;
camera.centerX = 0; camera.centerY = 0; camera.centerZ = 0;
scene.setCamera(camera);
3D Camera. I then set the camera's x-position and y-position to 0 and its z-position to -20. After setting the camera's centerX, centerY, and centerZ to 0 I set the scene's camera to this particular camera by making a call to scene.setCamera().gl.primitive plugin.
var sky = new Sphere(25);
sky.z = 85;
sky.mesh.setBaseColor('#FF0000');
scene.addChild(sky);
Sphere with the value 25 as its parameter, set its z-coordinate to 85, then set the color of the mesh to red with the hex value #FF000. Once all of its attributes were set, I added it to the scene using scene.addChild(). The scene with the red sphere in the background is pictured below in Figure 12.02.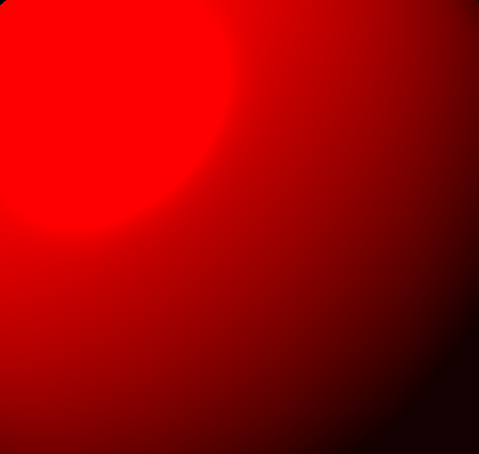
var ship = game.assets['vetron2.dae'].clone();
ship.x = ship.y = 0;
ship.z = 25;
scene.addChild(ship);
clone() from the collada file as referenced in game.assets[]. I then assigned x, y, and z coordinates and added the ship to the scene using scene.addChild(). The completed scene is pictured below in Figure 12.03.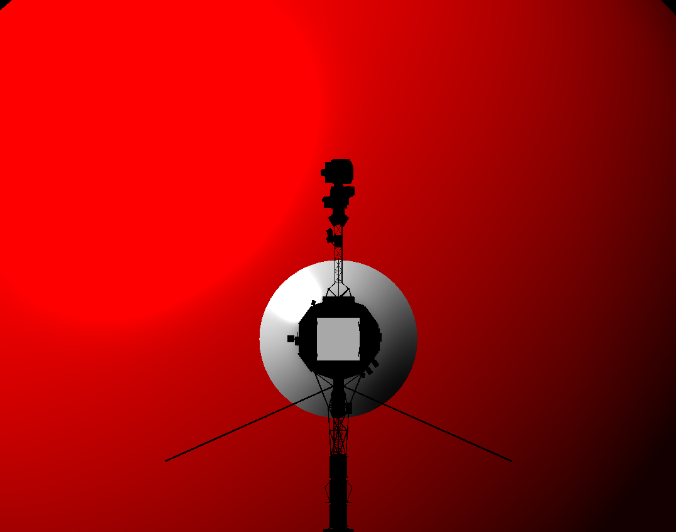
forward() and sidestep() in order to move the model around in space, and the arrow keys were bound to rotateYaw() and rotatePitch() in order to rotate it.