Enchant.js Guide
by Patrick Casao, Cal Poly
02 Sprites
The codeleap for this section may be accessed here. In this section, we will discuss the Sprite Class and its attributes. Following this explanation, we will add Sprites to the stage.
Subsections
01 The Sprite Class and its Attributes
02 Background Sprites
03 Adding/Removing Sprites
02.01 The Sprite Class and its Attributes
For our purposes, a Sprite is an entity that can be used to represent any kind of game element we want. This includes players, enemies, projectiles, backgrounds, and any other visual object you can think of. Sprites are loaded from a sprite sheet, which is an image file containing many sprites.
enchant.js provides a Sprite class that makes using sprites pretty simple. Let’s talk about some useful attributes of the Sprite class.
The x and y attributes allow us to set the location of a sprite. Remember that the y-axis is flipped in this context, so the position y = 0 is actually at the top of the scene and as y increases, a sprite will move down.
The height and width attributes allow us to set the size of a sprite. When we use a sprite sheet, sprites are cut from a sprite sheet defined by this height and width. An example of a sprite sheet with cuts is pictured below in Figure 2.01.
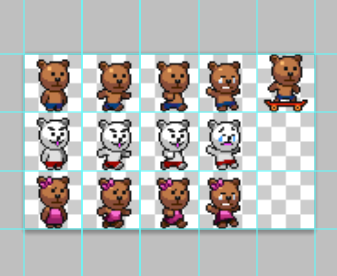 Figure 2.01: Spritesheet with Cuts
The image attribute allows us to set the image file containing a sprite sheet, referenced by the filename added to the game assets.
The frame attribute allows us to set which frame of a sprite sheet we’re using, indexed from 0. The frame width and height is defined by the height and width attributes.
The opacity attribute allows us to set the opacity of the object with values ranging from 1.0 (completely opaque) to 0.0 (completely transparent).
The scaleX and scaleY attributes allow us to scale the sprite in the horizontal and vertical directions, respectively. If an image is scaled negatively, (i.e. setting scaleX to -1.0) the sprite will appear flipped.
The visible attribute allows us to set whether or not a sprite is visible.
The age attribute keeps track of how long the sprite’s been active. A sprite’s age is incremented by one for every turn or “frame” after the sprite is added to a scene.
The Sprite class also has a few useful methods.
The scale method is a simpler way of changing the scale of the sprite. It takes in the parameter x and optional parameter y and scales the sprite accordingly.
i.e.) scale(2.0, 2.0) to scale 2x horizontally and vertically
The rotate method allows us to rotate the sprite by degrees. It takes in the parameter degree and rotates the sprite accordingly.
i.e.) rotate(30) to rotate 30 degrees clockwise
The intersect and within methods pertain to collision detection. They are discussed more in Section 06.
02.02 Background Sprites
A background image gives your scene context. It can be used to define the locale, time of day, or even the mood.
We can implement a background by adding a sprite that is the same height and width as the game window. Let’s implement it in our example code. (Once again, you can access it from here.)
CODE EXAMPLE: Adding a Background Sprite
First, we'll add the file to the preloader. Items that aren't preloaded simply won't appear. Under 02.2 Preloader, change it so it looks like this:
Next, we'll actually add the image to the scene as a sprite. Under 02.2 Background, add:
var bg = new Sprite(stgWidth, stgHeight);
bg.image = game.assets['bg.png'];
game.rootScene.addChild(bg);
Confirm that the background is added by clicking RUN. A blue background with a black bar running across the top should appear in the window.
02.3 - Adding/Removing Sprites
Now that we’ve added a background, we have a grasp on how to add sprites to the scene. However, when we want to add a player or enemy sprite that may be used across several scenes, it’s better to write a separate class for it.
Using our example code we’re going to add a static sprite to the root scene, and then remove it onces its age reaches a certain point.
CODE EXAMPLE: Adding and Removing a Sprite
Start by adding the image to the preloader under 02.2 Preloader like so:
game.preload('bg.png', 'icon0.png');
Next, we'll create the Sprite class. In this example, our Sprite will have the initialize and onenterframe functions. The initialize function allows us to set attributes as soon as the Sprite is initialized. The onenterframe function is discussed more in a later section. Let's start by setting some of the attributes.
this.image = game.assets['icon0.png'];
This sets it so the sprite uses the image we've preloaded.
this.x = stgWidth/2;
this.y = stgHeight/2;
This sets the sprite's location to the center of the scene.
this.scaleX = 2.0;
this.scaleY = 2.0;
This scales the size of the sprite by 2.0 in the X and Y directions.
This uses the 15th frame of the sprite sheet.
Confirm that the sprite has been added by clicking on the RUN button. Now that we’ve added a sprite in the code, it should appear in the center of the screen. Let’s add a condition that removes the code.
In the onenterframe function, under 02.3 Remove Sprite add:
if(this.age >= 60){
	this.scene.removeChild(this);
}
This removes the sprite after 60 frames.
Finally, let's instantiate an Apple sprite and add it to the scene. Under 02.3 Add Sprite, add:
var apple = new Apple();
game.rootScene.addChild(apple);
Confirm this section of code by clicking the RUN button. The game should start once you click on it, and the sprite should disappear soon after. This is because the sprite has been removed from the scene. It has stopped executing code written in its onenterframe function and can no longer be referenced.
For more information on the Sprite class, you can read more about them in its section of the Enchant.js docs.
In the next section we will discuss Animation.