Editorial Remark: This scenario illustrates a reasonably detailed level of analysis, but some pictures and text are still missing. For your Milestone 2, you should have a few scenarios like this, where some of the details have been worked out. As the quarter progresses, all of the scenarios will be done to a complete level of detail.
This introductory scenario shows an individual user scheduling two simple appointments. Appointment scheduling is one of the most commonly performed operations with the Calendar system. In this scenario, we assume that the user has just been registered in the calendar system and so has a brand new calendar with no entries, and only the normal default settings for all options. Details of user registration and default calendar creation are covered in Section 2.6
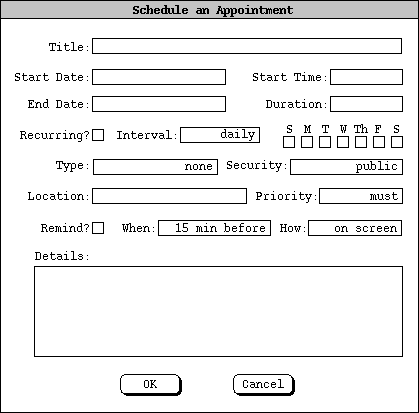
To schedule an appointment, the user selects the Appointment item in
the Schedule menu, whereupon the system displays the dialog shown in
Figure 3.
Figure 3: Appointment Scheduling Dialog.
The information in the fourth row of the dialog is used to specify whether, and if so how often an appointment recurs. Immediately to the right of the 'Recurring? label is a check box. If it is checked on, then information pertinent to a recurring appointment changes from greyed-out to black. This information is the end date, the recurring interval, and the seven daily check boxes to the right of the interval box.
Below the recurring information are additional data entry boxes. The category entry is a color-coded text string that categorizes the appointment for listing and filtering purposes. Appointment security is one of four levels: public, title only, confidential, and private. Details of these security levels are discussed shortly. The appointment location specifies where it will be held.
The priority indicates whether an appointment is a must or optional. The priority can be used to indicate the general importance of an appointment to the user. The more specific use of appointment priority is in group meeting scheduling, where optional appointments can be automatically rescheduled if necessary. Meeting scheduling is discussed further in Section 2.5
The data entry row staring with 'Remind? is used to enable the sending of a reminder prior to the start of the appointment. When the remind check box is on, the other reminder information changes from greyed-out to black. The two data entries immediately to the right of the check box indicate how soon before the meeting the reminder is sent. The small box is a numeric value, and the other box is one of the three alternatives 'minutes before', 'hours before, or 'days before'. To right of the time-before entry is a box for selecting how the reminder should be sent. The three choices are 'on screen', 'beep only', or 'email'.
The bottommost data entry area in the appointment dialog is for entering a detailed description of the appointment. Any amount of free-form textual information can be entered.
After the dialog appears on the screen, the user enters information by a
combination of typing and selecting from pre-defined choices. Figure 4 shows
the result of the user having filled in information for a new appointment
titled "Dentist". It has a date, start time and duration, but no end date
since it is non-recurring. Since this is the first time on the Calendar system
for this user, the category of 'outside appt' has to be created. In a
new calendar, the only pre-defined appointment category is "holiday". When the
user initially selects the down arrow next to me 'Category' display
box, the menu shown in Figure 4 appears.

Figure 4: Initial categories menu.

Figure 5: Edit categories dialog; Editorial Note: This is a rough sketch.

Figure 6: Add category dialog; Editorial Note: This is a very rough sketch.
To confirm the scheduling of the dentist appointment, the user presses the 'OK' button in the main schedule-appointment dialog. At this point, the appointment is added to the user's personal calendar.
The user now proceeds to create another appointment following the same
procedure as above. The resulting filled-in appointment dialog is shown in
Figure 7.
-- On paper -- need to draw electronic version. --
Figure 7: Scheduling a Second Appointment.
The user has set the priority for this new appointment to 'optional' instead of 'must', as was the case for the dentist appointment. The operative effect of selecting an 'optional' priority relates to scheduling group meetings, which is discussed further in Section 2.5 Aside from group scheduling, the meaning of 'must' versus 'optional' is purely informational, i.e., it indicates the relative importance of the appointment.
After scheduling and confirming an appointment, the appointment data are
entered in an online working copy of the user's calendar. In order for the
appointments to be permanently saved in the calendar file, the user must invoke
the 'File Save' command. The default name of the calendar file for
new users is chosen by the system administrator, as described in Section 2.?
However, the filename chosen by the system administrator is the only name known
to the Calendar Tool for group scheduling purposes. Further details of file
operations are discussed in Section 2.?