After creating categories as described in Section 2.4.1, an instructor adds graded items to the gradebook. This scenario uses the gradebook shown in Figure 2.4.2.1.
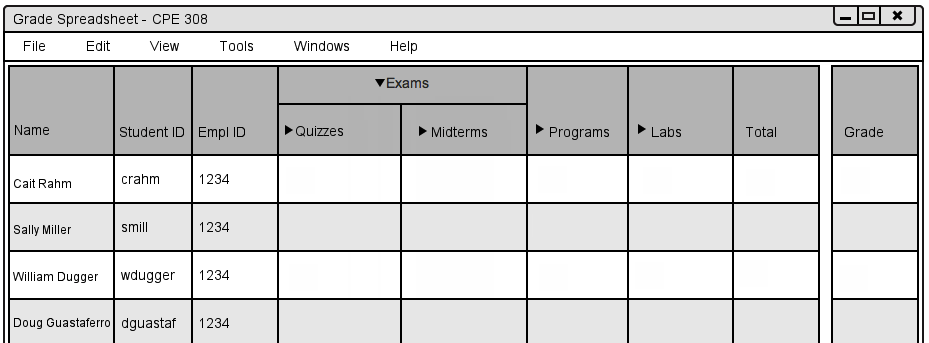
Figure 2.4.2.1
To add graded items, the instructor selects Tools -> Assignment -> Add from the menu toolbar. The Grader Tool displays the add graded item window as seen in Figure 2.4.2.2.
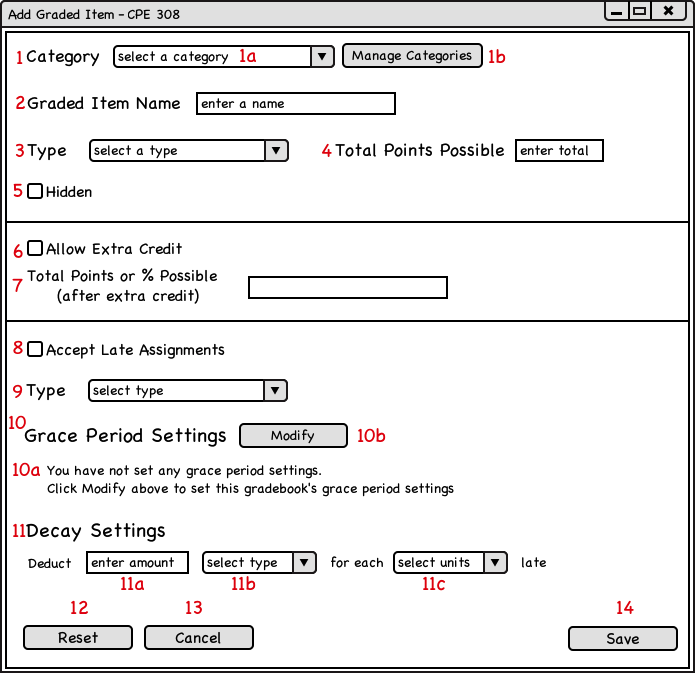
Figure 2.4.2.2
In this scenario, the instructor wants to add a graded item for the upcoming final for the class.
To start out, the instructor selects the graded item's category by selecting an item from dropdown menu 1a (Figure 2.4.2.3) which is populated with the same categories of graded items that appear in the spreadsheet. When the instructor selects a category in menu 1a, the Grader Tool displays the graded item in this category in the spreadsheet.
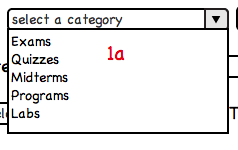
Figure 2.4.2.3
To modify the list of categories, the instructor clicks on button 1b named Modify Categories. When the instructor clicks this button, the Grader Tool brings up the Class Options window to allow the instructor to add and delete categories. Section 2.4.1 details how to add and delete categories.
Next, the instructor enters a name for the graded item into text field 2. The Grader Tool displays this name on the spreadsheet to identify the graded item. The Grader Tool allows graded item names to contain only letters, spaces, and digits. In this scenario the instructor enters the name Final as seen in Figure 2.4.2.4.

Figure 2.4.2.4
Next, the instructor chooses the scale that will be used to grade the graded item by choosing an option from dropdown menu 3. The Grader Tool allows graded items to be graded on the following scales: percentage, points - Figure 2.4.2.5 shows the expanded dropdown.
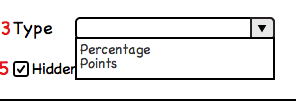
Figure 2.4.2.5
When the instructor selects the percentage grade scale, the Grader Tool grades assignments on a 0% to 100% grading scale.
When the instructor selects the points grade scale, the instructor also enters a total points possible in text field 4. The Grader Tool accepts any real number from 0 to 9999 (this includes decimals and non-whole numbers). The Grader Tool grades a graded item on the points scale by dividing the number of points a student earns by the total number of points possible to create a percentage.
Figure 2.4.2.6 shows an example of a graded item graded on the points scale.

Figure 2.4.2.6
In this scenario, the instructor selects the points grading scale and enters 30 points possible as shown above in 2.4.2.6.
When the instructor checks box 5, the Grader Tool does not display this graded item in the student's gradebook view. In this scenario, the instructor does not check box 5.
To allow extra credit for this graded item, the instructor checks box 6.
When the instructor checks this box, he/she designates the maximum number of points or highest percentage a student may achieve including extra credit in box 7. The Grader Tool allows accepts any real number greater than the original score and less than 9999.
In this scenario, the graded item is graded on a points scale with 30 points possible before extra credit. However, a student can earn up to 5 points extra credit, earning a total of 35 points, shown in 2.4.2.7

Figure 2.4.2.7
To accept late items, the instructor checks box 8.
After checking box 8, the instructor chooses the type of point deduction for accepting late graded items by selecting a late policy type from dropdown list 9.
The Grader Tool deducts points based on a decay or grace period type.
When the instructor selects grace period, the Grader Tool allows a set number of hours or days that students can use to submit graded items late throughout the entire quarter without a deduction.
Example: The instructor allows 3 days for students to submit graded items late. One student submits graded item #1 two days late. Throughout the rest of the quarter, the student can submit any graded item up to 1 day late without receiving any deduction.
The Grader Tool displays the gradebook's grace period settings in 10a.
If the instructor has not set grace period settings for this gradebook, the Grader Tool displays the message shown in Figure 2.4.2.2 asking the instructor to define a decay policy.
When the instructor clicks on button 10b, the Grader Tool displays the Class Options window shown in Figure 2.4.2.8
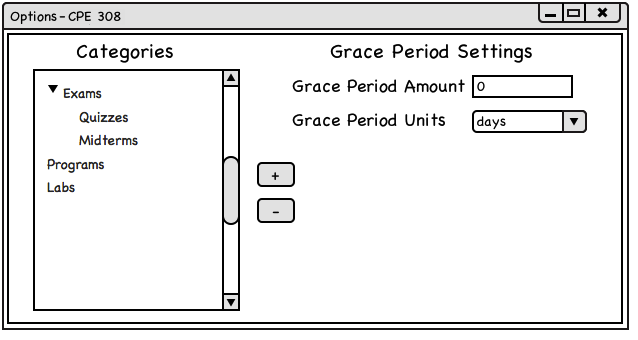
Figure 2.4.2.8
The instructor sets the grace period amount he/she enters an integer from 0 to 9999 in the Grace Period Amount box. The instructor then sets and the type (hours or days) by selecting an option in the Grace Period Units dropdown.
When the instructor selects decay as the late type in box 9, the instructor enters an integer from 0 to 9999 in box 11a. The instructor then selects a type in 11b. The Grader Tool allows professors to choose points or percentage. The Grader uses boxes 11a and 11b to calculate the amount of points or percentage to deduct. Next, the instructor chooses the units of time that the Grader Tool deducts points. When the instructor selects hours, the Grader Tool will deduct the amount defined in 11a and 11b every hour. When the instructor selects days, the Grader Tool will deduct the amount defined in 11a and 11b every day.
Example: An instructor designates that they want to deduct 5 points for every day a graded item is late. Then a student submits a graded item 2 days late. The student loses 10 points on it (Figure 2.4.2.9).

Figure 2.4.2.9
When the instructor clicks Reset, button 12, the Grader Tool clears all input and goes back to the default settings as pictured in Figure 2.4.2.2.
When the instructor clicks Cancel, button 13, the Grader Tool closes this window and returns to the spreadsheet view without saving the graded item.
When the instructor clicks on Save, button 14, the Grader Tool saves the Graded Item and places it in the defined category in the spreadsheet. The Grader Tool closes this window closes and returns to the spreadsheet view.
Figure 2.4.2.10 shows the spreadsheet after the instructor adds 3 graded items named M1, M2 and Final
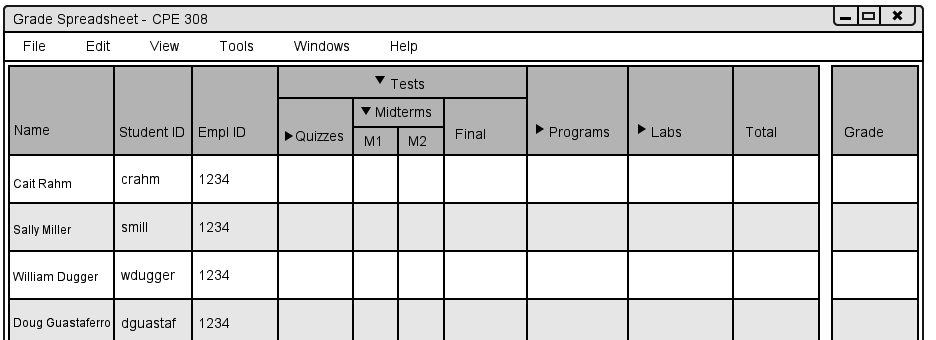
Figure 2.4.2.10