The Figure 2.21 found below shows an instructor viewing a list of their questions.
Each question has multiple tags they are associated with and is organized in
different ways to help the instructor. As shown, these tags incude:
Class #
Text
Question Type
Answer
Difficulty
Time
Last Used
![]()
Figure 2.2.1: Empty Question Bank that shows a dump of all questions. It has options to add a question, search, and generate an exam.
Figure 2.2.2 below shows a completely filled out question bank. The user sees this after adding enough questions by pressing the "Manually Add Question" button at the bottom of the screen. The Drop down menu next to the "Manually Add Question" button in Figure 2.2.2 shows the user what type of question to add. As shown above, the type of question defaults to Free Response. The other choices are Multiple Choice and Free Response.
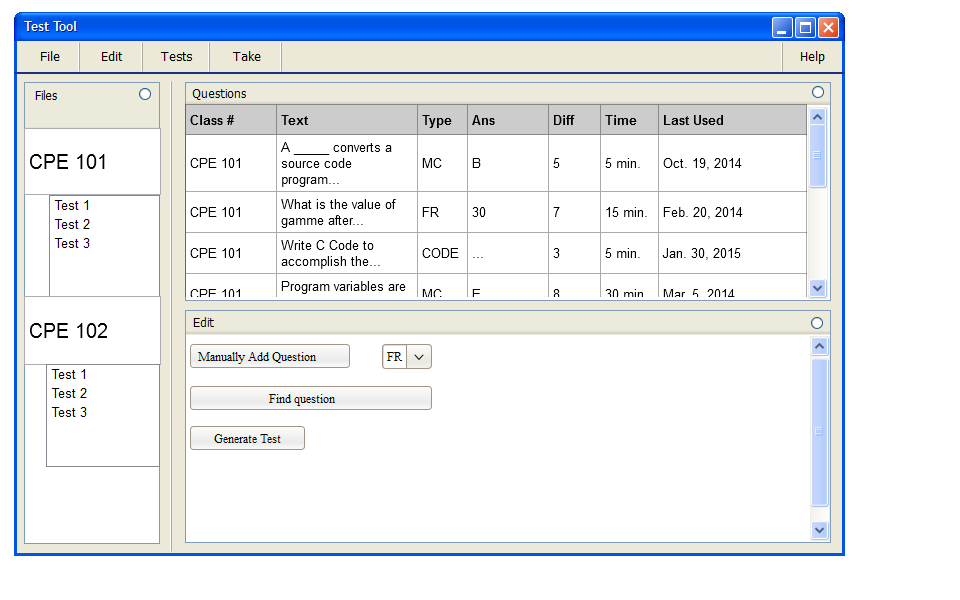
Figure 2.2.2: Filled out Question Bank
If the user wants to add a question to the bank, they select the Manually Add Question button on the bottom left and a dialog box prompts the user for question information. They choose what type of question to add using the dropdown menu next to the Manually Add Question button. This selection determines what kind of dialog box opens up.
Figure 2.2.3 Below shows the three different dialog boxes which open when a user selects Manually Add Question from Figure 2.2.2. They are in the form of Free Response, Multiple Choice and Coding respectively. In all three dialog boxes, the question and answer texts are multi-line strings that the user types in. The user selects a difficulty in the drop down menu between 0 and 10, a required time for the question that is greater than or equal to 0 minutes, and optionally selects an existing testbank to add the question to.
![]()
Figure 2.2.3: Add Custom Question Empty
After filling out each section, the user sees the resulting dialog boxes in Figure 2.2.4.

Figure 2.2.4: Filled out Add Question.
The instructor manually inputs a new custom question, the question's answer, the question difficulty, the time it takes, and the test bank to add the question to. Finally, by selecting OK, the instructor adds this question to the Question Bank and optionally to a specific Test Bank (if they select a Test Bank to add the question to). By pressing Search the user is taken back to the Figure shown in 2.2.2 and the question they added appears in the question bank. If the user presses Cancel, they return to the Figure shown in 2.2.2 with no changes.
If the question is empty, the answer is empty, the time is empty, or the difficulty is empty, adding a question will result in an error. This will prompt the dialog box found in Figure 2.12.1.
To edit a question, a user simply double clicks a section of the question they are editing. The section the user is editing will highlight when selected and the user changes the value directly. The example in Figure 2.2.5 below shows a user changing the second question's difficulty in their Question Bank.

Figure 2.2.5: Edit Question Selection
The user changes the old value by typing freely or increment/decrementing the value depending on which section is being edited.
If the question is not found in the questionbank database, editing will result in an error. This will prompt the dialog box found in Figure 2.12.1.
To search for a question, the user clicks the Find Question button from Figure 2.2.1 or Figure 2.2.2. This will prompt a new dialog box shown in Figure 2.2.6 which you can fill out to find a question. All sections besides the Text value are dropdown menus. The Text section is a multi-line string the user inputs.
![]()
Figure 2.2.6: Empty Find Question Dialog Box
The instructor fills out between 1 and all of the boxes in order to specify the requirements of the search. As they fill out more boxes, the number of questions matching the search decreases.
Here's how the same dialog box looks when filled out.
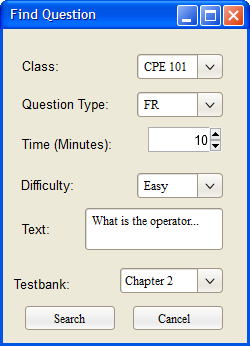
Figure 2.2.7: Find Question Dialog Box
By pressing Search, the questions that match the search rise to the top of the list from Figure 2.2.2 with a slight highlight. Cancel brings the user back to section 2.2.2 but with no changes.
To delete a question, the user selects a question from the Question Bank by clicking on it. The selected question will highlight to indicate to the user that it is selected. Figure 2.2.7 below shows the second question selected after the user clicks on it.
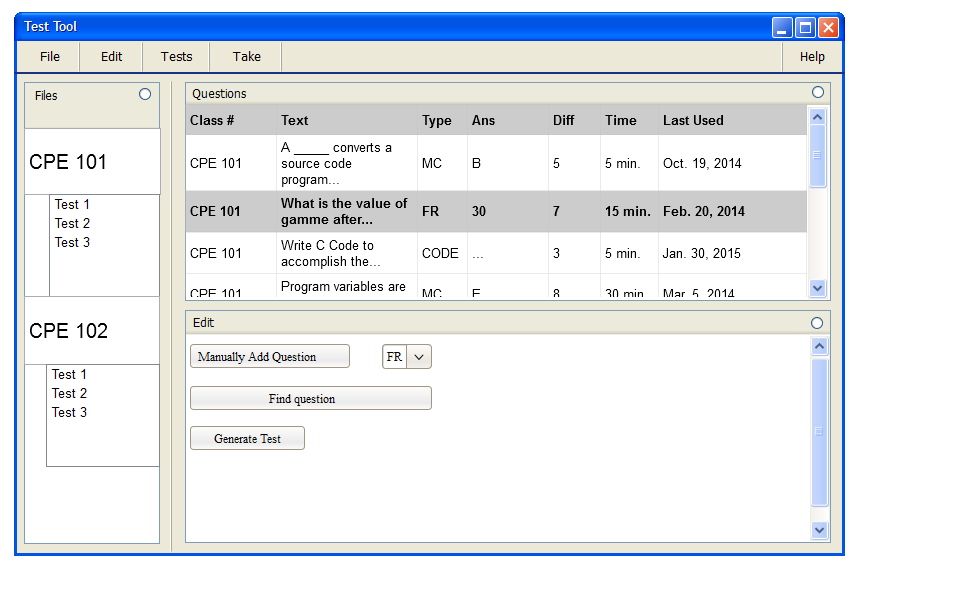
Figure 2.2.8: Select Question to Delete
Next, the user deletes the selected question by hitting the delete key on their keyboard. After pressing delete, a dialog box will prompt the user to confirm the deletion. By selecting Ok in Figure 2.2.8, the user will return to the image shown in Figure 2.2.2 but without the question they deleted. If the user presses Cancel they are brought back to Figure 2.2.2 with no changes.
If the question is not found in the questions database, an error will occur. This will prompt the dialog box found in Figure 2.12.1.

Figure 2.2.9: Confirm Deletion Dialog Box
The Generate Test button in Figure 2.2.1 and Figure 2.2.2 prompts a larger interface covered in Section 2.3.
This is a graphical user interface that is currently in working progress, and as so it is subject to change.