This section discusses the use of the NavLink To tool. We assume the user understands how to create a new Lesson and is familiar with at least the Text tool. The NavLink tool allows a teacher to link a node to other nodes not in the current Lesson being built and also link to webpages.
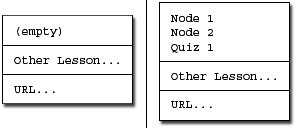
NavLinks in a node appear as either a button to be pressed or as a standard url in blue with a visible underline. To insert a NavLink the teacher enters the submenu "Authoring -> Node Tools -> NavLink To ->". From this submenu, the teacher can choose where to link the button (or url) to. The options available to the teacher in the submenu can be seen in figure 1 below.
Figure 1: HyperLink To submenu showing the two states of the submenu.
Note that if the teacher has created nodes in the current Lesson that their names are visible in a list, if there are no nodes in the current lesson then (empty) is displayed to the teacher. The teacher can also select "Other Lesson..." or "URL...".
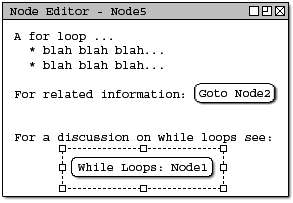
To insert a NavLink to link to Node2 of the current Lesson the teacher would select the command "Authoring -> Node Tools -> NavLink To -> Node2". The system would respond by placing a button in the current node with the title "goto Node2". Figure 2 shows this Navlink in a Node.

Figure 2: A NavLink button inserted into the node. It links to Node2 of the current lesson.
The teacher then wants to add a NavLink to a node not contained in this Lesson. The teacher selects the command "Authoring -> Node Tools -> NavLink To -> Other Lesson...". The system responds by displaying the "Select Node Window", the user highlights the node they desire to link to and click ok. Figure 3 shows the default "Select Node". This window contains a view essentially of the Lesson Explorer. From this window a teacher can select a node to link to by selecting it and pressing OK. Figures 3 and 4 show the default Select Node window and a corresponding selected node to link to.
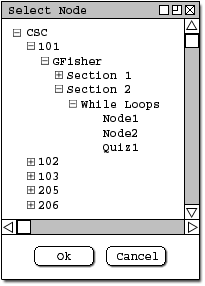
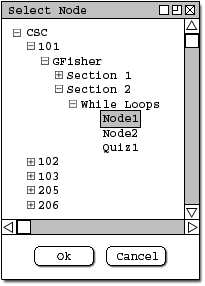
Figures 3 and 4: Default Node Select window, and also an example of an external node selected. note that the Lesson level and Node level items in the window have tooltips that contain useful descriptions of the lesson or node when moused-over.
The system responds by placing the NavLink in the current Lesson. It's format is always in the form of a button
with
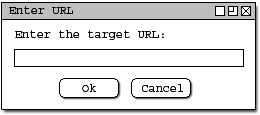
Figure 5: The external Navlink button in the node. The teacher would finally like to add a final NavLink to a url on the web (www.java.sun.com). To do so the teacher selects "Authoring -> Node Tools -> NavLink To -> URL..." from the menubar. Doing this causes the system to
respond by displaying the "Enter URL" window. This window allows the teacher to enter the target URL to link to from
their node. (These NavLinks cause the system internet browser to goto the site.)
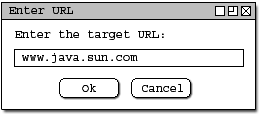
The teacher types in "www.java.sun.com" and clicks Ok. The Enter URL window and the url entry is seen below in figures
6 and 7.
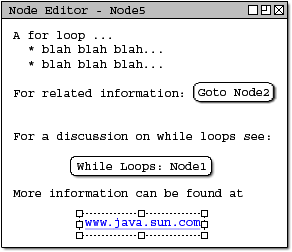
Figures 5 and 6: Default Enter URL Window and the same window with a typed in url string. The system responds by inserting the NavLink, in this case a standard url hyperlink, which looks blue and is underlined. This can action can be seen below in figure 8.
Figure 7: URL Navlink put into the current node by the system. This concludes the scenario of using the NavLink tool.