2.7.1 Class Roster in Presentation Mode
The class roster is automatically updated with students for each section based on the information that is populated within the grading tool for the section. The grading tool has the ability to either import the student information from the university's Student Information Systems (SIS), or manually add a student to the grade sheet. Eclass pulls its information directly from the database generated by the grading tool so will not actually have to interact with SIS at all.
The 'Roster' window is equiped with four columns ('Group', 'Name', 'AR', and
'IC') and five buttons ('Seating Chart', 'NC', 'LC', 'FC', and 'Grades'). Each
row within this spreadsheet formatted window contains the information for one
student. The first column indicates which group they are part of. The second
column shows the name of the student. The third column stands for 'Access Rights'
and shows the instructor the control level to which the student's workstation
is set. The 'IC' column stands for 'Individual Control' and indicates whether
or not the student has writing permissions on the public layer ('Whiteboard'),
a checkmark means they have permissions, and no checkmark means no permissions.
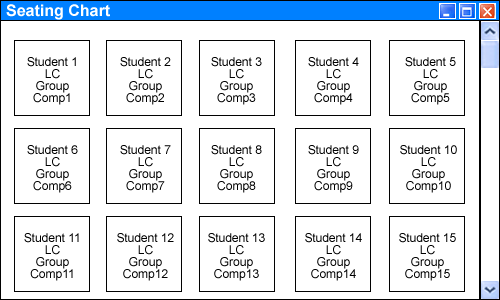
The 'Seating Chart' button will be discussed in more detail in section 2.7.3 Seating Chart.
The three buttons, 'NC', 'LC', and 'FC', all pertain to setting the control
levels of the student workstations. The 'Grades' button brings up the section's
gradesheet directly from the instructor's grading tool, Grader. At the beginning
of class, all of the students' names appear black in this scrollable 'Roster'
window (see Figure 2.7.1 I1).
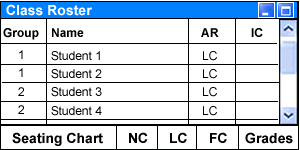
Figure 2.7.1 I1: Initial 'Roster' window.
As each student logs in for the class period, his/her name changes color to blue to make the instructor aware of who is absent and who is present (see Figure 2.7.1 I2).
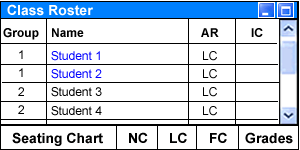
Figure 2.7.1 I2: Students 1 and 2 both login to their terminals.
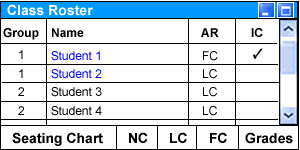
At the beginning of each quarter, all students have their control level set to 'Limited Control' as default (see section 2.6.3.2 Limited Control Details for further details). However, the instructor has the option of changing the control level of any or all students for both their machine (see section 2.6.3 Student Workstation Control), and the public layer ('Individual Control'- see section 2.6.4 'Individual Control'). Any changes that are made by the instructor carry over into the next class, so the instructor doesn't have to change the workstation control levels each class. The three workstation control levels come in the form of buttons located at the bottom of the 'Roster' window and can be set by first choosing a student(s) (by clicking on their name(s)) followed by clicking the control level button of choice. This change is then reflected in the 'AR' (Access Rights) column.

Figure 2.7.1 I3: Student 1 has access rights level set to 'FC'.
The 'IC' ('Individual Control'
2.7.2 Roster Setup in Prep Mode
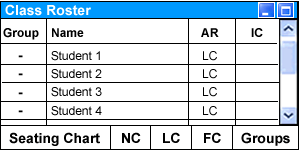
Figure 2.7.2 I1: 'Roster' window within Prep Mode.
The 'Groups' button brings up a separate window that allows the instructor to create groups for each section, as well as place students within these groups. The ability for the instructor to use groups minimizes time-consuming actions done regarding access rights delegated to an entire group.
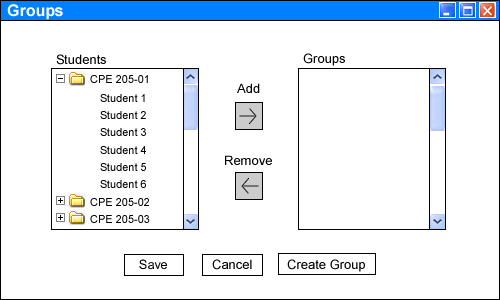
Figure 2.7.2 I2: 'Groups' window. Create and set groups.
After clicking on the 'Create Group' button, a separate window comes up titled 'Creating a Group' where there is a pull-down menu for the instructor to select the section for which the group will be assigned. Next to the section selector is the text field titled 'Group Name', where the instructor enters the name of the group (see Figure 2.7.2.1 I1.). Clicking the 'Cancel' button cancels the group creation request, while 'Save' creates the group for the desired section.
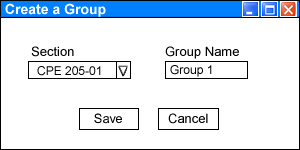
Figure 2.7.2.1 I1: 'Creating a Group' window.
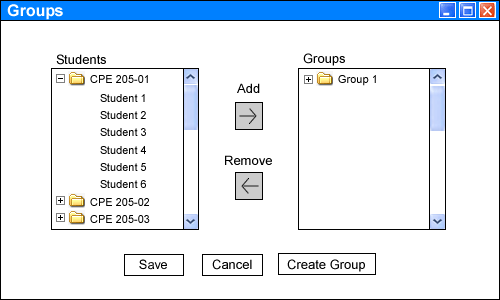
Figure 2.7.2.1 I2: 'Groups' window after having created the group.
2.7.2.2 Assigning Students to Groups
After having created the desired groups, the instructor now can assign students to the group. To assign a student to a group the instructor first clicks and highlights the name of the student under the 'Student' section, then clicks and highlights the name of the group under the 'Group' section, and finally clicks the 'Add' button. Students can be added to multiple groups as to the discretion of the instructor. In order to perform such a feight, the previous procedure is merely repeated with a new group. To assign multiple students to one group at a time, the instructor clicks on the name of the first student, then holds the 'Shift' key while clicking on the names of each following student. The rest of the procedure remains the same. After adding the student(s) to the group, the name of the group will appear next to the student's name in the 'Student' section. This indicates to the instructor whether or not a student has been assigned to a group yet.
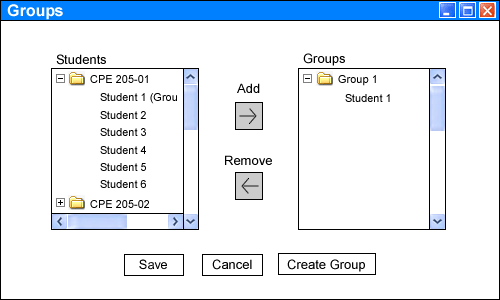
Figure 2.7.2.2 I1: Adding a student to a group.
If a mistake is made and the instructor wants to remove the student from the group, the instructor simply clicks on the name of the student followed by the 'Remove' button. This will remove the student from the group and remove the group name listed next to the student on the 'Student' section.
Figure 2.7.2.2 I2: Removing a student from a group.
Note: The 'Add' and 'Remove' buttons will not work unless both a student and a group are selected. The buttons always appear enabled, but if either one of the fields is not selected an error message will show and no function will be performed.