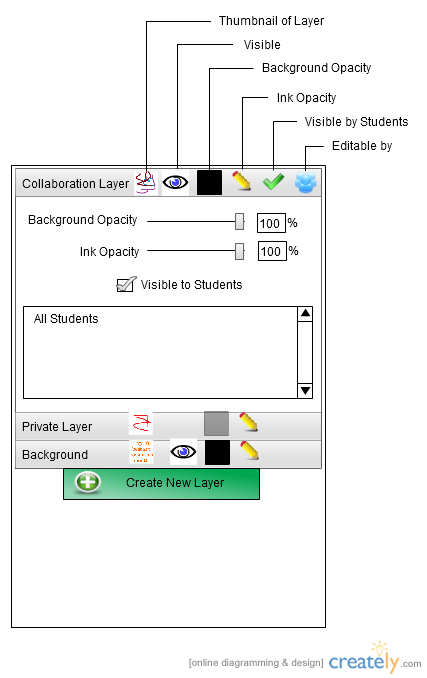
Figure 2.3.3.1: Layer Management Widget
One of the main features that sets this eClass software stand out from the rest is its layer management capabilities.
Each layer has inherent properties that can be edited. Each property is viewable at a glance and once the layer is selected,
all of the properties can be edited. Figure X shows the layer management widget
Figure 2.3.3.1: Layer Management Widget
Thumbnail of Layer: This is a thumbnail of the layer that is being represented. This is to make it easier on the user to select the correct layer.
Visible: The user clicks this button to toggle between making the layer visible and invisible. For a more in depth description of how to use this feature, see the page on Viewing and Editing Layer Properties
Background Opacity: The square represents the opacity of the background. If the background is at 30% opacity, the box will also be at 30% opacity. For a more in depth description of how to use this feature, see the page on Viewing and Editing Layer Properties
Ink Opacity: The pencil represents the opacity of the ink on the layer. If the ink opacity is at 30% opacity, the pencil will also be at 30% opacity. For a more in depth description of how to use this feature, see the page on Viewing and Editing Layer Properties
Visible by Students: Shows the read permissions of the layer. It has two permissions, visible to all and visible to none but the owner.
Editable by: Shows the write permissions of the students. It has three permissions, editable by group, user, and owner only.
Make Layer Publicly Viewable: The user selects this checkbox if he/she wants to allow the students to view the layer.
Give Write Permission to Layer The list of students in this list are the students that have editing permissions on the layer. If the user wanted to remove a student from the sharing list, the user selects the student(s) and presses delete. To add a user to share the layer visit the in depth page on sharing layers