2.2.2 Managing Groups
In this walkthrough, a user is adding a series of groups to the grade sheet.
The user is assumed to have just created a new grade sheet, with all default
entries nd settings. To add a student, the user selects "Students" >> "Groups".
In response the system displays the dialog shown in Figure 2.2.2.1.
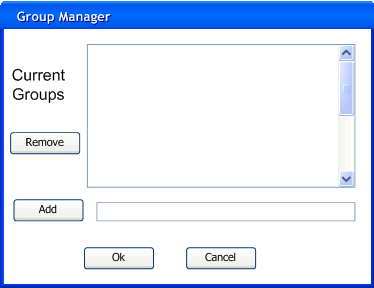
Figure 2.2.2.1
The large list box displays all of the groups currently in the grade sheet.
The grade sheet starts without any groups, so this is initially empty.
The next text box is involved with adding groups to the list.
To add a group to the grade sheet, the user enters the name of the desired group
into this box, and presses the "Add" button. The result of adding groups named
"Group 1","Group 2", and "Group 3" and the user entering "Group 4" into the "Add" box
is shown in Figure 2.2.2.2. It is important to note that the groups are shown in alphabetical order,
and are sorted each time a group is added.
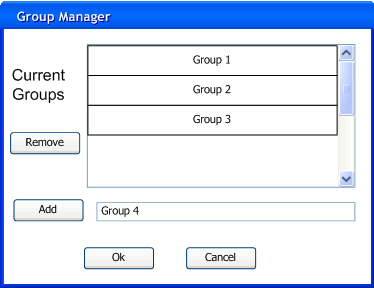
Figure 2.2.2.2
To remove a group from the list, the user first selects the group from the list,
then presses the "Remove" button. Removing groups does not remove the students associated
with them, it only removes the association between the student and the group.
Associating students with groups is done through editing the students, as described in section 2.2.3.
The changes to the grade sheet are not made until the user presses "Ok", and are not made permanent
until a "File">>"Save" command has been executed.
The user closes the dialog with no changes to the grade sheet by pushing "Cancel".
Prev: Importing from SIS
| Next: Manually Adding a student
| Up: Initial setup
| Top: index