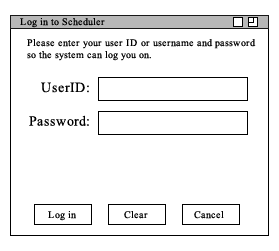
Figure 1: Log-in Dialog
A student logging onto the system is first presented with a basic login screen. The student enters a username and Student ID number, and presses 'submit'. Then, the student may choose between several services. Namely, completing a scheduling survey, viewing proposed or past schedules, instructor schedules, or schedule/student statistics.
Figure 1: Log-in Dialog
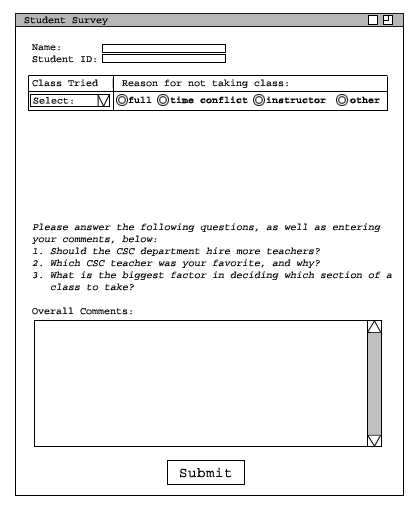
Figure 2: Student Survey dialog, blank
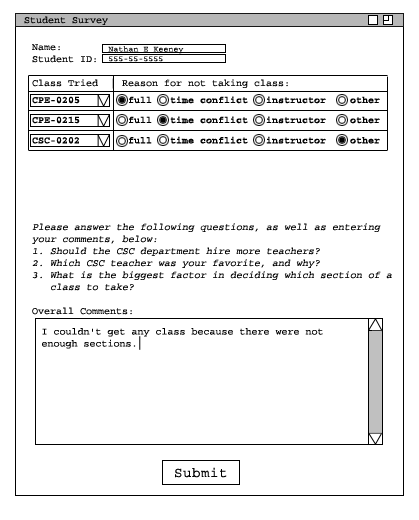
The student pulls down the selection box titled 'Select:' and selects a class that they attempted to take and were not able to, as shown in Figure 3.
Figure 3: Selecting a class
The student then selects the radio button next to the appropriate reason. If none of the available reasons are not applicable, then the student may select the radio button next to 'other', and enter the full reason in the comments box at the bottom of the screen. As soon as a radio button is selected, a new line will appear below the last one. The student may then enter information on this line and so on, until all such classes have been entered. If there are more lines than are needed, the student may select the 'None' option on the pull-down selection box and the line will vanish. The student then optionally enters suggestions or comments in the large dialog box at the bottom of the screen (and may answer administrator-posed questions in the same field), and then clicks the 'Submit' button at the bottom of the screen. A filled-out screen is shown in Figure 4.
Figure 4: Student Survey dialog, filled out
A student will only be able to take the survey once, but may change answers after submitting the survery using the 'Student -> Take/Edit Survey' option. The entered information will be compiled together with other such data and the system will generate a report that any user may view.
2.6.2. Answering Survey
A system administrator may post questions to acquire input from students. The student selects the option 'Student -> Take/Edit Survey...' and is presented with the screen shown in Figure 2.

2.6.3. Viewing Posted Information
A student user may view three kinds of information in addition to survey answers. 'Student -> View Survey' displays report data generated by student input. It is explored
in section 2.4.3.2.
'Instructor -> Select Instructor...' allows the student to view each instructor's schedule of classes. 'File -> Open...' allows the student to choose a posted schedule (the administrator must first post one or more schedules), and view (but not change) its information in the main viewing window. 'File -> Recent ->'
performs the same function for the five most recently viewed schedules. Also, the most recently posted
schedule is displayed when the student first logs into the system.