2.6. Advanced Scheduling
2.6.1 Changing Preferences
2.6.2 Dealing with Constraints
This scenario describes additional scheduling options not covered in the basic scheduling procedure. These advanced scheduling options allow more flexibility and customization for the user. To make a schedule based on data from a previous term, the user starts from the main dialog after initial start up procedures. Before generating a schedule for the current term, the admin should adjust the past schedule that is needed for this term to fit the current schedule requirements. This includes editing the classes being offered and the number of sections for each class, if any of these have changed since the past term. Adjustment of these aspects can also be done after the current schedule is created based on the previous term. Refer to the section on schedule editing. To start, the user navigates to the Create Schedule Dialog by following the procedure outlined in Section 2.1-1.
The following window comes up as shown in figure 2.6-1.

Figure 2.6-1: Create Schedule Dialog
In this dialog the user can initialize the schedule that needs to be created. There are 3 options at the bottom to allow continuation of scheduling. The user may choose to create an entirely new schedule, which is the default selection (this scenario was discussed previously in section 2.3), use the most recent term’s schedule, or use another saved term from the past. The user checks the box at the bottom labeled “Use Last Term’s Schedule”. This will cause the Scheduler to automatically use the schedule that was used from the previous term. If there was no schedule in the previous term, this option will be grayed out. The figure below shows the “Use Last Term’s Schedule” option selected. The user then presses “OK” to continue.
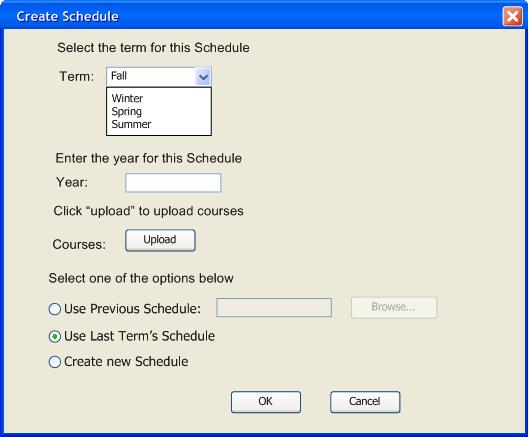
Figure 2.6-2: Create Schedule Dialog with “Use Last Term’s Schedule” checked.
Next, the Scheduler loads the data and a schedule is created. The user sees a completion window confirming that the Schedule has been loaded, as shown below in figure 2.6-3.
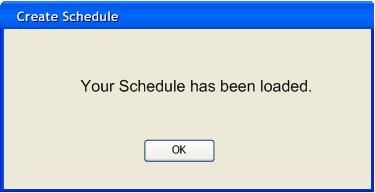
Figure 2.6-3: Completion Window
The user is able to adjust the schedule as desired after creating this schedule. Since the schedule will likely not match with the requirements of the current term, the user can inspect this schedule for necessary changes. The user should elect to view an evaluation by the program of how “good” this schedule is, i.e., how fair the schedule has been generated based on the algorithm used. Also, the user should select to show all the instructors with poor schedules according to the fairness algorithm. With this view, the user easily overrides the unfairness by editing their schedules. Other items that need editing include the number of classes offered, the section numbers, and the times at which the classes are offered. These editing procedures are discussed below, and further editing of the schedule is done by the processes previously mentioned in section 2.4, the Basic Schedule Generation section.
When manually scheduling a class, the user proceeds with the following process.
The administrator uses the Schedule menu in the file bar and clicks the Schedule Class item to manually schedule events. See Figure 2.1-1.
Upon clicking the Schedule Class item, the system will display a dialog as seen in figure 2.6-4.
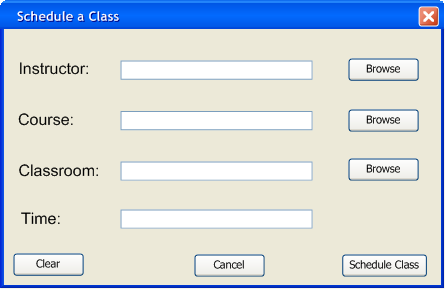
Figure 2.6–4: Default dialog for manual Class Scheduling
The user then can either type in all of the information or browse for it through the databases. The user first browses and finds Kurt Mammen to add as the Instructor.
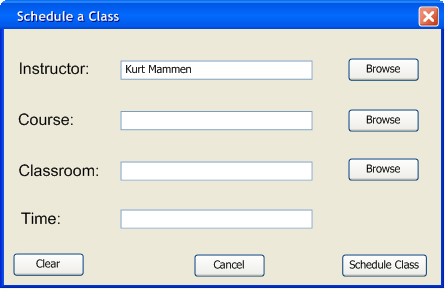
Figure 2.6–5: Schedule a Class dialog with instructor filled in
The user then selects CPE 101 from the course database.
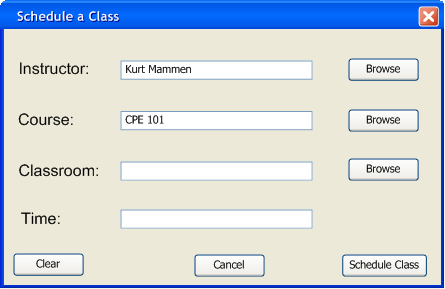
Figure 2.6-6: Schedule a Class dialog with course filled in
The user then selects a room from the database. The user chooses room 14 - 252 in this case.

Figure 2.6-7: Schedule a Class dialog with classroom filled in
The user then must type in a valid time to schedule the class. The time must agree with the given Work Units for the course. This is non editable. Courses with 5 Work Units must have 3 hours of lecture and 3 hours of lab. If the user does not conform to the given Work Units for the course, the Scheduler will display a dialog concerning the Work Units and the specific number of Work Units for the course that he is trying to schedule. Since this course has 5 Work Units the user schedules three 2 hour chunks to take care of the Time.
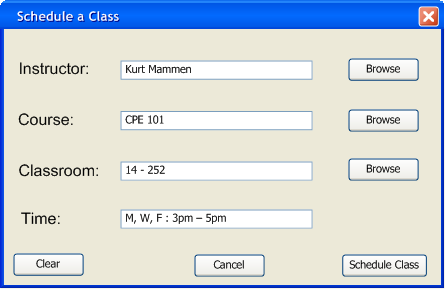
Figure 2.6-8: Schedule a Class dialog with time filled in
The user then hits Schedule Class and the Schedule now reflects the changes. Labs and their rooms are automatically paired with lectures by means of the closest available lab room.
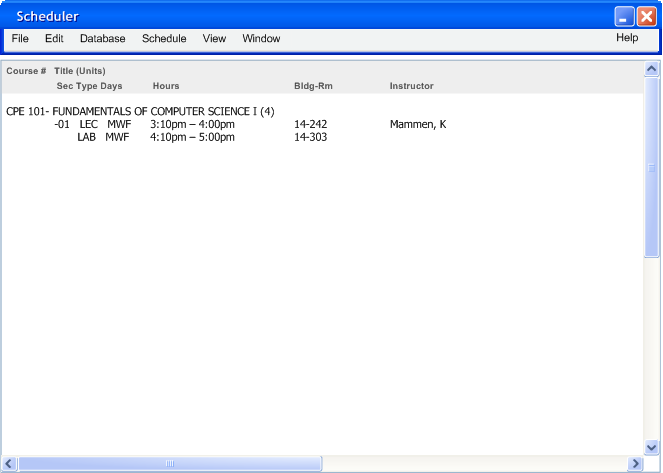
Figure 2.6-9: Schedule view of the class that was scheduled
The Administrator continues to schedule specific events in the schedule until every specific need for this term has been taken care of.
The user may then change any field in a particular instructor’s schedule by double clicking on the spot where the class is listed in the schedule view. The user is then taken to the “Schedule Class” dialog shown below, which shows the data that has already been entered either manually or automatically. The admin may override any of the fields in the scheduled class by browsing or inserting another input, then clicking “OK”. Any changes will be reflected in the schedule view. This method may be used when there is an obvious scheduling mistake, such as a professor chose the wrong course. This can also be used for changing a course’s instructor in the same manner. In the case below, the admin changes the course a particular professor is teaching. The schedule has been populated but Mammen needs to be teaching CPE 102 instead of CPE 101. The section numbers will automatically be updated in relation to other classes when a course change is initiated. The figures below show the admin changing Mammen’s course from CPE 101 to CPE102. Since the there is already a course scheduled in room 14-242, the admin must change the classroom as well. If the admin fails to do this, an error dialog will be shown describing the room conflict and the admin will be taken back to the Schedule Class dialog where he simply changes the classroom.
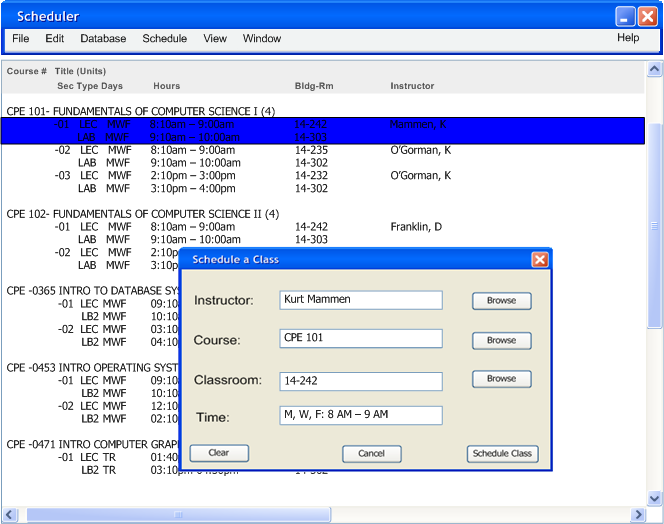
Figure 2.6-10: Dialog window after the “bad” schedule is double clicked on
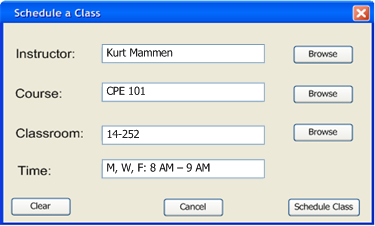
Figure 2.6-11: Schedule class dialog with the course changed
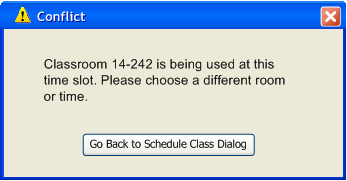
Figure 2.6-12: Error message if room number is left at 14-242
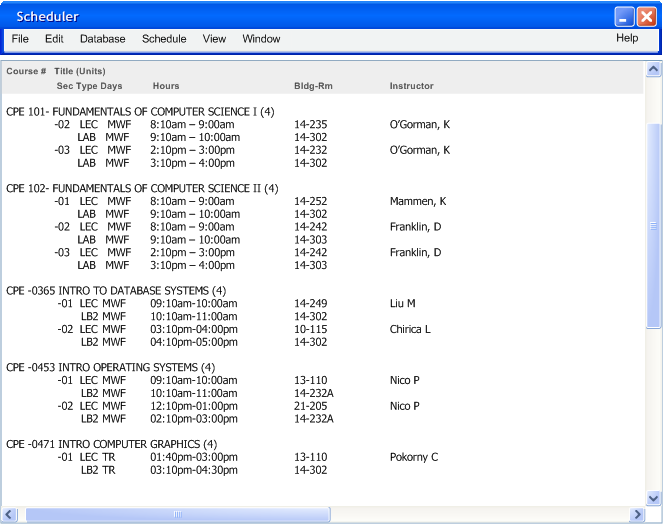
Figure 2.6-13: Schedule view of the changed class
If the admin leaves a field empty when scheduling a class, for the reason that the information is not yet known, then the Scheduler will display "TBA" in the appropriate fields as shown in figure 2.6-14. This indicates that the classrooms or instructors for these fields are not yet known, and have yet to be determined.
![]()
Figure 2.6-14: Schedule with TBA and STAFF fields automatically filled in.
See sections 2.6.1 – 2.6.2 for additional advanced scheduling options.
Prev: Database Overview | Next: Schedule Viewing| Up: Functional | Top: index