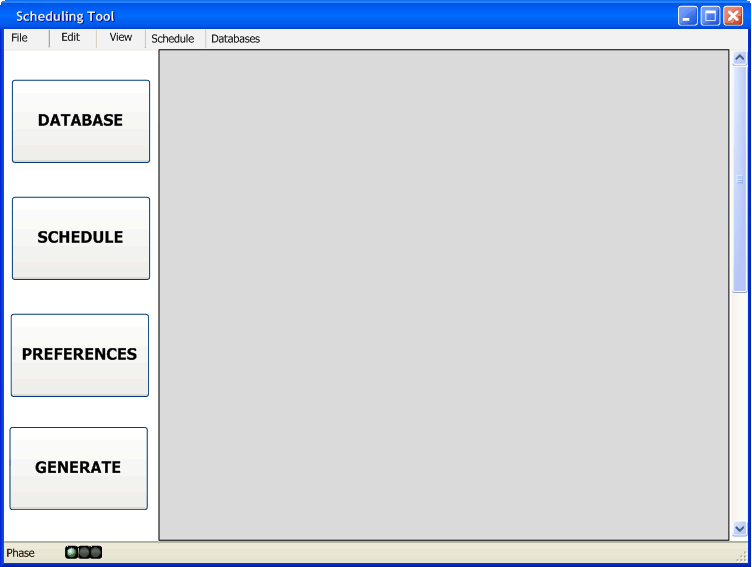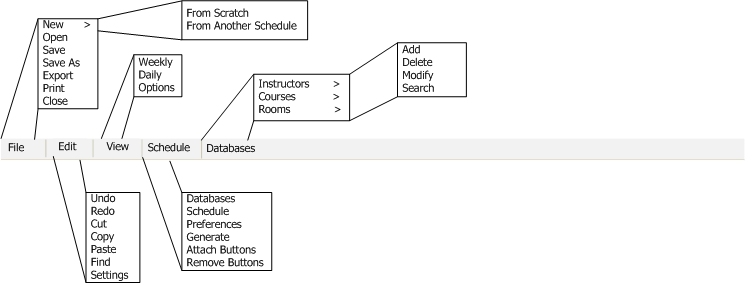
When the administrator first opens the Scheduling tool, they will be prompted to set up there initial databases. These databases are the courses offered, instructor in the department and the room numbers that are given to the department. Once the initial setup has been completed the administrator has the ability to create a new schedule. The "home screen", shown in Figure 2.1.1 is what the administrator will see each time program is opened. The administrator can then access other commands discussed later. Figure 2.1.2 shows the different available commands.

Figure 2.1.1: Home Screen with buttons

Figure 2.1.2: Expanded command menus
The File menu contains the typical commands for executing system level functions. 'File New' gives the administrator the option to either open a new schedule from scratch or to create a new schedule starting from a previously generated schedule. Starting from a previously generated schedule will copy over the old courses database, but will not copy over any other preferences. 'File Open' gives the administrator the option to open an existing schedule form a previously saved one. 'File Save' saves the current schedule from the file in which it was opened. 'File Save As' allows the current schedule to be saved to a different file from the one in which it was opened from. 'File Export' allows the user to export the current schedule to calendar program for viewing. 'File Print' prints the current window in the work area of the program as seen in Figure ? The administrator will have the option to only print what is in viewable area or to have the program print the entire scrollable window. 'File Close' will close the current schedule that is open and return you to a blank skeleton shown in Figure 2.1.1.
The Edit menu contains the basic generic commands that most all Edit menu's contain. 'Edit Undo' will undo the text changes just made by the administrator. 'Edit Redo' will redo the text changes just made by the administrator. 'Edit Cut' will cut the text selected by the administrator. 'Edit Copy' will copy the text selected by the administrator. 'Edit Paste' will paste the text that was either copied or cut and stored in the clipboard. 'Edit Find' will find all of the text in the work area section.
The View menu contains the difference types of views for the schedule. Selecting 'View Weekly' will show the administrator the weekly view of the currently generated schedule. 'View Daily' will show the administrator the schedule in the daily view. It can be broken down into different hours of the day. 'View Options' will give you the opportunity to select how you want to view the schedule. It gives you more then just the generic option that the program has predefined.
The Schedule menu contains the different buttons such as Databases, Schedule, preferences, and generate. 'Schedule Attach Buttons' will place the buttons in a tool-like display shown in Figure 2.1.1. 'Schedule Remove Buttons' will remove the buttons that are located on the left hand side of the window. These buttons are for use on the temporary databases created with each schedule. The administrator may also select the buttons from the menu. 'Schedule Databases' will open the databases window in the work area. 'Schedule Schedule' will show the administrator the currently generated schedule. 'Schedule Preferences' will show the preferences window in the work area allowing the administrator to change different preferences. 'Schedule Generate' will generate a schedule based upon the preferences set by the administrator and each individual instructor.
The Databases menu contains all of the permanent databases and the different commands that can be executed on them. 'Instructors Add' allows the administrator to add a instructore into the permanent database. 'Instructors Delete' allows the administrator to delete an instructor from the permanent database. 'Instructors Modify' allows the administrator to modify any data about a particular instructor in the permanent database. 'Instructors Search' allows the administrator to search for a particular instructor and pull up all of the information about that instructor. The same goes for all of the other selections such as 'Courses' and 'Rooms'.
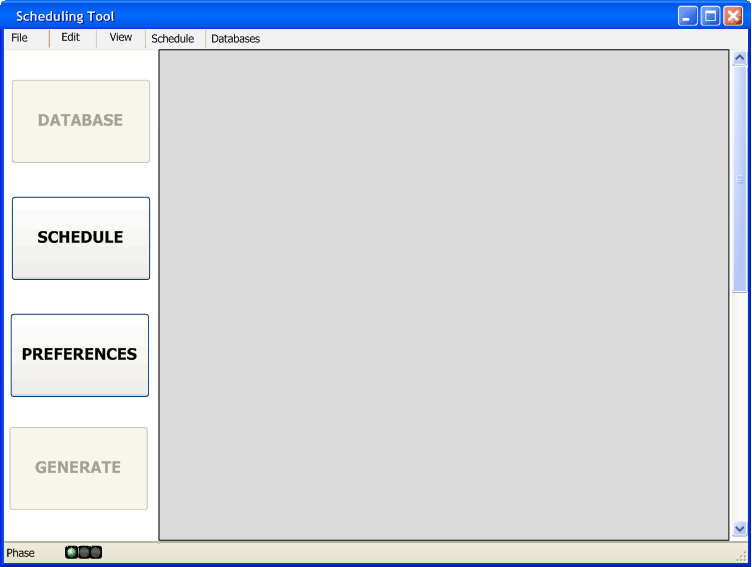
There is also a different view if the user is an instructor logging in versus the administrator. Figure 2.1.3 contains a picture of what the instructor will see at login. It is similar to the administrator's view, but the Databases and Generate button are greyed out because an instructor does not have the privileges to modify any of the databases nor can the instructor generate a schedule.

Figure 2.1.3: Instructor UI view
The status icon located at the bottom of Figures 2.1.1 and 2.1.3 represents what phase the schedule is in. The first light is green for phase 1, the second light is yellow for phase 2, and the thrid light is red for phase 3. Each of the phase dates are predetermined by calender dates set by the administrator.