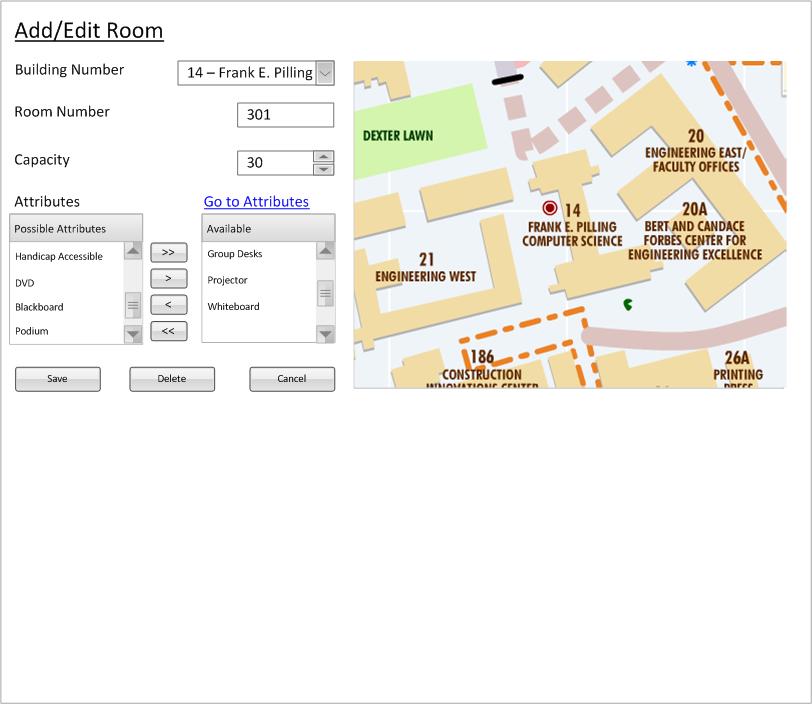
Figure 1: Room management example for a building 14 classroom.
When the user selects an existing room from the nav bar, the context window is replaced with the current content of that room, as demonstrated in figure 2. The building and room number are both filled in with the appropriate values, in this example Building 14 and Room 301, the capacity set to 30, and the attributes present for the room are displayed in the available scroll box. Additionally, the map is initialized to the building and then places a red dot on the current coordinates of the room inside the building (This example has the dot misplaced where 301 actually is). This entire page corresponds directly to what is in the room database for this unique room. All changes made on this page are confirmed or cancelled with the appropriate buttons at the bottom of the page.
The user may decide to change a building number for a current room and that is done by using the drop down menu. The user clicks the chevron and a drop down appears (shown in figure 3) The user then selects the building that they want to change this room into.
Figure 2 shows what the drop down menu (Bldg) looks like.
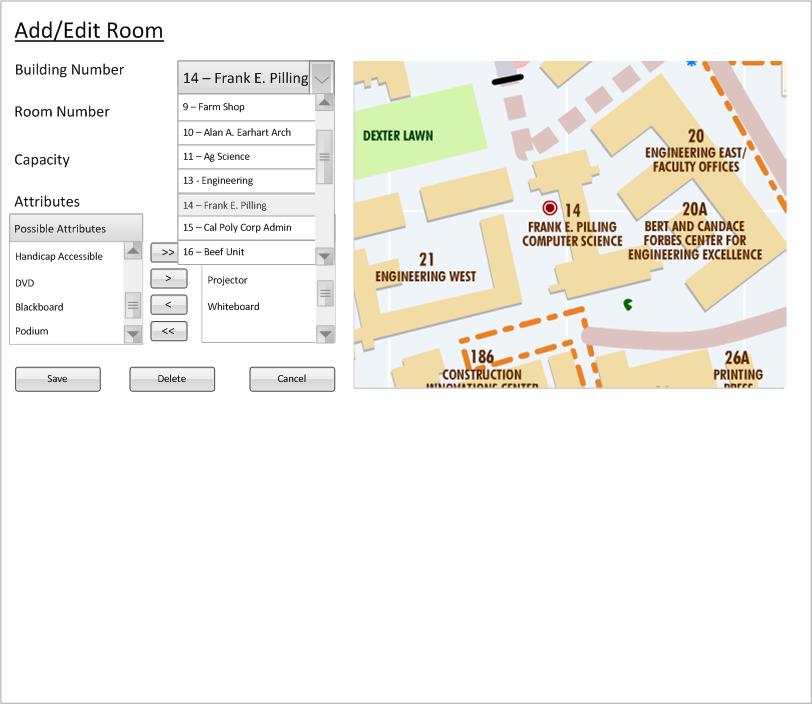
Figure 2: Drop down menu for buildings with 14 selected.
The user can choose to change the room number associated with this room by clicking or tabbing to the text field associated with room and typing in the new room number. Alpha numeric data is allowed however the beginning of the string must be a number
User can do this by clicking the spinner to the appropriate value or by typing the number out. If the user types non-numeric values, the spinner displays the previously correct value.
The scrollbox on the right contains the pool of all attributes that a room can have. The scroll box on the left is all of the attributes that the room actually has. The buttons between the two scroll boxes are the way you move available attributes to be the actual attributes for the room. There are four buttons and each is explained next. Go to Attributes is a link for the user to quickly edit the attributes for a room. Visit Lookup Attributes for more infomation on editing attributes. This allows ease in adding and removing features from rooms and allows for flexibility to work with future classroom technology and equipment.
The red "> >" button is a "add all" button. Pressing this button adds all available attributes to the current room.
The yellow ">" button is a "add single" button. Pressing this button adds the selected attribute(s) to the current room.
The green "<" button is a "remove single" button. Pressing this button removes the selected attribute(s) to the current room.
The blue "< <" button is a "remove all" button. Pressing this button removes all available attributes to the current room.
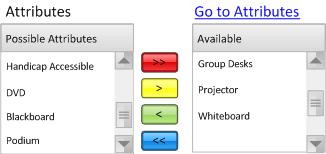
Figure 3: Attributes for Room 301
The map displays the current coordinate location of the current room. The dot at where the room is may be moved around and relocated (or located if it has no current coordinates). The dot is restricted inside the building square however and this prevents the user from placing the coordinates of a room outside the building, which in term may return incorrect distance calculations. Until the dot is moved into the building, the map is considered invalid and does not let you save the current changes.
Figure 4 shows the map for room 301.
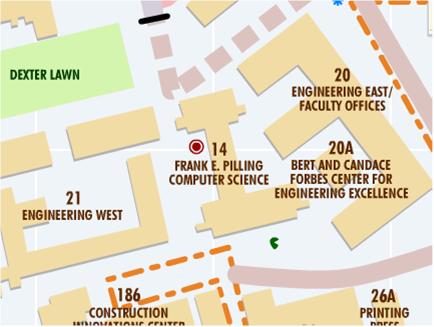
Figure 4: Map for Room 301 (note invalid dot placing, should be inside building)
If the user presses Save, a dialog pops up asking the user if they are ready to commit the changes
(if any have been made). The current state of the room (all the fields) is first be validated and then the database is
be updated accordingly.
If the user presses Cancel, a dialog pops up asking the user if they are ready to throw away the changes
(if any have been made). The window closes and returns to the workspace from which room management was called.
To read about the delete button functionality the use the "Next" link at the bottom of the page.