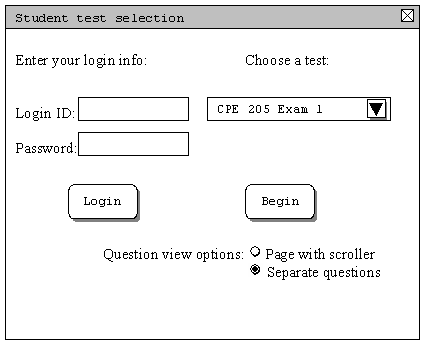
If the student chooses to take a practice (out of class) test or an actual (in class) test at the student tools menu, the test selection dialog appears as shown in figure 2.6.1.a. This dialog asks the student to choose a test to take from a list of available tests. If this is a practice test, any practice tests posted for students will be available here. The login information section is grayed out since login information is not nessesary for a practice test. The student can choose from the practice test(s) open to that student that appear in the test selection drop menu. If this in an actual test, the student must first enter their username and password in the "login ID" and "password" fields. The 'login' button is then clicked to log the student in. If the login information is correct, both login fields and 'login' button become inactive (50% grey) and the login is complete. If the login information is incorrect, the login fields reset and the student may try again. Actual testing doesn't require students to select a test, the test administrator controls which test is given. Students may choose from two test view options: "page with scroller" is the default view option which displays the entire test at once using a side scrollbar if needed as shown in figure 2.6.1.b. The "separate questions" style displays only one question at a time with navigation buttons as shown in figure 2.6.1.c. Once a test is selected, and a test viewing preference selected, the student may click the 'Begin' button to start the test.

When the test begins, the test taking screen appears. This screen shows the name of the test being taken in the window title as well as the current time that remains. If the view preference has been set to "Page with scroller", the student can scroll either by using the scrollbar on the right side of the window, or use the "Page Up" and "Page Down" buttons on the keyboard. The questions appear on the lefthand side of the screen while the answer input fields appear on the righthand side of the screen. Each question and corresponding answer field appear next to each other for organization.
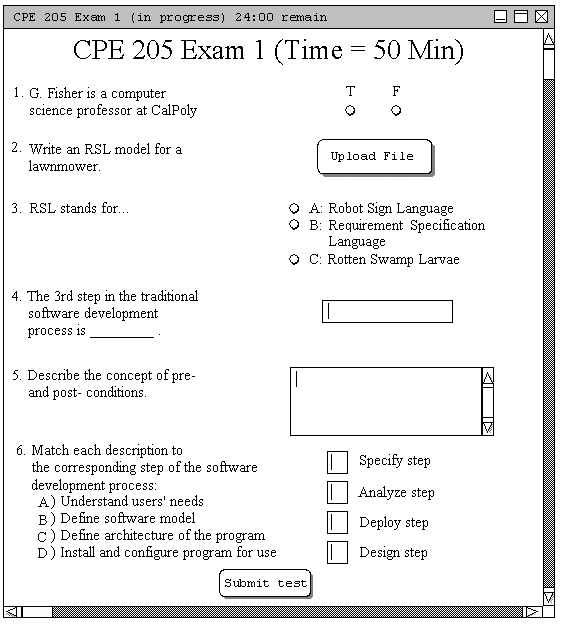
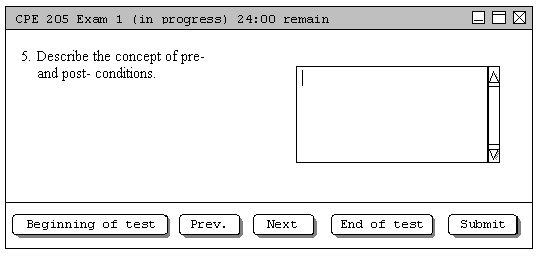
The possible question types include: true/false, coding, multiple choice, fill in the blank, short answer, and matching. True/false questions are either "true" or "false". The student clicks the corresponding radio button to answer a question of this type. Coding questions require the upload of code or a compiled file. Students can use any code editor to write, test, and debug the code that the test asks for. When the student is done coding, the code can be compiled with the editor chosen, and the file is uploaded by clicking on the 'Upload file' button next to the specific question in the test. Question 2 of the example above is a coding type. Multiple choice questions have 2 or more selectable answers. The student may select any one of these possible answers. Fill in the blank type questions can be answered by clicking in the corresponding answer text box and typing in the word or words that fill in the blank in the associated question text. Questions of the short answer variety can be answered by clicking in the corresponding text field and typing their responce to the question text. Students can answer the last type, matching, by selecting which statement of the question text is associated with which answer in the answer area. This is done by typing the letter of the matching question text in the corresponding answer box. Figure 2.6.1.d shows the test with questions filled in.
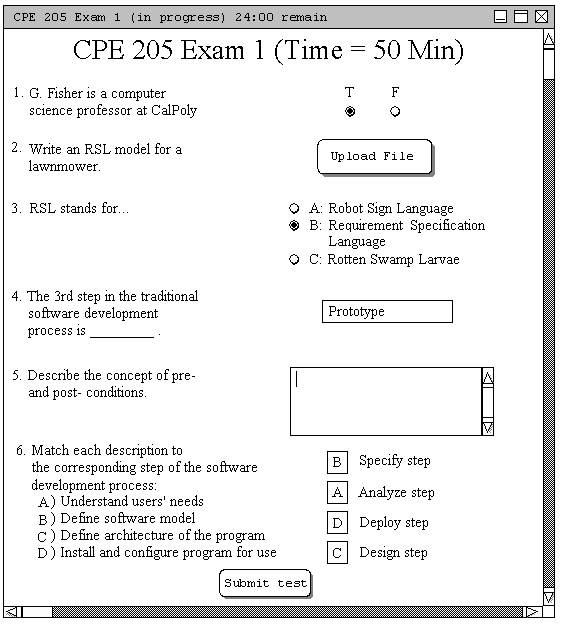
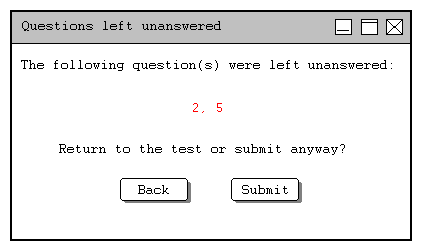
When the student is done, the test can be submitted by clicking on the 'Submit' button at the bottom of the test. If the student clicks the 'Submit' button with any questions left unanswered, a pop up message will notify the student and display the question numbers left unanswered in red. The student can click one of two buttons at this point: 'Back' or 'Submit' as shown in figure 2.6.1.e. In the above example, the student has not uploaded a file to satisfy question 2, the student also didn't respond to question 5. If time runs out and the student has not submitted the test, the test will automatically submit itself. Upon submission, the student is returned to the main student tools dialog.
