2.3.1. Add or Edit Questions
There are two different ways to add or edit questions to the database. The first way is to add or edit the question using the "Add" or "Edit" buttons shown on
the main GUI in figure 2.3.1. The other way to add or edit a question is to right click on an existing
question or an empty space in the database, and choose to either add a question above, or below the selected question or to edit the selected question. For these scenarios,
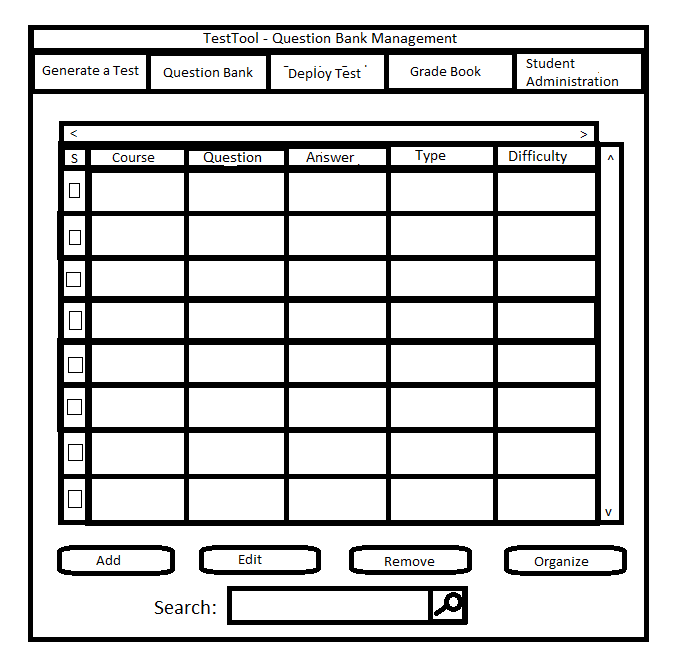
the user begins with the blank question bank pictured in figure 2.3.1.
Adding a question using a button
Once a user clicks the "add" button on the main question database GUI, they are presented with a question
addition dialog. This dialog is shown below in Figure 2.3.2.
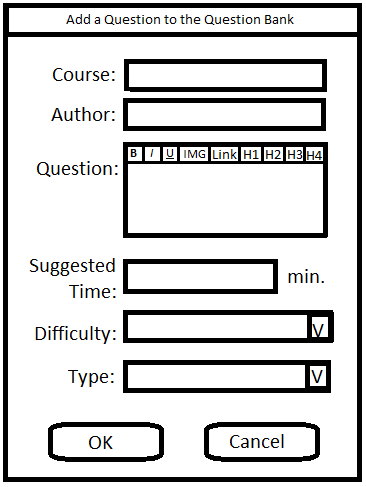
Figure 2.3.2: Question Add Dialog
Adding a question using right-clicks
Once the user right clicks a question in the question bank, a dropdown similar to Figure 2.3.3 shown below
is displayed. At this point, the user then clicks "Add Q After". This brings up the same question addition dialog
as illustrated in Figure 2.3.2 above.
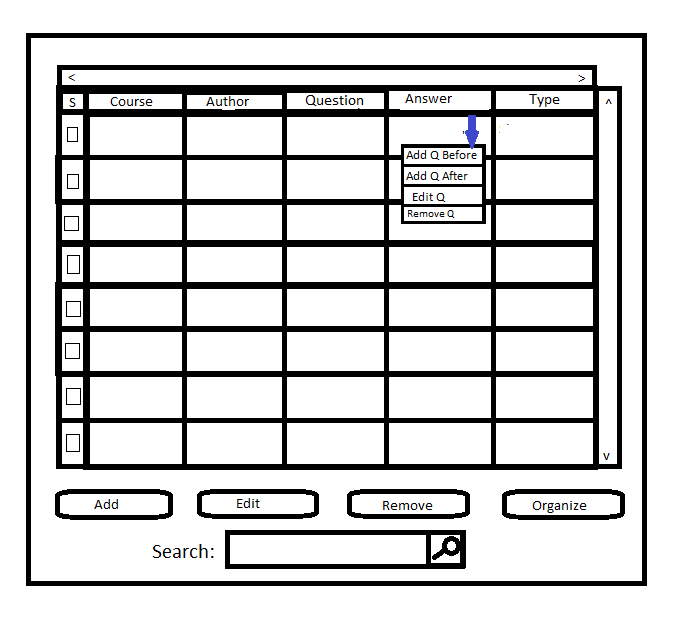
Figure 2.3.3: The right click dropdown
Once this dialog appears, all the fields is completely blank as shown above in Figure 2.3.3. From there, the user will use the textboxes and dropdown menus to add
information to the question. The answer, and any question specific information, is displayed when the user selects the question's type. The various sub-scenarios for each
type of questions are shown below:
The supported types of questions are:
- Short Answer
- Essay
- Fill in the Blank
- True/False
- Multiple Choice
- Matching
- Code
Adding a Short Answer Question:
When the user selects "Short Answer" from the question type drop down in Figure 2.3.3 above, the dialog in Figure 2.3.3 expands to display the question specific information
as shown below in Figure 2.3.4.
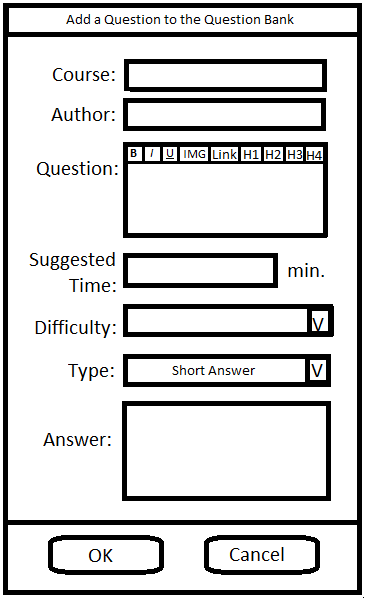
Figure 2.3.4: The expanded dialog for a Short Answer question
Once the question is expanded for short answer questions, the user then proceeds to fill in the question dialog as shown in Figure 2.3.5 below.

Figure 2.3.5: The completed dialog for a short answer question
Once the user clicks "OK", the question is added to the question bank as shown below in figure 2.3.6.

Figure 2.3.6: The question bank after the initial question addition
Adding an Essay Question
When the user selects "Essay" from the question type drop down in Figure 2.3.2 above, the dialog in Figure 2.3.2 expands to display the question specific information
as shown below in Figure 2.3.7.

Figure 2.3.7: The expanded dialog for the Essay Questions
The user then fills in the add essay question dialog, resulting in figure 2.3.8 below.
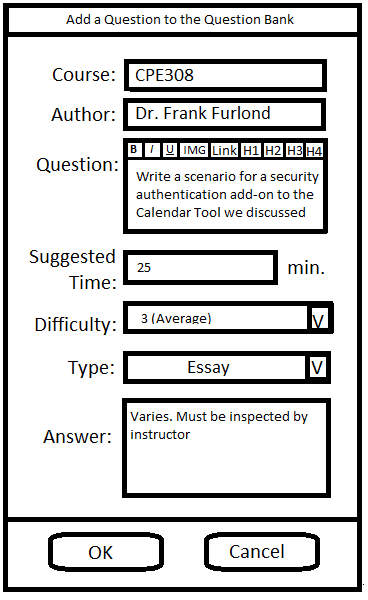
Figure 2.3.8: The completed dialog for the Essay Questions
Once the user clicks "OK", the question is added to the question bank as shown below in figure 2.3.9.
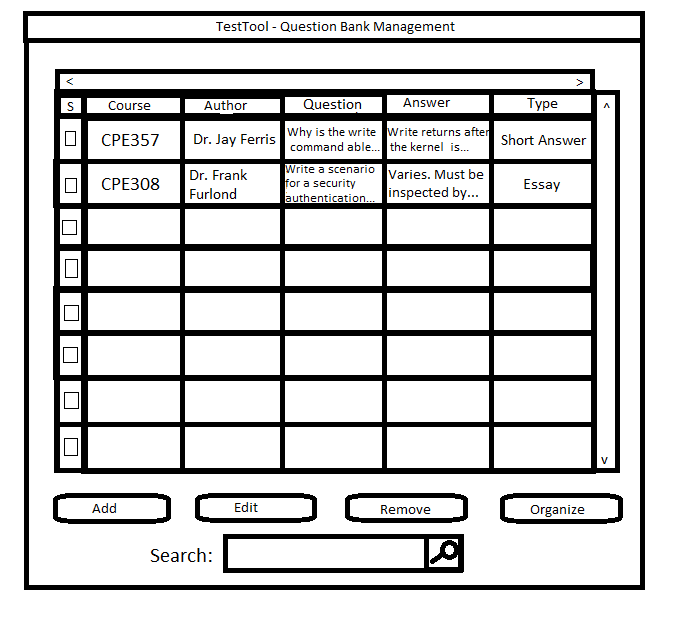
Figure 2.3.9: The question bank after the second question addition
Adding a Fill in the Blank Question
When the user selects "Fill in the Blank" from the type dropdown menu in Figure 2.3.2 above, the expanded dialog with Fill in the Blank specific
options is displayed as shown in Figure 2.3.10 below:
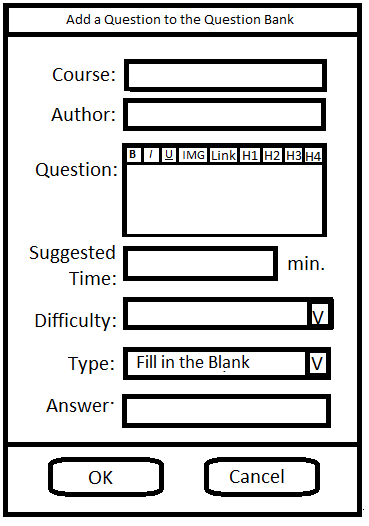
Figure 2.3.10: The expanded dialog for Fill in the Blank Questions
The user then proceeds to fill out the dialog, which results in figure 2.3.11 below:
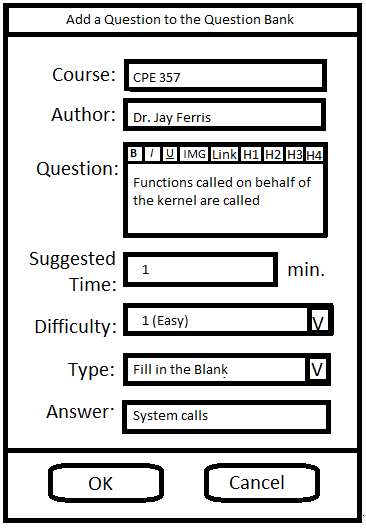
Figure 2.3.11: The completed dialog for Fill in the Blank Questions
Once the user clicks "OK", the question is added to the question bank as shown below in figure 2.3.12.
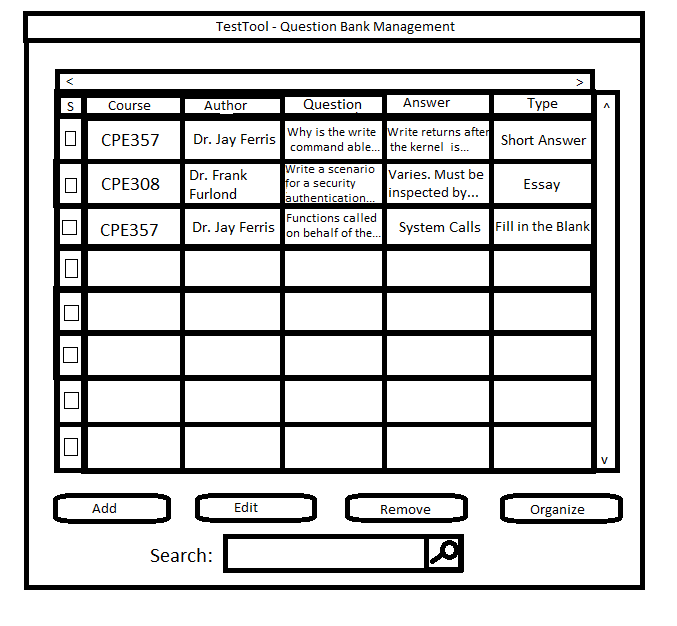
Figure 2.3.12: The question bank after the third question addition
Adding a True/False Question
When the user selects "True/False" from the type dropdown menu in
Figure 2.3.2 above, the expanded dialog with True/False specific options
is displayed as shown in Figure 2.3.13 below:
The user then proceeds to fill out the dialog, which results in figure 2.3.14 below:
Once the user clicks "OK", the question is added to the question bank as shown below in figure 2.3.15.
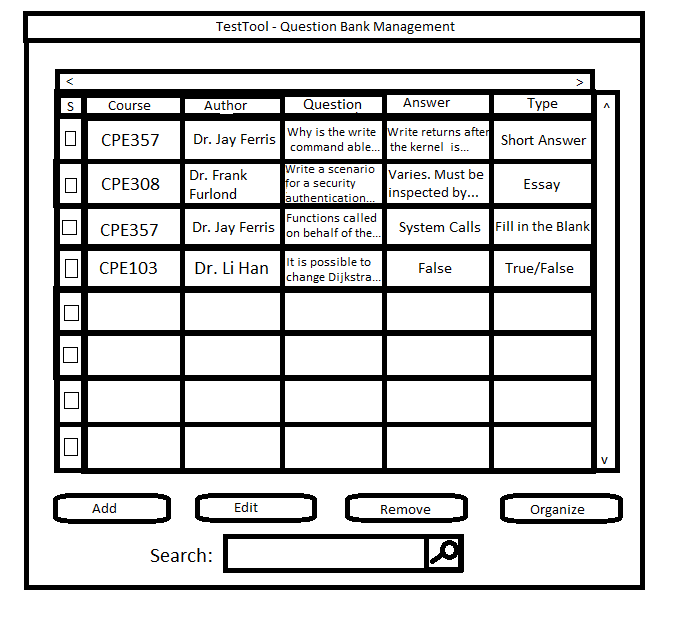
Figure 2.3.15: The question bank after the fourth question addition
Adding a Code Question
When the user selects "Code" from the type dropdown menu in
Figure 2.3.2 above, the expanded dialog with Code specific options
is displayed as shown in Figure 2.3.16 below:
The user then proceeds to fill out the dialog, which results in figure 2.3.17 below:
The format of the script and the way code grading works is discussed in section 2.6.
Once the user clicks "OK", the question is added to the question bank as shown below in figure 2.3.18.
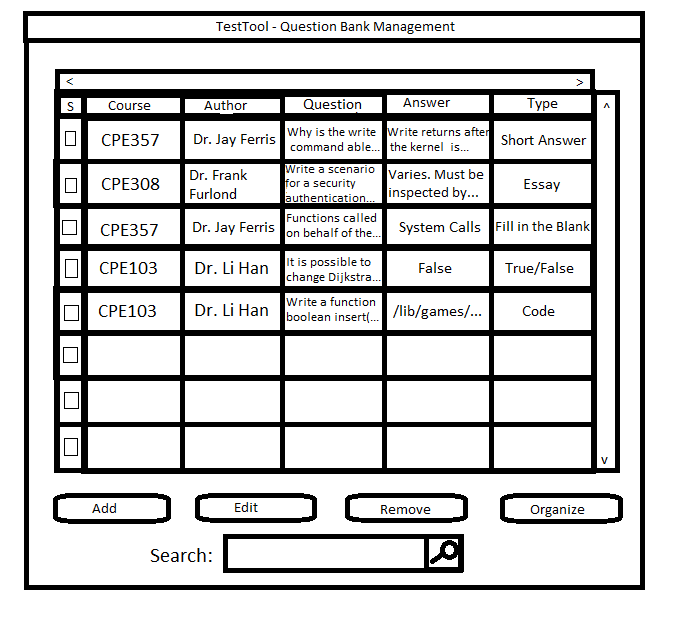
Figure 2.3.18: The question bank after the fifth question addition
Adding a Matching Question
When the user selects "Matching" from the type dropdown menu in
Figure 2.3.2 above, the expanded dialog with Matching specific options
is displayed as shown in Figure 2.3.19 below:
The user then proceeds to fill out the dialog, which results in figure 2.3.21 below:
The application will enforce that each key has a unique mapping to
an answer upon saving the question.
Once the user clicks "OK", the question is added to the question bank as shown below in figure 2.3.21.
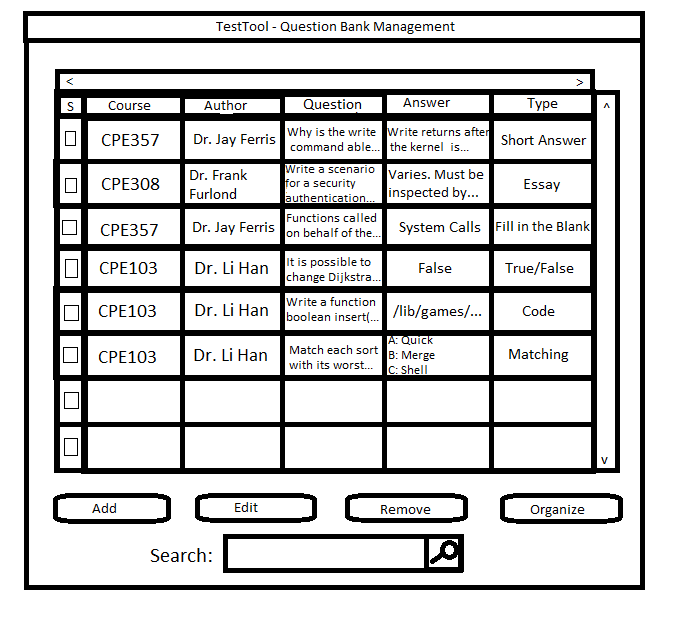
Figure 2.3.21: The question bank after the sixth question addition
Adding a Multiple Choice Question
When the user selects "Multiple Choice" from the type dropdown menu in
Figure 2.3.2 above, the expanded dialog with Multiple Choice specific options
is displayed as shown in Figure 2.3.22 below:
The user then proceeds to fill out the dialog, which results in figure 2.3.23 below:
The user may select any number of correct answers. If the user selects only
one correct answer, then the question on the test allows the student to
select only one answer via radio buttons. If zero or many answers are selected
then the question on the test allows the student to select multiple answers
via checkboxes.
Once the user clicks "OK", the question is added to the question bank as shown below in figure 2.3.24.

Figure 2.3.24: The question bank after the seventh question addition
Inputting HTML (WYSIWYG formatting) into a question
The user then proceeds to add his first formatted question. In previous examples, the user has simply inputted text without any
formatting to the question dialog, although HTML formatting is always available. When the user clicks "Short Answer" in the dropdown menu in figure 2.3.2 above,
the short answer dialog is displayed. The user then completes the dialog as shown below in figure 2.3.25.
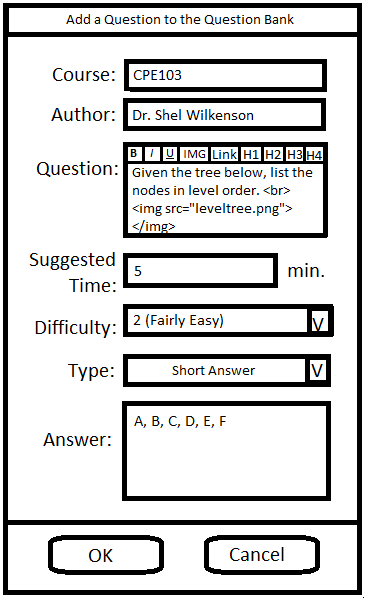
Figure 2.3.25: The completed formatted short answer question
Once the user clicks "OK", the question is added to the question bank as shown below in figure 2.3.26.
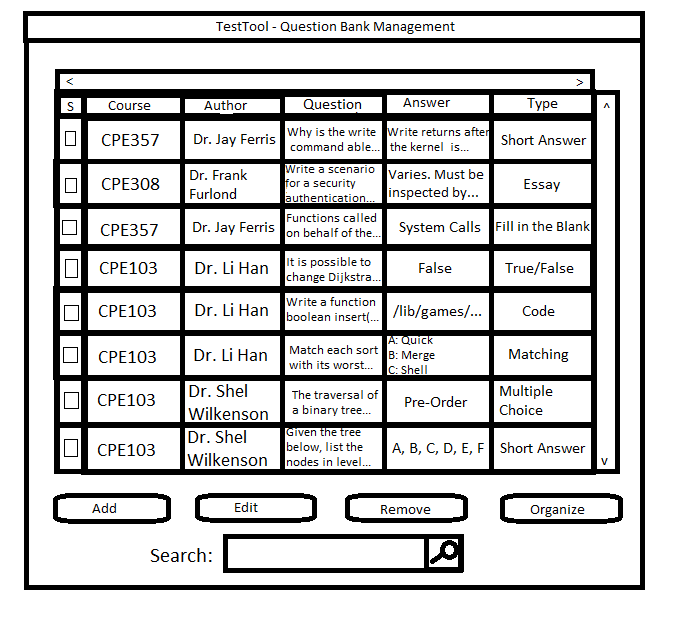
Figure 2.3.26: The question bank after the eigth question addition
The user now proceeds to add more questions. This leads to a fully-populated question bank, where "fully" means the question bank is populated to
a level sufficient for test generation in section 2.2. Furthermore, a significant number of CPE103 questions are added to the question bank to a level such
that all future CPE103 questions can be assumed to already exist in the question bank.
Editing a question using a button
Once a user clicks the "edit" button on the main question database GUI, they is presented with a question
editing dialog. This dialog is in the same format as the addition dialog illustrated in Figure 2.3.2. referenced earlier.
Once this dialog appears, at least some of the fields are populated as shown below in Figure 2.3.27.
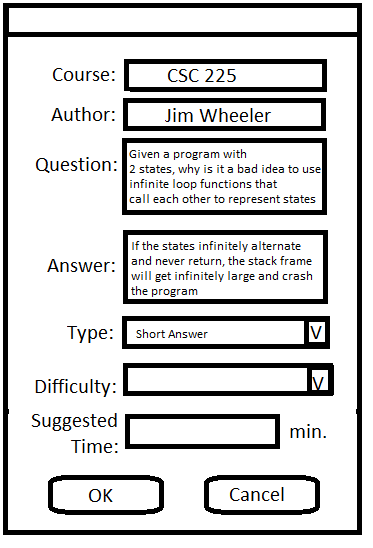
Figure 2.3.27: Example Edit Dialog with Pre-existing Information
From there, the user will use the textboxes and dropdown menus to add information to the question or change the information currently in the question.
In the example in Figure 2.3.28 below a user has decided to remove the author from the question. As with the add dialog, the only required fields are:

Figure 2.3.28: Question Edit Dialog - In Progress
Once the user is done making changes to the question information, and presses OK, the question will appear in the
database in a similar fashion to Figure 2.3.29 below.
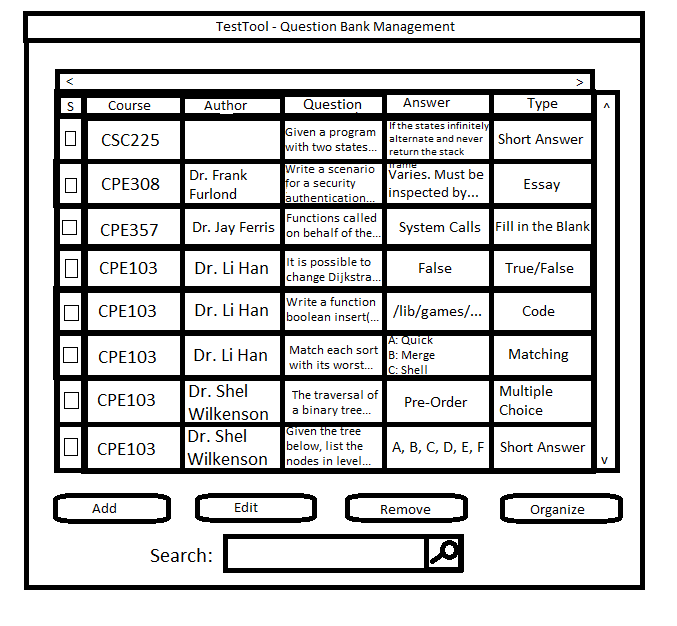
Figure 2.3.29: The edited question now appears in the question bank
Editing a question using right-clicks
Once the user right clicks a question in the question bank, a dropdown similar to Figure 2.3.3
is displayed. At this point, the user then clicks "Edit Q". This brings up the same edit dialog
as illustrated in Figure 2.3.27 above. Once the user completes the dialog in the same fashion as Figure 2.3.28 and clicks OK
the question database will display that the question has been edited. This is illustrated in the above example in Figure 2.3.29.
Prev: [None]
| Next: questionbank-search
| Up: question bank
| Top: index