| Requirements | Specification | Prototype | Design | Implementation | Testing | Administration | Documentation |
|
|||||||||
|
This introductory scenario shows an instructor creating a grade book. An instructor usually creates a grade book at the beginning of each school term. In these scenarios, the instructor is assumed to be registered with Student Information Systems (SIS) at Cal Poly. Each grade book starts off with a blank roster, unless an instructor has decided to load a saved grade book template (covered later in this section).
The instructor can upload student rosters or create templates in either order. Uploading student rosters updates the current grade book roster, deleting and adding students as necessary. Further information about updating the student roster is given in Section 2.3.3. In the current scenario, the instructor downloads the student roster before creating assignments.
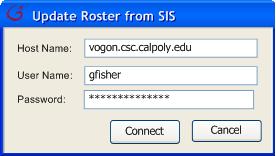
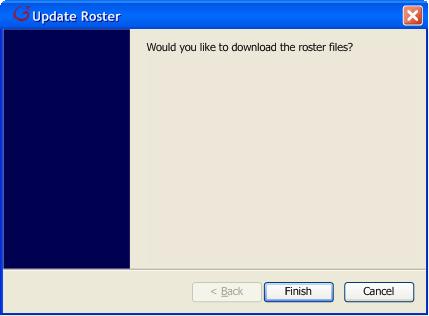
To upload students from the roster SIS provides, the instructor selects 'Class->Update Roster from SIS.' In response, the system displays the dialog shown in Figure 13. The figure shows a form that contains fields needed to connect to SIS. The 'Host Name' field is the name of the SIS server where the instructor can receive and submit grades. The 'User Name' field is the user name Cal Poly gives the instructor, which is the same as his/her Cal Poly e-mail account. The 'Password' field is the instructor's password for the username account. All fields must be completed to download the rosters. Figure 14 shows a completed dialog. Click 'Connect' to continue. As soon as the instructor is connected to SIS, a dialog window appears, as shown in Figure 15. This lists the class rosters available for download. Click 'Finish' to download the rosters.

|
|
|
Figure 13 |
Figure 14 |
|
|
|
Figure 15 |
|
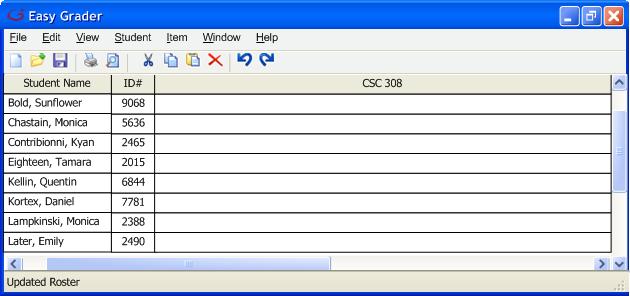
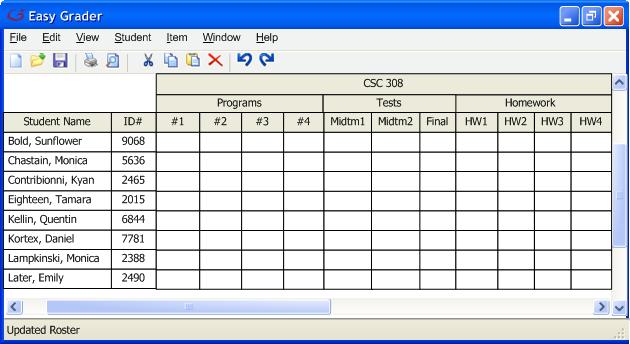
When the roster finishes downloading, the two leftmost columns fill up with students' information. The third column is the name of the class, under which the instructor can create Categories and Grade Items. The instructor is ready to start creating assignments. The Figure 16 shows the resulting roster.
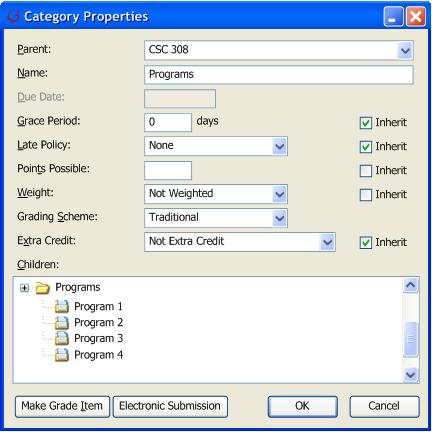
When the instructor selects 'Class->Add->Category,' a dialog window shown in Figure 17 appears. The figure has several optional fields, with 'Name' being mandatory to enter. The field 'Parent' has a drop down menu of parent category items, in this case, the class itself. The field 'Due Date' contains the due date of the assignment and is a Grade Item feature; once the the Category has any children Grade Items, this field is disabled for the Category. The following five fields are optional features a Category can have by clicking the checkbox next to 'Inherit. Further details about each field is explained in Section 2.3.3. The 'Grace Period' field is a Grade Item feature that allots a cetain amount of days a student can turn in work for full credit. 'Late Policy' has a drop down menu that allows instructors to decide whether or not to allow students to turn in Grade Items late but with a decayed value. The field 'Points Possible' lets instructors enter the raw points available for the Category or Grade Item. Another Grade Item field is 'Weight,' which has a drop down menu of items where the instructor can determine whether the grading is absolute (relative to 100% of the class) or parent-relative (relative to 100% of the parent item). The 'Grading Scheme' drop down menu lists four ways to grade the Category. The field 'Extra Credit' gives instructors the ability to add extra credit either by bumping up the points a student can recieve on a Grade Item, or by actually incrementing letter grades. The box underneath 'Children' contains a tree of the children Grade Items or Categories within the current working Category. Click 'OK' to continue. Figure 18 displays an existing Category content, with four children Grade Items and several properties that its children inherits. Because it has children, its 'Due Date' field has been disabled.
|
|
|
|
Figure 17 |
Figure 18 |
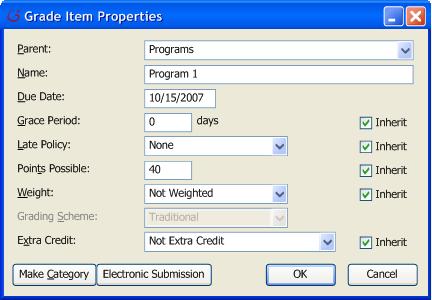
Continuing from Figure 18, the 'Make Grade Item' button makes the Category into a Grade Item, which pops up the new dialog window 'Grade Item Properties.' If there was any information on 'Category Properties,' clicking this button will transfer all information that was on 'Catalog Properties' to 'Grade Item Properties.' Many of the fields, as seen in Figure 19, are identical to 'Category Properties.' Several of the differences in a Grade Item is that it can use the 'Due Date' field, it automatically inherits the 'Grading Scheme' field of its parent Category, and it and does not have children. Figure 20 displays the dialog with all of its optional fields inherited.
|
|
|
|
Figure 19 |
Figure 20 |
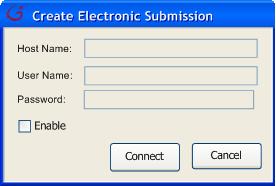
Clicking the button 'Electronic Submission' displays the dialog window in Figure 21. The purpose of this feature is to retrieve the timestamp of electronic submissions through the central server. The timestamp is used in conjunction with 'Grace Days' and/or 'Progressive Grading'.The initial process is identical to how an instructor updates the roster, with initially disabled fields asking for the 'Host Name,' 'User Name', and 'Password.' To officially enable electronic submissions, the instructor marks the checkbox 'Enable, which enables the instructor to type in the three fields, as shown in Figure 22. If the instructor chooses to end electronic submissions for a Grade Item, the instructor unchecks 'Enable.' Click 'Connect to continue.
|

|
|
Figure 21 |
Figure 22 |
After successfully connecting, Figure 23 displays the 'Item Explorer' dialog. Double clicking on the selected folder will take its current file contents and analyze them for timestamps.

Figure 24 shows the result of adding several categories and grade items.
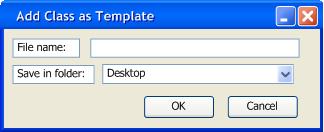
At this point, the instructor has the option to save the assembled assignments
for future use as a template. To save the sheet, the instructor selects
'Class->Save Category as
Template.' Figure 25 shows the dialog window that pops up.
The field 'Name' accepts strings
and titles the template. The field 'Save
in folder' gives the instructor the option to choose which folder to save
the template to. The instructor is ready to begin grading.