
| Requirements | Specification | Prototype | Design | Implementation | Testing | Administration | Documentation |
|
|||||||||
|
|
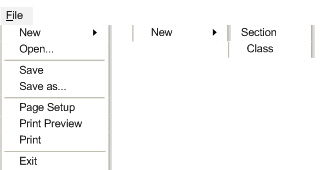
Figure 7 |
|
|
The File menu contains commands that should be familiar to most users
and are primarily concerned with manipulation of the file stored on the
computers hard drive or disk drive. This menu can be seen in Figure 7. The File->New command is used to create a new class. The user must select whether to create an entirely new class under File->New->Class or add a section to the currently opened class File->New->Section. Sections will be covered in more depth later. File->Open will open a previously existing class file. The user will select which file to open through an "Open File" dialog that will begin in the default location for Easy Grader saves, but can navigate elsewhere. File->Save will write the entire file to disk. File->Save As will do the same, but will allow the user to specify the name of the class file and the location where it will be saved. Easy Grader will then close the file the User was editing and open the file the User just saved. This also allows the user to save the current document as a template. File->Page Setup allows the user to change preferences about how the page will appear when printed. File->Print Preview will show the user a visual preview of how the page will look when printed. File->Print will allow the user to print the current class file. Finally, File->Exit will close Easy Grader. If the current class(s) has changes that have not been written to disk, Easy Grader prompts the user to save these changes. |
|
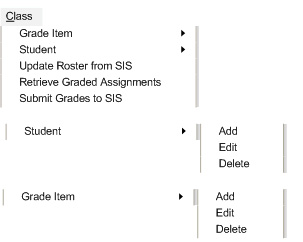
Figure 8 |
|
|
The Class menu allows the Teacher to both add elements to the class and
synchronize the class with Student Information Services (SIS). The menu
can be seen in detail in Figure 8. Class->Grade Item->Add This option adds a Grade Item to the grade sheet through a new window opened expressly for this purpose. This Grade item can either be at the highest level of the class (i.e. the uppermost row of the grade sheet) or can be listed under one of the catagories already on the grade sheet. Any Grade Item that has another Grade Item listed under it becomes a Catagory. Class->Grade Item->Edit If a Grade Item is selected, then this opens the same window used to create a Grade Item with the selected Grade Item's information filled in. Otherwise, the user is prompted to select a Grade Item from a list. This option will edit both Grade Items and Catagories. Class->Grade Item->Delete If a Grade Item is selected, it is removed from the grade sheet after prompting the user if they are sure. If no Grade Item or Catagory is selected, the user is prompted to select one from a list. If a Catagory is deleted, then all Grade Items under that catagory will also be deleted. Class->Student->Add This option adds a Student to the grade sheet through a seperate window. The only difference between students created in the manner and those downloaded from SIS is these students will be listed as "custom" students and excluded from grade submissions to SIS (unless explicitly told to do otherwise). If SIS ever adds the Student, downloading the roster from SIS will automatically move the Student out of the "custom" catagory. In addition, any students removed from the roster by SIS are not deleted, but moved to "custom." Class->Student->Edit If a Student is selected, this option opens the same window used to add a student with the selected Student's information filled in. The user can then change information or add notes about the Student. If a Student is not selected, the user picks the Student they wish to edit from a list of Students. Class->Student->Delete If a Student is selected, that Student will be removed from the class. Otherwise, the user will choose which student to remove from a list. Class->Update Roster from SIS connects to the SIS server and retrieves the most recent copy of this classes student roster. If this class has multiple sections, it will retrieve the information for all sections. Class->Retrive Graded Assignments This option retrives any grades that TAs have uploaded to the server and adds them to the gradesheet they are associated with. Class->Submit Grades to SIS uploads all the current final grades to SIS. Any students marked as "custom" will not have their grades uploaded. Class->Create Template behaves in the same was as |