When the user selects the `node' command in the `Elements'
menu, the tool displays a node-addition cursor under the current mouse position
on the dataflow canvas, as shown in Figure 3.
Figure 3: Adding a new node.
To create a node, the user positions the cursor at the desired placement
location, then presses and releases the left mouse button at that location. In
response, the tool draws the node, with the upper left corner of the smallest
enclosing rectangle at the pressed location, as shown in Figure 4.

Figure 4: New node placed on the canvas.
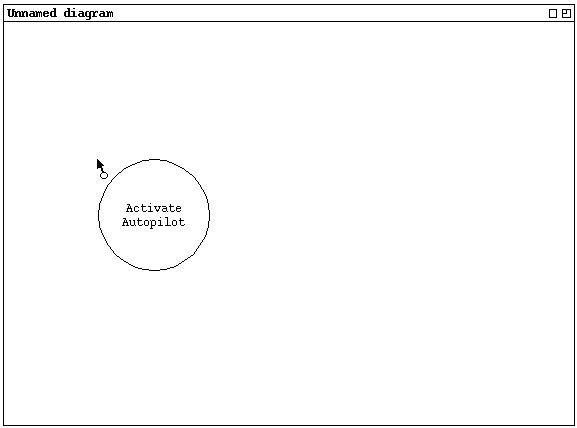
Figure 5: New node placed on the canvas.
As the user types, the text remains centered within the node. If the user presses the Enter key while typing, a new line of text begins, with the text remaining centered within the node. If as the user types, the horizontal or vertical size of the text becomes larger than the diameter of the node, the tool dynamically resizes the node so that the text does not extend beyond the node boundary. The minimum distance between any portion of the text and the node boundary is the value of the node-name margin, which by default is 1 em in the current node-name font. The the user can change the default node- name margin with an option setting, as described in ???.
If the user deletes text to make the size of the name smaller, the system dynamically contracts the size of the node, such that the distance between the text and node boundary is no larger than the current node-name margin value. The tool stops node contraction whenever the text reaches a size where it fits within a node of the node diameter setting, which by default is 10 em of the current font. The the user can change the default node diameter with an option setting, as described in ???.
The user signals the completion of node-name typing by clicking the mouse some place other than within the text of the name. If the user performs such a click without having typed any text for the node name, the tool types a default name of the form "NodeN", where N is a positive integer ... (see the phrasing in the cal tool rqmts).
Node names may contain only the following characters:
Formally, the name of a node does not include any whitespace characters. Therefore, the formal name of a node consists of the concatenation of all of its characters with all whitespace removed. So, for example, the following are the same name formally:
"ActivateAutopilot"
"Activate Autopilot"
"Activate
Auto
pilot"
Uppercase and lowercase letters are considered distinct within node names. So,
for example, "ActivateAutopilot" and "ActivateAutoPilot" are
two different names, due to the uppercase versus lowercase "p" character.
2.2.1. Sizing New Nodes by Click and Drag
When the user specifies the placement of a new node with a single mouse click,
the tool places a node of the current default diameter. If the user places a
node with a click and drag operation, the position and size of the node are
determined by the location of the initial click plus the length and direction
of the drag.
2.2.2. Using Already-Defined Nodes
When entering the text for a node name, the user may type the name of a new node that has not yet been defined, or the name of an already-defined node. Sketch of the remainder:
The idea I have right now is that the default appearance of port icons will be as follows:
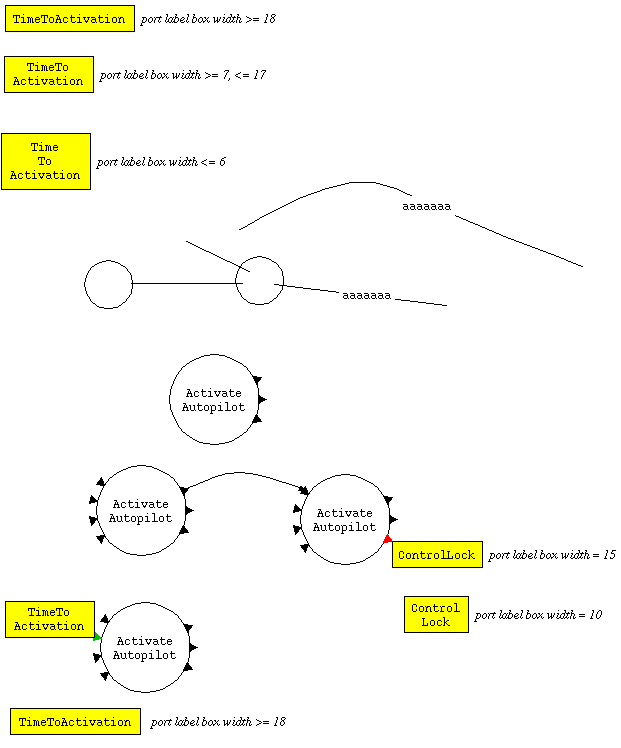
Figure 6: DRAFT -- Example to clarify port ordering (and other aspects of node display).
Other port-related functionality:
Nodes may not overlap. When the node cursor moves over any part of an existing
node, it turns grey.
2.2.5. Resizing Nodes
2.2.6. Reshaping Nodes
2.2.7. Editing the Node Label
Clicking anywhere within label causes cursor to become vertical text-edit bar.
This can happen at any time, including during initial creation. Can change the
name to something other than an existing node. Can change the name to that of
an existing node, as long as it has the same signature of the node with the
changing name. In the latter case, the completion list contains only the names
of other same-signature nodes. (I think this is pretty cool, actually.)
2.2.8. Repositioning the Label